Excel offers a wide range of formatting options for dates, times, and combinations of both. To format a cell value, follow these steps:
- Select the cells that contain the date and/or time values.
- Go to
Hometab and click the dropdown arrow in theNumbergroup. - Choose one of the predefined formats, such as Short Date, Long Date, or Time.
Or, choose the More Number Formats option from the list if your required format is not available in the list. It will open the “Format Cells” dialog box where you can customize the cell formatting.
- Date and Time Custom Formats
- Formatting Codes for Date and Time
- Convert Imported Dates to Excel Formatted Dates
- Fix: Dates and Times Showing as Text
Date and Time Custom Formats
To format date and time values using custom formats, follow these steps:
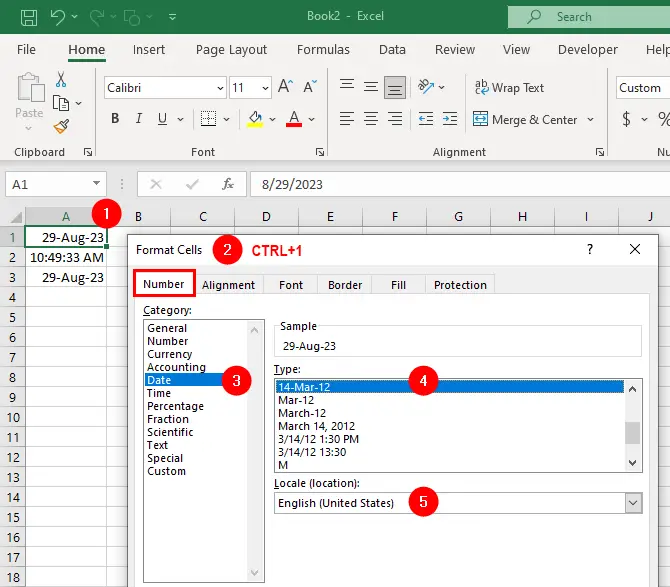
- Select the cells that contain the date and/or time values.
- Open the “Format Cells” dialog box (press
Ctrl+1) and choose theNumbertab. - In the left sidebar, select
DateorTimeunder the Category section. - Choose the desired format from the
Type:section on the right. - You can also use the
Locale (location):dropdown to choose a specific region’s format if needed. - Click
OKto apply the formatting to the selected cells.
If you have cells containing both date and time values, you can combine the formatting options by using the Custom category to create a custom format like dd/mm/yyyy hh:mm:ss:
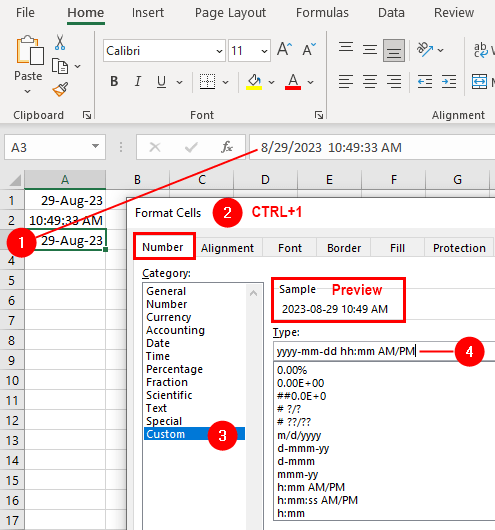
- Select
Customfrom the Category list. - In the
Typeinput box, enter a custom format like:yyyy-mm-dd hh:mm AM/PM. - Click OK to apply the custom format.
Also, try the following formatting codes:
dd/mm/yyyy
Displays the date as 29/08/2023.dddd, mmmm dd, yyyy
Displays the date as Tuesday, August 29, 2023.hh:mm:ss AM/PM
Displays the time as 10:49:33 AM.yyyy-mm-dd hh:mm AM/PM
Displays the date and time as 2023-08-29 10:49 AM.
Format Codes for Date and Time
When creating custom date and time formats you can use many format codes to represent different parts of the date and time. Here are some commonly used format codes for creating custom date and time formats:
Date Format Codes:
d: Day of the month as a number without leading zeros (1-31).dd: Day of the month as a number with leading zeros (01-31).ddd: Abbreviated weekday name (e.g., Mon, Tue, etc.).dddd: Full weekday name (e.g., Monday, Tuesday, etc.).m: Month as a number without leading zeros (1-12).mm: Month as a number with leading zeros (01-12).mmm: Abbreviated month name (e.g., Jan, Feb, etc.).mmmm: Full month name (e.g., January, February, etc.).yy: Last two digits of the year (e.g., 21 for 2023).yyyy: Full year (e.g., 2023).
Time Format Codes:
h: Hour without leading zeros (0-23).hh: Hour with leading zeros (00-23).m: Minute without leading zeros (0-59).mm: Minute with leading zeros (00-59).s: Second without leading zeros (0-59).ss: Second with leading zeros (00-59).AM/PM,am/pm,A/P, ora/p: Displays the AM/PM or A/P indicator in uppercase (or lowercase, respectively) e.g. 11:59 PM or 11:59 P.[h]: Elapsed time in hours.[mm]: Elapsed time in minutes.[ss]: Elapsed time in Seconds.
E.g.[h]:mmshows elapsed time as65:18. For more information visit the Calculating Date Time Values page.
You can use these format codes to create the date and time format you need. When creating a custom format, use these codes along with any desired separators and text literals (such as spaces, commas, or other punctuation) to achieve the exact appearance you want for your date and time values. For example: yyyy-mm-dd (2023-08-29), hh:mm AM/PM (10:49 AM), or yyyy/mm/dd hh:mm:ss (2023/08/29 10:49:33).
Convert Imported Dates to Excel Formatted Dates
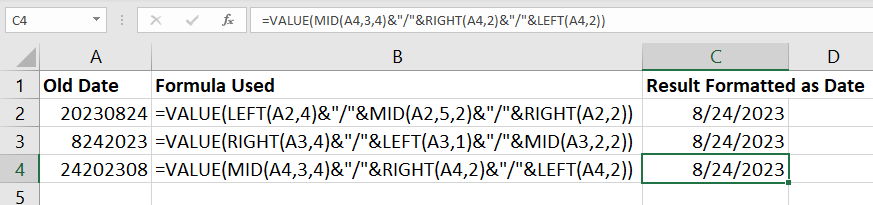
"A2 cell value is: 20230824 (2023 08 24)"
=VALUE(LEFT(A2,4) &"/"& MID(A2,5,2) &"/"& RIGHT(A2,2))

"A3 cell value is: 8242023 (8 24 2023)"
=VALUE(RIGHT(A3,4) &"/"& LEFT(A3,1) &"/"& MID(A3,2,2))

"A4 cell value is: 24202308 (24 2023 08)"
=VALUE(MID(A4,3,4) &"/"& RIGHT(A4,2) &"/"& LEFT(A4,2))
Dates imported from other programs frequently cause problems in Excel. Many people manually retype them, but there are easier ways to solve the problem.
Let’s look at some of the date formats you might encounter and how to convert them to standard Excel dates.
As the figure shows, the formulas in column B convert the data in column A to three results in column C, all of which follow the U.S. date format of mm/dd/yy.
The following figure shows the same approach at work, except that the cells in column C were formatted with the European date format of dd/mm/yy:
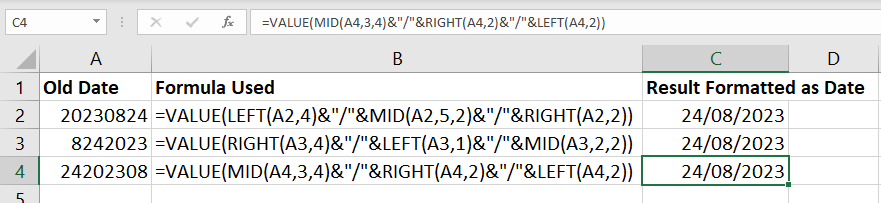
Hopefully, these nifty formulas will take some of the stress out of working with imported dates.
Fix: Dates and Times Showing as Text
Sometimes spreadsheets with imported data (or data that was entered incorrectly) end up with dates and times being seen as text and not real numbers.
You can spot this easily in Excel by following these steps:

- Widen the columns a bit and select a column (containing date or time)
- Open the Format Cells dialog box (press
CTRL+1) and selectAlignmenttab. - Change the
Horizontalalignment toGeneral(the default format for cells) see above figure. - Click OK and examine your dates and times closely.
If any are not right-aligned, Excel doesn’t think they are dates. To fix this:
- Select the column (or data).
- Press
CTRL+1and select theNumbertab from the Format Cells dialog box. - Select any Date and/or Time format and click
OK. - Copy any empty cell and then select the column again that we formatted as date and/or time.
- Press
CTRL+ALT+Vto open the Paste Special dialog box. - Select
Addand click OK.
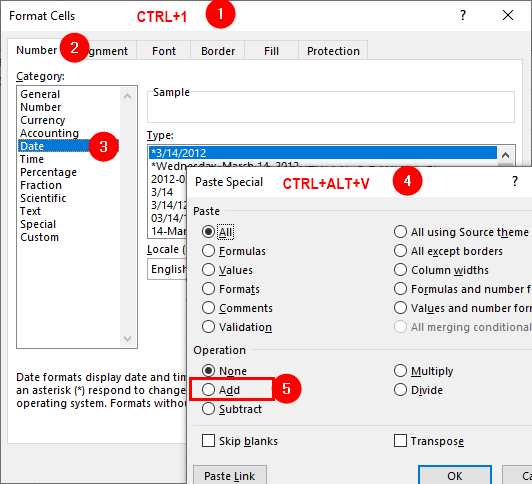
This will force Excel to convert any text dates and times to real dates and times. You might need to change the format again. Another simple method is to reference the cell(s) like this: =A1+0 or A1*1.
Date and Time
- How Date and Time Feature Works in Excel
- Calculate Date and Time
- Display Negative Time Values
- Count All Occurrence of a Specific Day in a Month or Two Dates
- Calculate Working Days and Holidays
- Determine Deadlines, Schedules, or Due Dates
- Show Total Time as Days, Hours, and Minutes
- Format Date and Time Values