You can also write an app in HTML, CSS, and JavaScript, using tools like Crodova and React Native and can be distributed through the Play Store.
Android Devices
Android devices come in all shapes, sizes, and colors. Manufacturers continue to create new generations of Android devices like: HD display phones, watches, ebook readers, televisions, netbooks and many other devices. However, there are four dominant device types and each has its own specialties in terms of configuration, size, shape, utilities, and features:
Phone
This type of Android hardware platform is the most famous and widely used device across the world. Typical Android mobile specific features are:
- Small screen
- High dpi display
- Wide range of hardware configurations
- Full touchscreen
- Maximum sensor support
- Multipurpose use
Tablet
This type of Android hardware platform is the second most famous and widely used devices across the world, with slightly different utilities. Typical Android tablet specific features are:
- Comparatively bigger screen
- Low dpi display
- Full touchscreen
- Specific use device
Television
This type of Android hardware platform is spreading rapidly as smart TVs with more features and abilities than a simple television gain popularity. Typical Android television specific features are:
- Biggest display unit
- No touch interface
- D-pad or controller-based input system
- Fixed landscape orientation
- Limited hardware support
Watches
This is the most used wearable platform on Android. The main feature of this device is to provide health information. However, gaming is also spreading on this device. Typical Android watch specific features are:
- Very small display
- Limited hardware support
- Less memory and processing power
- Touchscreen interface
- Very portable
- Separate development environment needed
IoT (Internet of Things)
The Internet of things (IoT) is the network of everything from refrigerators, coffee makers, washing machines, headphones, lamps and almost anything else you can think of. These things are provided with unique identifiers and the ability to transfer data over a network without requiring "human to human" or "human to computer" interaction.
Android Things templates are available in Android Studio 3.0 to help you start developing for IoT devices.
Android API Levels and SDK Versions
To keep up with the latest technology, new versions of the Android platform are released frequently. As developers, this means we can incorporate the newest features and developments into our applications. The obvious drawback to this is the fact that only the very newest devices will be able to run this platform and these devices represent only a tiny proportion of the entire market.
At the time of this writing, the API levels of significance to most Android developers are:
| Code Name | Year | SDK Version | API Level |
|---|---|---|---|
| Oreo | 2017 | 8.0.0 | 26 |
| Nougat | 2016 | 7.1 | 25 |
| Nougat | 2016 | 7.0 | 24 |
| Marshmallow | 2015 | 6.0 | 23 |
| Lollypop | 2014 | 5.1 | 22 |
| Lollypop | 2014 | 5.0 | 21 |
| KitKat | 2013 | 4.4.x | 19 |
| Jelly Bean | 2012 | 4.3.x | 18 |
| Jelly Bean | 2012 | 4.2.x | 17 |
| Jelly Bean | 2012 | 4.1.x | 16 |
| ... | ... | ... | ... |
Note that API Level 20 was used for the version of Android 4.4 running on the first-generation Android Wear devices. Unless you are specifically developing apps for Wear, you will not be worrying much about API Level 20.
Java Knowledge
We assumes that you know Java, if you do not, you will need to learn Java before you go further. The following Java knowledge is recommended:
- Java fundamentals and flow control (if else, while, switch, for, break, continue statements)
- Classes, objects and interfaces
- Methods variables and data members
- Access modifiers: Public, private, and protected
- Static and instance scope
- Exceptions
- Threads and Runnable
- Collections
- Generics
- File I/O
- Reflection
Some Java API classes are not available for Android development so you can skip any section in any resource that talk about following topics:
- Java Server Faces (JSF)
- Java Server Pages (JSP)
- Servlets
- Applets
- Swing
- JavaFX
- JavaME
- JavaEE
Android apps do not have a main method as in conventional Java. In Java you started off with something like this:
class HelloWorld {
 public static void main(String[] args) {
  System.out.println("Hello World!");
 }
}
In Java the entry point into your application was a public static void method named main() that took a String array of arguments.
In Android apps you will not write a public static void main() method. Instead, you will create subclasses of some Android-supplied base classes that define various application components. In addition, you will create some metadata that tells Android about those subclasses.
Android App Components
An Android application consists of one or more of the following components:
- Activities (the most basic component)
- Services
- Content Providers
- Broadcast Receivers
- Sync Adapters
Activities
The building block of the user interface is the activity. An activity is responsible for managing user interaction with screen of information as well as the code that displays information into that screen and can respond to user events on that screen.
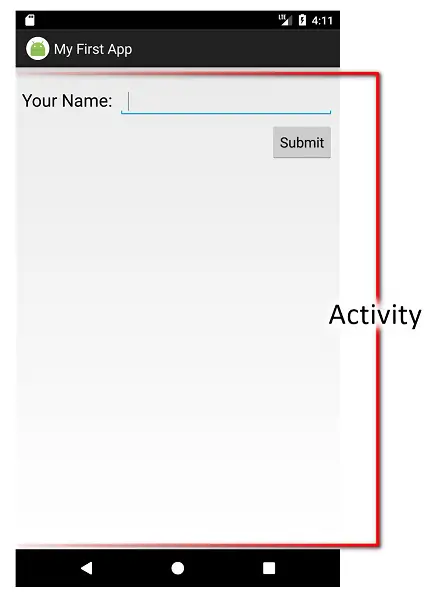
Figure: Screen capture of an example app.
The Activity class android.app.Activity is a fundamental building block of any
Android application. Every application has at least one Activity class and most applications are made up of several activities.
Activities are short lived and can be shut down at any time (i.e. when the user presses the BACK button).
Services
A Service has no user interface, and can run for a longer period of time than an Activity.
Services are designed to keep running, independent of any activity, for the specified period of time. Tasks that do not require user interaction can be encapsulated in a service. A service is most useful when the operations are lengthy or need to be done regularly. You might use a service to play back music even if the controlling activity is no longer operating.
The Service class android.app.Service is used to handle background operations related to an Android application.
Content Providers
Content providers are used when an application needs to share its data with other applications.
The term content provider is unique to Android development, its how Android stores data and provides content to an application. It is primarily found in the form of SQLite databases. You can use the content provider SQLite databases that are provided as an integrated part of the Android OS, or you can create your own content provider databases for your application if you want.
Broadcast Receivers
Android operating system will schedule broadcasts for system events and your app can potentially receive these messages.
The system and applications, will send out broadcasts from time to time, for everything from the: system boots up, battery getting low, battering finished charging, screen turns off, connectivity changes from WiFi to mobile data etc. A broadcast receiver can arrange to listen for these broadcasts and respond accordingly.
Sync adapters
Sync adapters synchronize data with cloud services, for example Contacts and Calendar apps which can easily be synchronized to your Google account.
Android App User Interface (UI)
Android apps are made up of Activities. Typically, one Activity is displayed at a time and this Activity occupies the entire screen. Each Activity is made up of views, which are the most basic component of a user interface. Views always occupy a rectangular area, although a view can display content of any shape:
Widgets
The term widgets can refer to several different concepts in Android. When most people talk about widgets, they are referring to app widgets, which are typically seen on the home screen. When developing for Android, the term widgets generally refers to specialized Views placed in the layout files, such as a label (TextView), field (EditText), and button (Button) and so on.
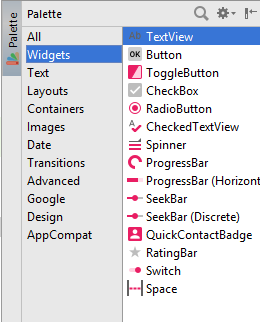
Figure: List of available widgets in Android Studio: Activity XML > Design Mode > Pallette > Widgets.
An activity’s UI is made up of one or more of these widgets. For example, here we see TextView, EditText, and Button widgets:

Figure: Screen capture of an example app.
Container
Widgets exist inside of layout containers, if you have more than one widget, you will need to tell Android how those widgets are organized on the screen. To do that, you will use various container classes referred to as layout managers. These will let you put things in rows, columns, or more complex arrangements as needed.
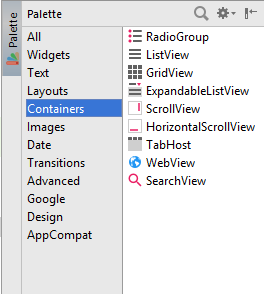
Figure: List of available containers in Android Studio: Activity XML > Design Mode > Pallette > Containers.
Resources
Android applications rely on many different types of resources, such as text strings, graphics, and color schemes for user interface design. These resources are stored in the /res directory of your Android project.
Different resource types are stored in different directories. Each resource type corresponds to a specific resource subdirectory name. For example, all graphics are stored under the /res/drawable directory structure.
Fragments
Fragments are the foundation of modern Android app development, allowing us to display multiple application screens within a single activity. Fragments are an optional layer you can put between your activities and your widgets, designed to help you reconfigure your activities to support screens both large (e.g., tablets) and small (e.g., phones).
Fragments help you create an app that can adapt across a range of different device types, screen sizes, and screen orientations. Combining screens into multi-pane layouts also helps to minimize the number of interactions users have to perform in order to complete each task.
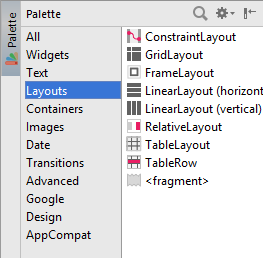
List of available layouts (including fragments) in Android Studio: Activity XML > Design Mode > Pallette > Layouts.
Build Tools and APK File
Android build tools combine the resources (images, layouts etc) and your code to create an application. The application comes in the form of an APK file. It is that APK file that you will upload to the Play Store.
Android App Naming
Each Android application package name is the name of the Java package that serves as the root package of the project. The package name is used as a unique application identifier by the Android OS. A package name must fulfill three requirements:
- Package name must be a valid Java package name,
- Package name must be unique as no two applications can exist on a device with the same application ID and
- No two applications can be uploaded to the Play Store having the same application ID
The Android Emulator
Android developer tools ship an emulator. Emulator is the most useful tool. Developers use the emulator to quickly develop Android applications for a variety of hardware. The emulator runs on your computer and behaves much as a mobile device would. You can load Android applications into the emulator, test, and debug them.
Android Studio
Android apps had been developed using Eclipse IDE with Android Development Tools (ADT) plugin in the past. However, Google introduced Android Studio as the official IDE for Android app development in 2014 and this IDE became the standard.
Using Android Studio, you can create any app you like. Apps for phones, tablets, watches and other wearables, Google Glass, TV apps, and even auto apps.
We’ll use Android Studio, as it is the official IDE for Android app development. You can download Android Studio from this link: https://developer.android.com/studio/
In the next page, we’ll be diving into topics related to setting up the environment for Android application development using Android Studio IDE.