Before exploring the UI and layout, let's examine the MainActivity.java code piece by piece:
1.  package com.brainbell.myfirstapp;

2.  import android.app.Activity;
3.  import android.os.Bundle;

4.  public class MainActivity extends Activity {

     @Override
5.   protected void onCreate(Bundle savedInstanceState) {
6.    super.onCreate(savedInstanceState);
7.    setContentView(R.layout.activity_main);
     }
    }
1. package com.brainbell.myfirstapp;
By default, the package declaration is the same as the one we used when creating the project.
2. import android.app.Activity;

3. import android.os.Bundle;
Like any other Java project, you need to import all classes you reference. Most of the Android-specific classes are in the android package.
Note: There are limited number of Java SE classes available to Android programs!. You can not use every Java SE class to proram your Android App. To see the the available packages visit the Android class reference at https://developer.android.com/reference/packages.html.
4. public class MainActivity extends Activity {
Activities are public classes, inheriting from the android.app.Activity base class (or from some other class that itself inherits from Activity).
5. protected void onCreate(Bundle savedInstanceState) {
The onCreate() method is invoked when the activity is started.
6. super.onCreate (savedInstanceState);
The first thing you normally should do in onCreate() is chain upward to the superclass, so the stock Android activity initialization can be done.
7. setContentView (R.layout.activity_main);
The other statement in onCreate() is a call to setContentView(). This is where we tell Android to load the user interface (activity_main.xml) for our activity.
What does R.layout.main mean? Where did this R come from?
Ris the dynamically generated class, it contains resource info for all the resources in theres/directory. For each type of resource, there is anRsubclass (for example,R.layoutfor all layout resources andR.drawablefor all drawable resources). For more information visit https://developer.android.com/guide/topics/resources/accessing-resources.html.
Android OS covers a vast array of tablet and smartphone products with different screen sizes and resolutions. As a result, user interfaces must be carefully designed to ensure correct presentation on as wide a range of display sizes as possible. A key part of this is ensuring that the user interface layouts resize correctly when run on different devices. Also note that the majority of Android smartphones and tablets can be held by the user in both portrait and landscape orientations. A well designed user interface should be able to adapt to such changes and make sensible layout adjustments to utilize the available screen space in each orientation.
The Android SDK ships with a host of components that you can use to build UIs for your application. It provides text fields, buttons, lists, grids, and so on. In addition, Android provides a collection of components that are appropriate for mobile devices.
You can choose from several approaches to build UIs in Android. You can construct UIs entirely in Java code. You can also define UIs in XML. You can even combine the two-define the UI in XML and then refer to it, and modify it, in code. To demonstrate this we'll build a simple UI using each of these three approaches in next sections.
In most cases, UIs are defined with XML files to keep your code cleaner and easier to maintain. While it is possible to create UIs purely through Java code.
At the heart of the common components are two classes: android.view.View and android.view.ViewGroup:
Views
A View (an instance of android.view.View) is the base class of user interface elements. Everything that is displayed on the screen utilizes a View. For example, a button is a view. A View always occupy a rectangular area and responsible for event handling.
It is possible to create a new view either by subclassing and extending an existing class, or creating an entirely new component by building directly on top of the android.view.View class.
What are widgets, components or controls
Each of these represents a pre-built UI element. Examples include a Button, a CheckBox, a ProgressBar, a TextView and so on. The terms view, widget, component, and control are used interchangeably in Android programming.
View Groups
A container of other views is called a ViewGroup, it is the instance of android.view.ViewGroup class and may contains other views or view groups. The views contained in a view group are it's children. A Layout is an example of view groups.
What are Layouts
Layouts are the invisible containers for views and widgets; they are group of views. Widgets do not naturally line themselves up in some specific pattern, we have to define that pattern ourselves. Each layout has its own rule for how it lays out its children on the screen.
In Android, the majority of User Interfaces (UIs) are created using XML language. XML tags are used to define both the layout container, as well as the UI components which exist inside the layout container. The Android OS renders the UI using the XML file and Java code to draw the UI elements to Android devices.
GUI Editor in Android Studio
As you can see, Java files go in the java/ folder hierarchy, and the rest of the folders contain XML files and media assets. There are a large number of different types of resource folders, which start with specific names, such as drawable (image, animation, or shape assets), layout (UI Design XML definition assets), mipmap (app icons), and values (value constants defining colors, dimensions, styles, and text strings).
Android Studio provides an easy way of designing user interfaces (even if you don't know the XML language). The files located under the res/layout folder contain all the layout information. When we open an .xml file in Android Studio, it reads the .xml file and shows the corresponding activity layout with its components (e.g. images, buttons etc.). To open "activity_main.xml" in Android Studio, double-click on it in the project explorer and the activity layout will be displayed in the middle pane as shown below:
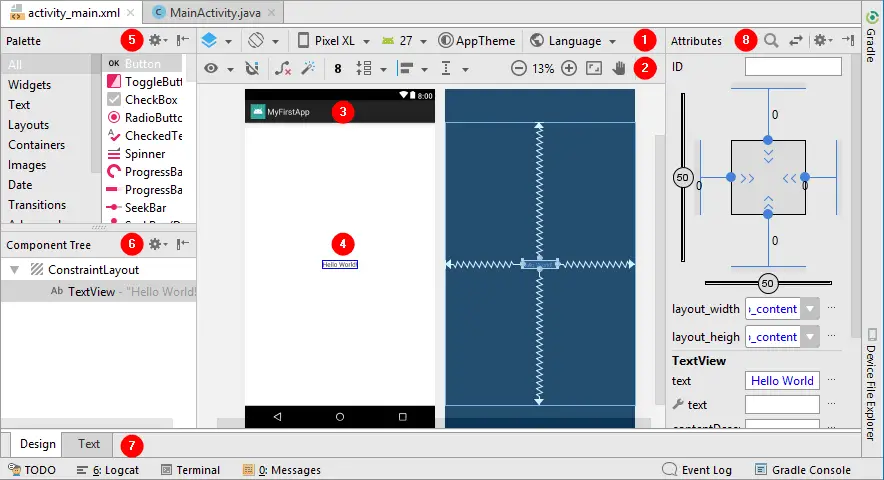
1. and 2. Toolbars: The "Design Editor" toolbar provides quick access to a wide range of options including, amongst other options, the ability to zoom in and out of the device screen layout, change the device model currently displayed, rotate the layout between portrait and landscape and switch to a different Android SDK API level. The toolbar also has a set of context sensitive buttons which will appear when relevant view types are selected in the device screen layout.
A. Device selection: You can select predefined screen devices for previewing the layout during development from the designer toolbar. You can select devices by clicking the button with a device name to display the list of available previews. You can also select tablet and TV-sized devices, and wear devices.
B. SDK Selection: At each release of Android, there can be minor or major changes to the API, which is directly related to UI layout. To avoid any compatibility issue, install the Android SDKs you want to test the UI on, and preview your UI with the major SDK versions.

3. App name: The app name appears at the top of the activity.
4. TextView: The default empty activity contains a "Hello World!" TextView field which appears in the middle of screen.
5. Palette: For a professional Android UI developer, using XML files is the best way to develop the user interfaces. However, if we want to drag and drop, Android Studio provides the Palette tool from which we can add all possible user interface objects and layout templates to the activity. The Palette contains several groups like Widgets, Text Fields and Layouts. We can easily drag and drop these components to the user interface.
6. Component Tree: In Android, user interfaces are constructed using a hierarchical structure. The component tree provides a visual overview of the hierarchy of the user interface design. Selecting an element from the component tree will cause the corresponding view in the layout to be selected. Similarly, selecting a view from the device screen layout will select that view in the component tree hierarchy.
7. Mode Switching: On the left side of Android Studio editor, take a look at the very bottom and you should see two small tabs. One is labeled Design and the other is labeled Text. Click the one that says Text and the UI preview will be replaced with the XML editor view of the Layout.
If a layout has been opened in Text mode, you will see the content of the XML file along with the preview. In case the preview is not opened by default, you can activate it with the Preview tool button on the right-side edge of Android Studio or you can navigate to the View > Tool Window > Preview from the main menu.
It is important to keep in mind when using the Android Studio Designer tool that all it is really doing is providing a user friendly approach to creating XML layout resource files. At any time during the design process, the underlying XML can be viewed and directly edited simply by clicking on the Text tab located at the bottom of the Designer tool panel. To return to design mode, simply click on the Design tab.
In "Text mode" the editor displays the XML that makes up the current user interface layout design. As changes are made to the XML in the editor, these changes are visually reflected in the preview window. This provides instant visual feedback on the XML changes as they are made in the editor, thereby avoiding the need to switch back and forth between text and design mode to see changes.
8. Attributes: There is also a Properties window where you can edit the properties of a layout, view, and all other user interface components. The properties panel provides access to the properties of the currently selected view allowing changes to be made. In Text mode, the editing is done within the XML tags.