So, why not make desktop applications out of the very same technologies used in web development?
The Electron.js
The Electron framework lets you write cross-platform desktop applications using JavaScript, HTML and CSS. It is based on two incredibly popular technologies: Node.js and Chromium and is used by the Atom editor and many other apps. Any web application or Node application can run on Electron.
Introduction to Node.js
Node.js is one of the most popular JavaScript-driven technologies now-a-days. It is easy to set up and doesn't require much in terms of memory and disk space. No complex integrated development environments or build systems are required. Its package manager (npm) is full of useful modules and developers around the world have started using Node.js in their production environments.
What Is Chromium?
Chromium is the open source version of Google's Chrome web browser. What is included with Electron is technically the Chromium Content Module (CCM), the core code that makes a web browser. CCM It includes the Blink rendering engine and its own V8 JavaScript engine. The CCM will handle retrieving and rendering HTML, loading and parsing CSS, and executing JavaScript as well.
Installing Node.js
You can install node.js by visiting https://nodejs.org/download/ and downloading the appropriate installer for your operating system. Node.js is a command-line tool. After installing it, the node command will be available on our terminal. To see if Node is installed properly, open the command prompt or a similar command line tool, and type node -v . This should print a version number, so you'll see something like this v8.9.4 . To see if NPM is installed, type npm -v to print its version number.
D:\>node -v
v8.9.4

D:\>npm -v
5.6.0

D:\>
Once Node.js has been installed, the next thing to do is to get the Electron.js framework installed. In order to do this, create a folder anywhere on your PC for this project, browse to this folder, and then open the Command Prompt or shell terminal and type this command:
npm init
Just follow the steps requested. This will create the package.json file required for our project
Or you can force npm to not ask any question by invoking it with -y, it will use defaults and not prompt you for any options.
npm init -y
It's okay to choose the defaults. You can edit the package.json later in a text editor.
For more information on npm init command, visit https://docs.npmjs.com/cli/init.
For more information on package.json, visit https://docs.npmjs.com/files/package.json.
Installing Electron.js
Basically Electron is an npm module, when installing a module like Electron, we have two options:
- Install locally - on a per project basis
npm install –-save-dev electron
- Install globally - any project can use it
npm install –g electron
We suggest installing Electron globally. Later, if you need to install Electron in a project, you should install it locally.
For more information, visit: https://www.npmjs.com/package/electron.
Application structure
Structuring an Electron application is very simple. In this example, we need to create only three files to build the application. Create project structure in duplicate-file-finder directory as follows:
duplicate-file-finder
package.json
main.js
index.html
node_modules Electron.js and its dependencies
Step by step
Install Node.js
Create a new folder
duplicate-file-finder.Open command prompt or terminal and change directory to
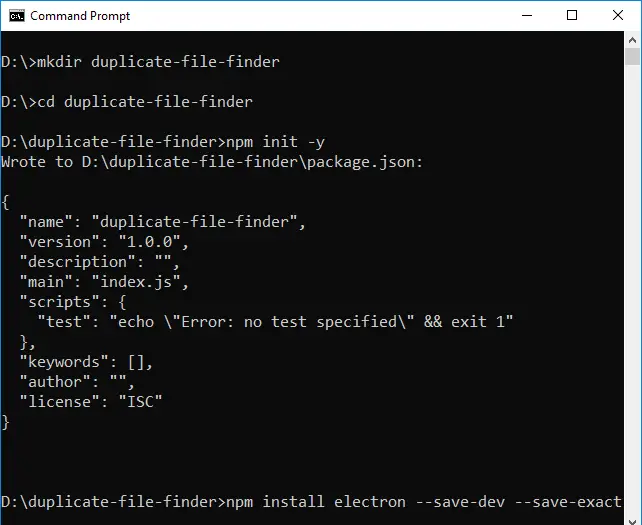
duplicate-file-finder.D:\>mkdir duplicate-file-finder D:\>cd duplicate-file-finder
Generate
package.jsonfile by invokingnpm init -ycommand.D:\duplicate-file-finder>npm init -y
Install Electron.js by invoking the
npm install electron --save-devcommand inside the project folder.D:\duplicate-file-finder>npm install electron --save-dev
Open
package.jsonin a text editor and Update themainand add astartscript to scripts, as highlighted in below sample file (line 4 and line 7).Sample package.json file for our project:
   {
1.    "name": "duplicate-file-finder",
2.    "version": "1.0.0",
3.    "description": "Duplicate File Finder and Remover",
4.    "main": "main.js",
5.    "scripts": {
6. 	 "test": "echo \"Error: no test specified\" && exit 1",
7. 	 "start": "electron ."
      },
8.    "keywords": [],
9.    "author": "BrainBell",
10.   "license": "ISC",
11.   "devDependencies": {
12.     "electron": "1.8.2"
     }
   }
The filename specified by the
mainfield (line 4) in package.json file is the entry point of for the application. Themainfield is optional, if this field not present in the package.json file then Electron.js will attempt to load index.js file.The
scriptsfield (line 5) tells Node Package Manager (npm) what actions to take for specific commands. Here, entering"start": "electron ."results in the command electron being run. This is a convenient way to organize commands