Modifying the OutputCache Directive
It's often very useful to be able to govern output caching. For example, some pages present the exact same content to all the users who access the page. In that case, caching a single version of the content is just fine. However, there are other circumstances in which sending the same content to everyone is inappropriate. The easiest way to control the behavior of output caching is to modify the OutputCache directive.
One obvious case in which controlling the cache is important is while caching different versions of content for different browsers making requests. Different browsers often have different capabilities. If you send content requiring a feature not supported by all browsers, some browsers making requests will get a spurious response. The VaryByCustom parameter within the OutputCache directive allows you to cache different content based on different browsers.
Controlling the output caching is also important when your page renders content based upon the parameters that are sent within the query string. For example, imagine you have a page through which a user has identified himself or herself by typing a name in a text box. The browser will insert that name inside a parameter inside the query list. You may instruct the output cache to cache different versions based on parameters in the query string. For example, users identifying themselves as "John Doe" can get a different version of cached content than users identifying themselves as "Jane Smith." The VaryByParam attribute controls this behavior.
Table 15-1 shows a summary of these parameters.
|
Attribute |
Option |
Description |
|
DiskCacheable |
true false |
Specifies that the output may be written to a disk-based cache (or not) |
|
NoStore |
true false |
Specifies that the "no store" cache control header is sent (or not) |
|
CacheProfile |
A String |
Name of a profile (found in Web.Config) to control output cache settings |
|
VaryByParam |
none * param name |
A semicolon delimited list of strings specifies query string values in a GET request or variables in a POST request |
|
VaryByHeader |
* header names |
A semicolon delimited list of strings specifying headers that might be submitted by a client |
|
VaryByCustom |
browser custom string |
Tells ASP.NET to vary the output cache by browser name and version, or by a custom string; must be handled by an override of GetVaryByCustomString |
|
Location |
Any Client Downstream Server None |
Manages which header and metatags are sent to clients to support caching; here are their meanings: Any== page may be cached anywhere Client== cached content remains at browser Downstream== cached content stored both downstream and on the client Server== content cached on the server only None== disables caching |
|
Duration |
number |
Number of seconds the page or control is cached |
The following exercise illustrates creating separate versions of cached content based upon how the user identifies himself or herself.
Varying Cached Content by Query String Parameters
-
Add a TextBox and a Button to the default.aspx page. Give the TextBox an ID of TextBoxName. This will hold the client's name and will server as the parameter controlling the number of cached versions of the page.
-
Double-click on the button to add a handler for it. In the handler, respond to the user's request by displaying a greeting using the contents of the text box. Also, modify the processing time of the page loading by reducing the amount of time the current thread sleeps (or by removing that line completely):
using System; using System.Data; using System.Configuration; using System.Web; using System.Web.Security; using System.Web.UI; using System.Web.UI.WebControls; using System.Web.UI.WebControls.WebParts; using System.Web.UI.HtmlControls; using System.Threading; public partial class _Default : System.Web.UI.Page { protected void Page_Load(object sender, EventArgs e) { Thread.Sleep(0); Response.Write("This page was generated and cached at: " + DateTime.Now.ToString()); } protected void ButtonSubmitName_Click(object sender, EventArgs e) { Response.Write("<br><br>"); Response.Write("<h2> Hello there, " + this.TextBoxName.Text + "</h2>"); } } -
Increase the time that the content will be cached (this example uses a minute). That will give you time to change the contents of the TextBox to view the effects of caching. Also, include TextBoxName as the parameter by which to vary the content within the OutputCache directive.
<%@ Page Language="C#" AutoEventWireup="true"
CodeFile="Default.aspx.cs" Inherits="_Default"
trace="false"%>

<%@ OutputCache Duration="60" VaryByParam="TextBoxName" %>
-
Surf to the page and type in a name. Click the button to submit the form and note the time stamp of the page. Type a second name into the TextBox and click the button to submit the form. Note the time stamp. Then type the same name you typed the first time. Click the button to submit the form. If you do all this within the 60-second window, you should see the cached versions of the page, which you can discern using the time stamp displayed as part of each page. The following three graphics illustrate the caching varying by the value of the TextBoxName parameter. The first graphic shows the original request:

The second graphic shows a request with a new value for the TextBoxName parameter:
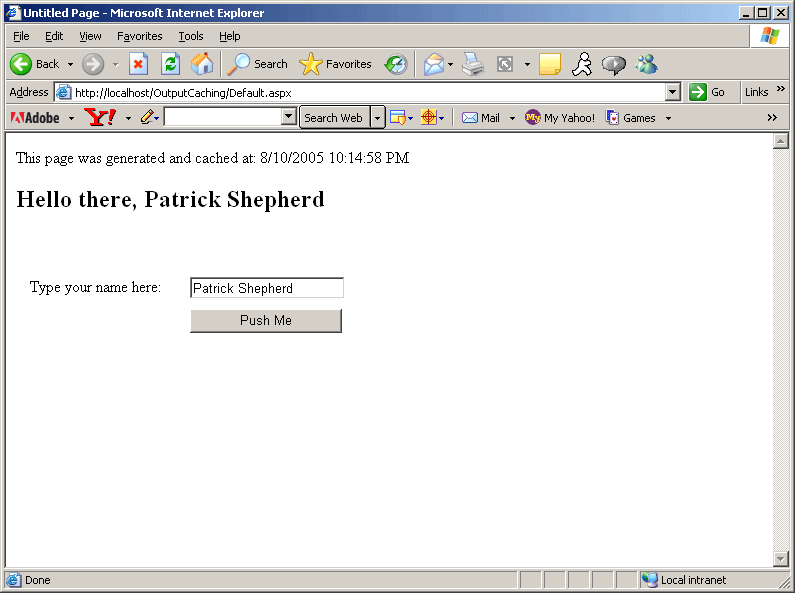
The third graphic shows making a request to the page using the same name as the original request. Note the cached page shows.

There are other ways to modify the VaryByParam attribute. One way is to use the word "none," which means ASP.NET will cache only one version of the page for each type of request (for example, GET, POST, and HEAD). Using an asterisk for VaryByParam ("*") tells ASP.NET to cache as many different versions of the page as there are query string or POST body requests. The example above caches as many different versions of the page as there are unique names typed by users.
Using VaryByHeader in the OutputCache directive tells ASP.NET to generate a separate cache entry for each new header string that comes down (for example, UserAgent and UserLanguage represent HTTP headers that may be sent by the client).
We'll cache a User Control shortly. The VaryByControl attribute lets you cache separate content versions for each page that has a User Control with unique properties.
Finally, VaryByCustom tells ASP.NET to manage separate cache entries dependent upon a couple of factors. The first factor is the browser types and versions. Alternatively, you may provide a custom GetVaryByCustomString method that tells ASP.NET to create separate cached versions of a page based on a custom defined string.
The HttpCachePolicy
The second way to manage the output cache is through the HttpCachePolicy, which is available from the Response class. Listing 15-1 shows a C# representation of a portion of the HttpCachePolicy class.
Listing 15-1
public class HttpCachePolicy
{
  public HttpCacheVaryByHeaders VaryByHeaders {get;}
  public HttpCacheVaryByParams VaryByParams {get;}
  public void AppendCacheExtension(string extension);
  public void SetRevalidation(HttpCacheRevalidation
        revalidation);
  public void SetETag(String str);
  public SetValidUntilExpires(bool b);
  public void SetExpires(DateTime date);
  public void SetLastModified(DateTime date);
  public void SetMaxAge(TimeSpan delta);
  public void SetNoServerCaching();
  public void SetNoStore();
  // more methods and properties…
}
When you set up an OutputCache directive, you tell ASP.NET to populate this class during the Page class's InitOutputCache method. The Response object makes the HttpCachePolicy available through its Cache property. The name "Cache" is unfortunate because you might easily confuse it with the application data cache. Perhaps CachePolicy would have been a better name for the property to avoid such confusion. You can use the HttpCachePolicy class to control the behavior of the server-side caching as well as the headers used for content caching. The OutputCache directive may also be used to control some of the same aspects as the HttpCachePolicy class. However, some features such as sliding the expiration date or changing the "last modified" stamp for a page are available only through the HttpCachePolicy class.
For example, Listing 15-2 shows a page fragment ensuring that all origin-server caching for the current response is stopped. It also sets the last modified date to the current date and time.
Listing 15-2
public partial class _Default : System.Web.UI.Page
{
    protected void Page_Load(object sender, EventArgs e)
    {
      Thread.Sleep(0);
      Response.Write("This page was generated and cached at: " +
           DateTime.Now.ToString());

      Response.Cache.SetNoServerCaching();
      Response.Cache.SetLastModified(DateTime.Now);
    }
}
Caching Locations
In addition to varying the number of cached versions of a page, you may tell ASP.NET where to cache the content. This is controlled through either the Location attribute in the OutputCache directive or by using the HttpCachePolicy class's SetCacheability method.
ASP.NET supports several output caching locations for which you can specify using the OutputCache directive:
-
Any
Page can be cached by the browser, a downstream server, or on the server
-
Client
Page should be cached on the client browser only
-
Downstream
Page should be cached on a downstream server and the client
-
Server
Page will be cached on the server only
-
None
Disable caching
The HttpCachePolicy also allows you to determine the location of the cached content programmatically. This is done through the HttpCachePolicy.SetCacheability method, which takes a parameter of the HttpCacheability enumeration. The enumeration is a bit easier to read than the attributes used in the OutputCache directive. They include:
-
NoCache
Disable caching
-
Private
Only cache on the client
-
Public
Cache on the client and the shared proxy
-
Server
Cache on the server
-
ServerAndNoCache
Specify that the content is cached at the server but all others are explicitly denied the ability to cache the response
-
ServerAndPrivate
Specify that the response is cached at the server and at the client but nowhere else; proxy servers are not allowed to cache the response
Output Cache Dependencies
We saw how ASP.NET supports data caching in Tutorial 14. The contents of the data cache in ASP.NET may be flushed due to various dependencies. The same is true of ASP.NET output caching. The response object has a number of methods for setting up dependencies based on cached content. For example, you may want to set up a page that renders data from a text file. You can set up a CacheDependency on that text file so that when the text file is changed, the cached output is invalidated and reloaded.
Caching Profiles
One of the problems associated with using the OutputCache directive directly is that the values become hard-coded. Changing the caching behavior means going in and changing the source code of the page. A new feature for ASP.NET 2.0 is the ability to add caching profiles. That way, setting the caching behavior variables is offloaded to the configuration file, and output caching becomes an administration issue and not a programming issue (as it should be).
The Web.Config file may include an outputCacheSettings section that may contain a list of outputCacheProfiles. The outputCacheProfiles are simply key-value pairs whose keys are the output caching variables (such as Duration). When you mention the profile name in the OutputCache directive, ASP.NET will simply read the values out of the configuration file and apply them to the OutputCache directive.
The following exercise illustrates setting up a cache profile instead of hard-coding the values into the page.
Set Up a Cache Profile
-
Add a cache profile to the Site's Web.Config file. If Web.Config isn't already there, go ahead and add one to the project. Then add a cache profile to Web.Config nested between the system.web elements. Name the cache profile "profile."
<configuration> <system.web> <caching> <outputCacheSettings> <outputCacheProfiles> <add name="profile" duration="60" varyByParam="TextBoxName" /> </outputCacheProfiles> </outputCacheSettings> </caching> </system.web> </configuration> -
Change the OutputCache directive in the Default.aspx page to use the new profile:
<%@ Page Language="C#" AutoEventWireup="true"
CodeFile="Default.aspx.cs" Inherits="_Default"
trace="false"%>

<%@ OutputCache CacheProfile=<;$QD>profile" %>
-
Surf to the page. It should work exactly as it did before when the caching values were hard-coded. That is, run the page, type a name, and note the date and time stamp. Type a new name and note the date and time stamp. Type the original name, submit it, and you should see the original cached page appear (as long as you complete the post within the specified time window).