-
The form will resemble a sign-in form that you often see on Web sites. It's the canonical example for employing user input validation.
-
Add a TextBox to hold the user's first name text box. Name the control TextBoxFirstName.
-
Add a last name TextBox. Name the control TextBoxLastName.
-
Add an address TextBox. Name the control TextBoxAddress.
-
Add a ZIP Code TextBox. Name the control TextBoxZip.
-
Add a phone TextBox. Name the control TextBoxPhone.
-
Add TextBoxes to hold a password and a password confirmation. Name them TextBoxPassword and TextPasswordAgain, respectively. Set the TextMode property for both of them to Password so that they don't display the text being typed by the end user. This is a common scheme to ensure the user types a password he or she really means to enter because the Password property on the TextBox prevents the user from seeing the characters as they are keyed.
-
Add a TextBox to hold the user's age. Name the control TextBoxAge.
-
Add a Button to submit the form.
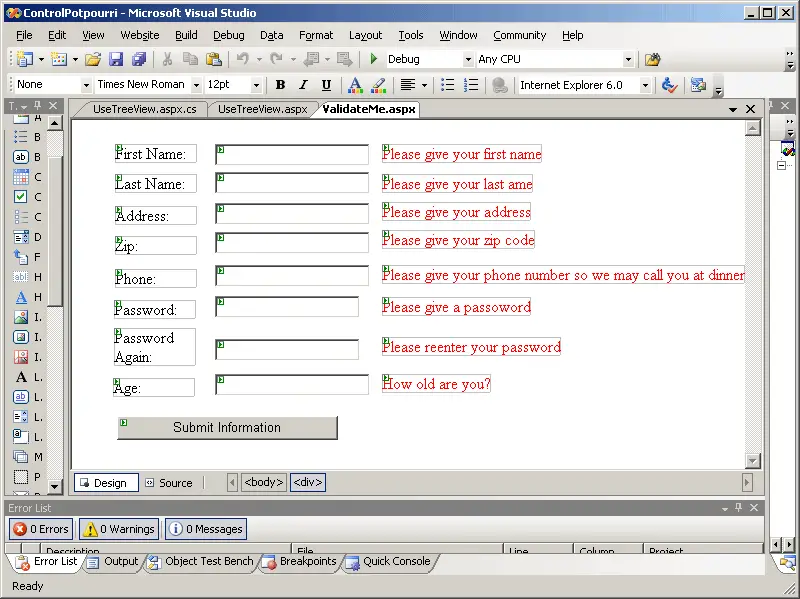
The form should look something like this when you're done.
-
Now start adding validators. Add a RequiredFieldValidator control for the first name. In the properties for the first name validator control, pull down the combo box in the ControlToValidate property. Select the TextBoxFirstName control. Set the ErrorMessage property to a useful error message such as "Please give your first name."
-
As with the first name text box, add a RequiredFieldValidator control for the last name. In the properties for the last name validator control, pull down the combo box in the ControlToValidate property. Select the TextBoxLastName control. Set the ErrorMessage property to a useful error message such as "Please give your last name."
-
Add RequiredFieldValidator controls for the ZIP Code, the phone number, and the password text boxes. In the properties for the ZIP Code validator control, pull down the combo box in the ControlToValidate property. Select the TextBoxZip control. Set the ErrorMessage property to a useful error message such as "Please give your zip code." In the properties for the phone validator control, pull down the combo box in the ControlToValidate property. Select the TextBoxPhone control. Set the ErrorMessage property to a useful error message such as "Please give your phone number so we may call you at dinner." In the properties for the first password validator control, pull down the combo box in the ControlToValidate property. Select the TextBoxPassword control. Set the ErrorMessage property to a useful error message such as "Please make up a password." In the properties for the second password validator control, pull down the combo box in the ControlToValidate property. Select the TextBoxPasswordAgain control. Set the ErrorMessage property to a useful error message such as "Please confirm your password."
-
Add a RequiredFieldValidator control for the age field. In the properties for the age required field validator control, pull down the combo box in the ControlToValidate property. Select the TextBoxAge control. Set the ErrorMessage property to a useful error message such as "Please give your age."
-
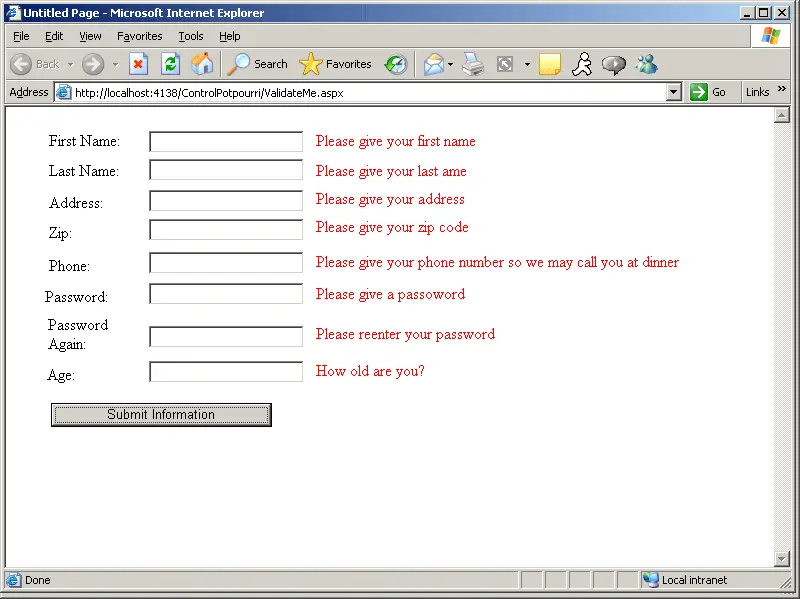
Compile and run the program. At first, all you'll see is a collection of input boxes. Before entering any fields, click the Submit button. Watch the error messages appear, as shown in the following graphic.
-
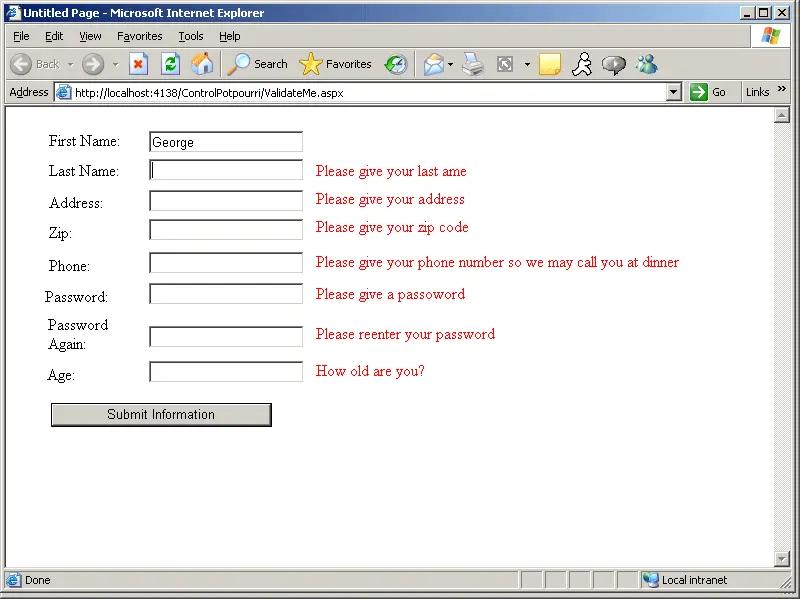
Type a first name and then press the Tab key to move the focus to another control. Watch what happens. The ASP.NET validator controls insert some JavaScript into the HTML sent to the browser (if the browser understands JavaScript). With the client-side script in place, required field validators can manage their error messages without a round-trip to the server, as shown in the following graphic.
Before adding more validation controls, let's take a look at how ASP.NET user input validation works.
How Page Validation Works
ASP.NET's page validation is set up very cleverly-and it's all based on the page server-side control architecture. As with many other features in ASP.NET, the validation mechanism solves the most common use cases you encounter during Web site development. Most sites include both client-side and server-side validation. By supporting client-side validation, users are spared a round-trip when validating data input to the page. In addition to client-side validation, most sites also support server-side validation for two reasons: to make sure no data was garbled or modified during transmission, and to support clients unable to support client-side scripting (perhaps the client browser doesn't support JavaScript). Let's start with a look at client-side validation.
Client-Side Validation
If you looked at the ASPX source code generated by Visual Studio as you placed controls on the page, you probably noticed the page became littered with even more tags, such as server-side control tags to support text boxes and selection controls. In addition, each validator control placed on the page corresponds to a separate tag. Validators are server-side controls, too. They render standard browser-interpretable code-similar to the regular server-side controls.
ASP.NET validator controls support client-side validation by linking a JavaScript file named WebUIValidation.js into the HTML sent to the browser. The file contains the client-side validation functions necessary to support client-side validation.
When the validation controls render to the browser, they add span elements with custom attributes to the rendered HTML. The validation handlers are hooked up when the HTML document is loaded in the browser.
Because client-side validation requires JavaScript support in the client, clients without JavaScript support will need to rely on server-side validation. If you want, you may disable the client-side script for each control by setting the EnableClientScript property on the validator to false.
Server-Side Validation
Once the client has passed the client-side validation tests, the request is posted back to the server and the server-side validation kicks in. Server-side validation is managed by infrastructure within the Page class. As you add validator controls to the page, they're added to a collection of validators managed by the page. Each validation control implements an interface named IValidator. The IValidator interface specifies a Validate method, an ErrorMessage property, and an IsValid property. Of course, each validator has its own custom logic to determine the validity of the data held within the control it's validating. For example, the RequiredFieldValidator checks to see that there's data within the control it's associated with. The RegularExpressionValidator compares the data within a control to a specific regular expression.
During the post-back sequence for a page, validation occurs just after the Page_Load event fires. The page checks each validator against its associated control. If validation fails, the server-side validation controls that failed render themselves as visible span elements.
The page itself has a property named IsValid that you can check to ensure your confidence in the data passed in from the client before you actually start using the data in the controls. In addition, the Page class implements a method named Validate(). Validate walks the list of validation controls, running each control's Validate method.
Add Finer-grained Validation
Once you've ensured users fill the required fields, it's important to make sure that the data coming from users is likely to be correct. For example, you may not be able to ensure the veracity of the user's phone number, but at least you can make sure it is in the right format and doesn't contain garbage.
-
Dismiss the browser and go back to the designer window. Now that you have controls that show error messages when the user forgets to type something, let's take a look at some fine-grained validation. When you look at the fields being entered, you can see a couple more opportunities for the user to enter bad data.
-
There's not much you can do for the first name, last name, and address fields except hope that the users type what they really mean to type. However, you might want to ensure the user types only numbers into the Zip Code field. The way to ensure that is to use a RegularExpressionValidator for the TextBoxZip control.
-
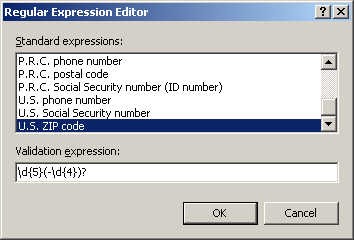
Set the ValidationExpression button to U.S. Zip code. Highlight the ValidationExpression property, and then click the little button with an ellipsis to bring up the Regular Expression Editor:
-
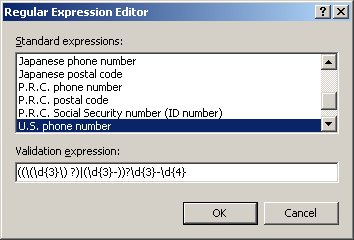
Add a regular expression validator for the TextBoxPhone control. Set the ControlToValidate property to TextBoxPhone. Bring up the Regular Expression Validator and choose U.S. phone number as the regular expression to validate, as shown in the following graphic.
-
Add a CompareValidator for the TextBoxPasswordAgain control. In the properties for the password again validator control, pull down the combo box in the ControlToValidate property. Select the TextBoxPasswordAgain control. Set the ControlToCompare property to TextBoxPassword. Set the ErrorMessage property to a useful error message such as "Please reenter your password."
-
Add another CompareValidator for the TextBoxAge control. Enter 18 for ValueToCompare and Integer as the data type to compare. The operator property should be GreaterThanEqual.
-
Add a ValidationSummary to the form. This will show any errors occurring at once. If you want an alert to pop up in the browser, set the ValidationSummary.ShowMessageBox property to True.
-
Build and run the program. Enter some erroneous data. See what happens. You should see the error messages emitted by the validator controls. For example, if you type 17 as the age, the CompareValidator for the control should emit an error message. The CompareValidator should throw up an error in this case because the validator is looking for values greater than or equal to 18.
Other Validators
In addition to the validators mentioned above, ASP.NET includes two other validators: the RangeValidator and the CustomValidator. Let's take a quick look at each of those.
The RangeValidator is similar to the CompareValidator in that you may use it to check the data in a control against a value. However, the RangeValidator's purpose is to report an error if the data held in a control is out of a range. The validator specifies a minimum and a maximum value and reports the error if the value in the control falls beyond these thresholds.
You can try to fit any other kind of validation you might encounter into the CustomValidator. The CustomValidator fits on the page in the same way as the other validators. However, rather than predefining validation methods (on the server and within the client script), these pieces are left open. When you put a CustomValidator onto a page, you assign it an associated control. Then you refer to a validation function (that you write into the page). You may also specify a script block to be shipped to the client and run (along with the other client-side script).
Validator Properties
In looking through the validator controls, you can see that they contain the standard properties available to the other standard ASP.NET controls. For example, there's a Text property, a Font property, and various coloring properties. In addition, you'll find a couple of other properties useful for managing the error output sent to the browser.
The first property is the Display property. Its value may be either static or dynamic. This property manages the client-side rendering of the error message. Static (the default value) causes the span element emitted by the control to take up layout space in the HTML bound for the client, even when hidden. When the Display property is Dynamic, the span element emitted by the control changes the layout and dynamically expands when displayed.
A new feature for ASP.NET 2.0 is the ability to group validation controls. That is, each validation control may belong to a named group. The ValidationGroup property controls the name of the group. When a control belongs to a group, controls in that group only validate when one of the other validators in that group fires. This gives you a "multiple forms" effect within a single page.
Let's take a look at two other interesting controls: the TreeView and the MultiView.