When you use the Spell Check feature, you can change certain spelling options to better suit the
spreadsheet that you are checking. To change the spelling options, click the Options button at the
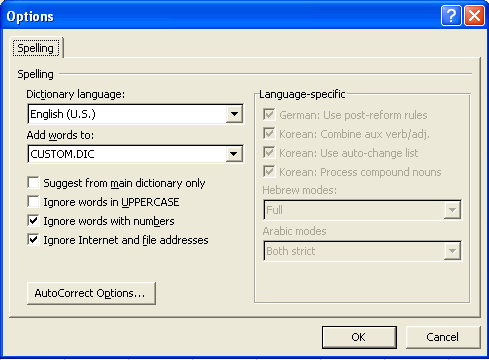
bottom of the Spelling dialog box to open the Options dialog box, shown in Figure below.
You can use the controls in the Options dialog box to change the following settings:
Dictionary Language:
Select a new dictionary language. (This option is especially useful if your spreadsheet contains British English spellings or French or Spanish terms.)
Add Words To:
Select another custom dictionary to which to add new terms.
Suggest from Main Dictionary Only:
Select this check box to have Excel use only the main dictionary when doing a spell check (thus, ignoring all words that you add to the custom dictionary).
Ignore Words in UPPERCASE:
Select this check box to have Excel ignore acronyms in your spreadsheet that use all capital letters.
Ignore Words with Numbers:
Clear this check box to have Excel flag unknown words that contain numbers.
Ignore Internet and File Addresses:
Clear this check box to have Excel let unknown words that contain URL and Mailto addresses and file pathnames slide. (You know, stuff such as www. google.com and c:\mydocuments\finance.)
AutoCorrect Options:
Click this button to open theAutoCorrectdialog box where you change the settings that determine when certain words are automatically corrected as well as add new automatic replacements.
Note that Language Specific check boxes and dropdown lists on the right side of the Options dialog
box remain grayed out until you select a dictionary in the Dictionary Language drop-down list for
German, Korean, Hebrew, or Arabic. Then you can use them (depending on the language you select) to
determine how their words are treated during spell checking.
by updated