Add XMLConnector and DataSet Components
First you will add the components that will manage the data.
- Create a new Flash document using Flash Professional 8. Make sure your computer is connected to the Internet.
- From the Components panel, open the Data category and drag an XMLConnector component on the Stage. In the Property inspector, enter the instance name timeInfo_con.
- In the Component inspector or the Property inspector, click the Parameters tab. For the URL parameter, enter data.xml, and for the Direction parameter, select Receive from the pop-up menu.
- From the Components panel, drag a DataSet component on the Stage. In the Property inspector, enter the instance name timeInfo_ds.
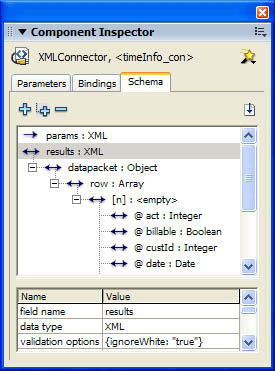
- On the Stage, select the XMLConnector component. In the Component inspector, click the Schema tab. Select the results:XML property, and then click Import a Schema from a Sample XML File on the upper-right side of the Schema tab.
Note: Alternatively, you can select Import XML Schema from the Component inspector title bar menu.
- Browse to where you saved the data.xml file, and select the file.
The Schema tab now shows the structure of the data in the file. The row node is mapped to an ActionScript array of anonymous objects, because it repeats several times within the XML file. Any subnodes or attributes directly under the row node are considered properties of the anonymous objects contained within the array.
For more information about how Flash translates XML documents into an internal schema representation, see "Data Integration (Flash Professional Only)" in Flash Help.
Note: The XMLConnector component stores information internally as strings. When a request is made for the data through a DataBinding component, you can define how the string data is converted into the correct ActionScript types. This is accomplished by selecting an item within the Schema Tree pane and modifying its settings.
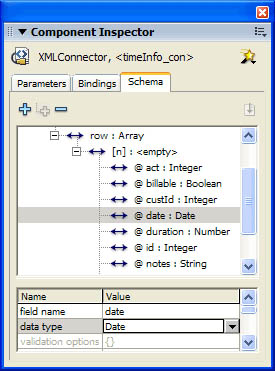
- Select the Date schema field. Its type is set to String. This is because the Flash authoring tool cannot determine that it is a date type based on its value. You need to give Flash some additional information to encode this value correctly.
- Select the Data Type parameter for the Date schema field and change it to Date. This tells the DataBinding component to try to work with this value as a date.
 For more information on data binding and data types, see "About handling data types in data binding (Flash Professional only)" in Flash Help.
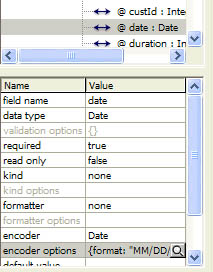
 - Select the encoder parameter for the Date schema field and change it to Date. Select the encoder options parameter and select the value "MM/DD/YYYY". This tells the DataBinding component how the string value is represented in the XML file. With this information, the DataBinding component can successfully take any string in this format and convert it into an ActionScript date object.
 For more information on data binding and encoders, see "Schema encoders" in Flash Help.
 - Select the @billable schema field.
The field's data type was automatically set to Boolean by the authoring tool, which looks for certain patterns to guess the type of an XML element. However, you need to modify the encoder options for the field. For Boolean data types, the encoder options specify strings that indicate true and false values.
- With the @billable schema field still selected, double-click the Encoder Options field.
- In the Boolean Encoder dialog box that appears, enter true in the Strings That Mean True text box and enter false in the Strings That Mean False text box.
- Select the @duration schema field.
The field's data type was automatically set to Integer. This is because the sample XML field contained only whole number values for this attribute.
- Select the Data Type setting for the @duration schema field and change it to Number so that it is not limited to integer values.
- In the Component inspector, click the Bindings tab.
- Click the Add Binding button.
- In the Add Binding dialog box, select the row: Array item and click OK.
- In the Component inspector, select the Direction property and set it to Out.
- Double-click the Bound To property.
- In the Bound To dialog box, click the Data Set component, and then select the dataProvider: Array schema location and click OK.
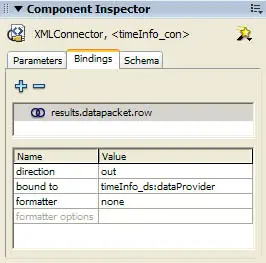
The DataBinding component copies each object within the row array into a new record (transfer object) within the DataSet component. It applies the settings you selected as the data is copied so that the DataSet component receives ActionScript Date, Boolean, and Number fields for the @date, @billable, and @duration attributes.
Next, you will create fields for the DataSet component that match those in the XMLConnector component.
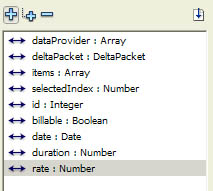
- On the Stage, select the DataSet component. In the Component inspector, click the Schema tab.
- Click Add a Component Property (+) and enter id for Field Name and Integer for Data Type.
- Using the same method, create the following new fields:
- Field Name = billable, Data Type = Boolean
- Field Name = date, Data Type = Date
- Field Name = duration, Data Type = Number
- Field Name = rate, Data Type = Number
Note: The field names must exactly match the names of their corresponding properties within the XMLConnector component (@date = date, @billable = billable, @duration = duration), including capitalization.
- Field Name = billable, Data Type = Boolean
- Select the Date field that you just created. Select the encoder setting and change it to DateToNumber.
Note: The DataSet component needs to store date values internally in their numeric format so that they can be sorted correctly. The DateToNumber encoder converts a date into a number whenever the value is set. It converts a number into a date whenever the value is accessed.
- With the Date field still selected, double-click the Formatter field in the Component inspector and select Date from the pop-up menu.
- Double-click the Formatter Options field in the Component inspector.
- In the Date Formatter Settings dialog box that appears, enter MM-DD-YYYY in the Format text box.
Add DataGrid and Button components
Next you will add components for displaying the data.
- From the Components panel, open the User Interface category and drag a DataGrid component to the Stage.
- In the Property inspector enter the instance name timeInfo_grd.
- Still in the Property inspector, set the Width to 360.
- In the Component inspector, click the Bindings tab.
- Click the Add Binding button.
- In the Add Binding dialog box, select the dataProvider: Array item and click OK.
- In the Bindings tab, click the Bound To property.
- In the Bound To dialog box, click the Data Set component, and then select the dataProvider: Array schema location and click OK.
- In the Bindings tab, set the Direction to In.
- With the Data Grid still selected, go to the Component inspector Bindings tab and click the Add Binding button.
- In the Add Binding dialog box, select the selectedIndex: Number item and click OK.
- Double-click the Bound To property.
- In the Bound To dialog box, click the Data Set component, and then select the selectedIndex: Number schema location and click OK.
- Leave the Direction property set to In/Out.
- Drag a Button component to the Stage, and give it the instance name loadData_btn in the Property inspector.
- In the Component inspector, click the Parameters tab. In the Label field, type Load Data.
- With the button still selected on the Stage, open the Behaviors panel (Window > Behaviors).
- Click Add Behavior (+), and select Data > Trigger Data Source. In the Trigger Data Source dialog box, select the timeInfo_con component, and click OK.
- Save the file in the same folder where the data.xml file resides.
- Run the application, and click Load Data.
The XML data is retrieved, converted, and loaded into the DataSet component. The binding between the DataSet and the DataGrid copies the data into the grid for display.