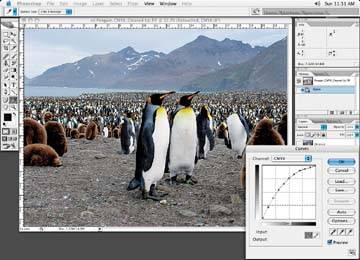
Figure 8-38. The final image with the Photoshop curve applied to simulate how it will look in the newspaper
For black and white or grayscale images, you would basically follow the same steps as for the color images. Obviously you would not have the color issues to worry about. With the exception of the color issues related to a color image, you would still want to follow the previous outlined steps in producing the grayscale image.
You would also try the Photoshop newspaper curve created on each of your images set for newspaper to see how they might print. For a grayscale image, you will have to create a new newspaper compensation curve because you would no longer be in the CMYK color space, so the CMYK curve you created earlier would not work with the grayscale image.
However, one thing to be careful of when you receive a color image and you are asked to generate a grayscale image is how the color changes to grayscale when you convert.
The obvious way to create a grayscale image from a color image is to go into your main menu bar and select Image » Mode » Grayscale to convert an image from color or RGB to grayscale.This is fine to do, and I do it myself to convert color images to grayscale.
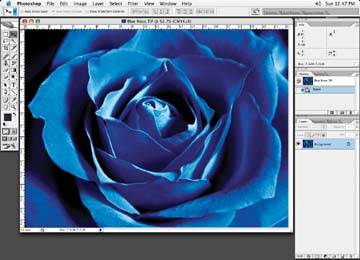
The problem when doing this is that some colors in a full color image convert and become very dark or lose detail from the conversion process to grayscale. There is sometimes a lot of information or color in the image, and naturally Photoshop adds up all of this color and can produce a pretty dark grayscale image. Some colors simply don't convert well. Take the example Figure 8-39.
Figure 8-39. Here is the original color image of the blue rose
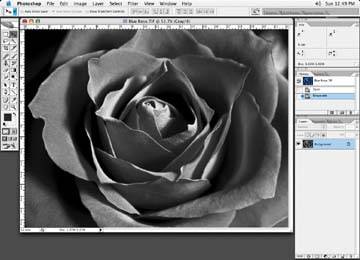
To convert the original image to a grayscale, choose Image » Mode » Grayscale; you can see in Figure 8-40 that much of the detail is lost.
Figure 8-40. The result of the grayscale change; notice how the newly converted image looks very full and how the detail has been lost
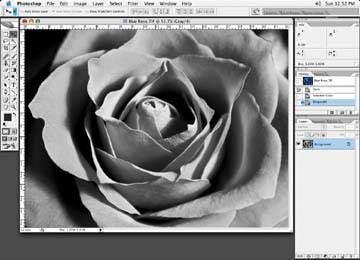
To fix the problem, take the same original image and do a color correction first with the Selective Color correction tool. If the color is blue, take down your blue. If the image is red, take down the red. Adjusting an image this way strips it down and adds a lot of shape. Of course, it varies with each image, but you'll generally get a great look.
Figure 8-41 shows the color corrected image after conversion to grayscale. Notice how it is more open and the darker tones are not as filled in. You now have an image with lots of room to make adjustments, if you wish to.
Figure 8-41. Color correcting the image before grayscaling it opens up the detail
Don't be afraid to try any number of corrections to the color image prior to the conversion. Although I favor the Selective Color option as just illustrated, curves work well too. Anything you can do to add lots of shape and contrast to the image will help you achieve a superior looking image when the conversion is made to grayscale.
All these effects may seem rather drastic, and the image may look over the top, but these effects will be muted once the image appears in newsprint. Your client may initially balk at the final look of the image with these changes, but after your client sees the results, that should put them at ease and allow them to trust you.
It's a good idea to check the results of your efforts when the newspaper prints your images, and to make further adjustments if you feel that it is warranted. Stay on top of the results and keep reference files of your work when you see results that you and your client are happy with. The next time you need to correct an image for newsprint, you can use your reference files as a guide to match to on screen.
Keep in mind that some newspaper publications can run tests for you of your images, and it may be worthwhile to take advantage of this.
One last thing: when saving your files, make sure you give them descriptive names. I personally add BW_News or 4C_News to my file so that anyone picking up the files will have an idea of what they are.