The first thing to understand is that coated paper stock is typically used in quality magazines is not very absorbent, and therefore higher line screens and higher ink densities can be used for the images. Newsprint stock or paper, on the other hand, is very absorbent, so fine-line screens and full, rich images will not print well.
Fine screen values printed on newsprint stock fill in very quickly when the ink hits the paper, and full dense areas and shadow details completely plug up or fill in. Subtle lines and details also become soft because the lines and details spread due to the nature of the paper stock.
Note: Drop a droplet of water on a tissue and watch how quickly it spreads. The same effect happens with ink on newsprint.
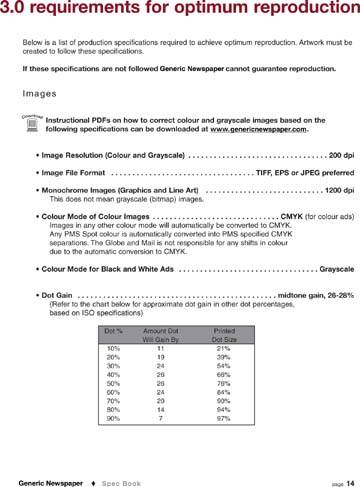
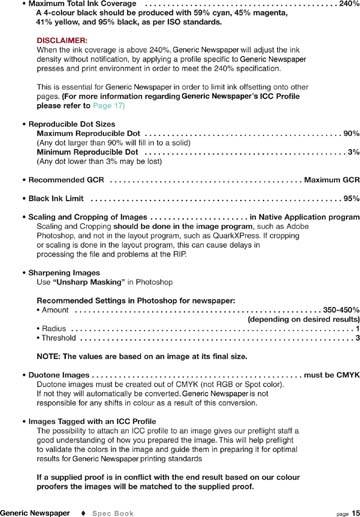
One thing you may want to get your hands on is a specification sheet from your local newspaper printer, like the ones shown in following figures.
Figure 8-1. Specifications supplied by a typical newspaper printer for black and white ads
Setting Up Your Image to Meet the Client's Specs
Let's look at some of the specs mentioned and see how we can apply them.
-
Make sure the image is not too full overall and the ink densities are not too high in the darker areas of the image. Because of the nature of newsprint, the ink spreads, so a dot that starts off at 50% will gain and may end up being 60 or 70%. You will have to compensate for this by opening up and sharpening the image a fair amount.
Figure 8-2. Newsprint spec sheet from a typical newspaper printer for color images
-
Take note of the dot gain information to see just how much the values measured in your image file will gain when the same image is printed on the newsprint. This will be covered shortly in this tutorial so you can optimize your image properly.
-
Check the image resolution. Supplying an image at 200 pixels per inch (dpi) is fine. Make sure, though, that the image is the correct size of the ad placement at 200 ppi. Supplying the image at higher resolutions makes for a larger file, and the newspaper may charge you to reduce the size of the file if you supply them with a file that is much larger than necessary.
-
Make sure you have applied plenty of sharpness to the image so that detail and edges within the image are held. Although the specifications in figure make suggestions as to how much sharpening to add, you'll want to experiment with these values, as the recommended values may not suit images of different sizes.
-
For color images, total ink density is the amount of ink in the darkest part of an image when you add up all the CMYK values. They should add up to no more than 240 for newsprint. This will be covered shortly in this tutorial.
-
Clients are not used to seeing images properly prepared for newsprint on a proof prior to being printed. Clients may look at the image and think that it is too light, open, or sharp when an uncompensated proof is made, but rest assured that the printed image will fill in, get fuller, and reproduce well if prepared properly.
Using Photoshop Tools to Simulate a Newspaper Press
Try to get an ICC profile from your local newspaper that you can load into Photoshop to check you images and to simulate press conditions. Following figure shows you the process through which to use the profiles in Photoshop. Prior to using the profiles in Photoshop, though, you'll have to copy the supplied profile into the following folder: On you main hard disk, go to Library » Application Support » Adobe » Color » Profiles » Recommended.
Set up a custom profile to meet the client's spec sheet
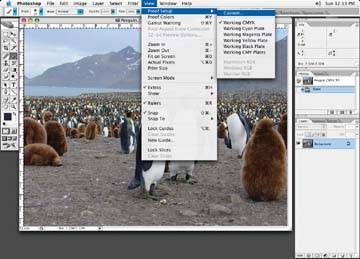
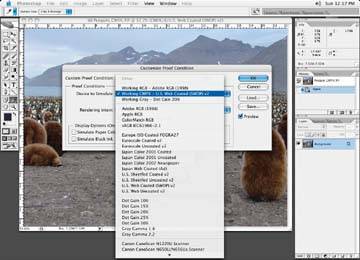
To load the profile to view your file, go to View » Proof Set-Up » Custom. The Customize Proof Condition dialog box will come up, as shown in following figure.
The Customize Proof Condition dialog box
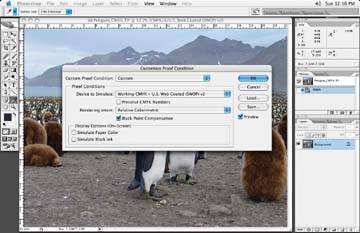
Under Device to Simulate, you will want to load the newspaper profile the newspaper company supplied you with. Following figure shows the options that come up on my computer.
Choose the profile under which you wish to view your image
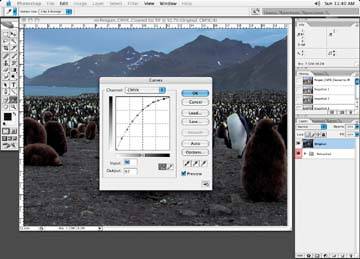
A sample compensation curve using the Curve tool in Photoshop, based on the dot gain specifications supplied by the newspaper company or printer
When the image you are to correct for newspaper is open and you wish to get an idea of how it may look in the newspaper, simply select View » Proof Colors or Command+Y. You can now toggle between your original image as it was and what it is suppose to look like as the newspaper will print it!
Creating a compensation curve in Photoshop, as shown in following figure, may also be useful. You can then use the compensation curve you create to check your images as you plot along with the changes you make. You would never apply the curve, it would simply be used as a guide to show how the image may look when printed.
To create the newspaper compensation curve based on what the newspaper specs suggest, open your image. Go to your Photoshop menu and select: Image » Adjustments » Curves. You will be presented with the Curves palette. With the CMYK Channel mode selected, the default, click anywhere on the curve line and a dot will appear. Look at the bottom of the dialog box to your left, and you will see that numbers appear in the Input and Output boxes. The input number is the actual place on your curve line where you placed the dot. The output number represents a change made to that number.
Look at the numbers supplied to you to see how the ink gains from the newspaper. Place a dot on the curve line that represents each of the numbers. Then type in a gain value in the Output box for each dot you place on the curve line.
For instance, if you place a dot on the curve line that reads 20, and the newspaper says that a 20 gains to 30, then type 20 in the Input box and 30 in the Output box. Keep adding dots and type in the both the input and output values for each dot until you build a curve like the one in the example.
The techniques described in this tutorial will apply to both black and white and full color images. I'll talk about full color images because there are more steps involved, but the changes are applicable to any color mode.