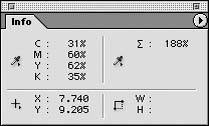
Since I started my career in the pre-press industry, I've worked with many experienced industry professionals who taught me to learn color by the numbers. By this, I mean that it was typical to read the color values of an area of an image on screen with a densitometer-type tool and relate that to an actual color sample a client has supplied or a color that was to be matched or created. Today, this knowledge is a big bonusI rely on it everyday. You can read the numbers of a given sampled color in the Info palette in Photoshop.
The Info palette in Photoshop

Sadly, many people new to retouching or color correction more often rely on a visual color check, either on screen or on whatever comes out of their desktop printer. With no color background, they often struggle to achieve the correct color. Also, many regular and digital photographers are growing up on RGB and have difficulty with the CMYK color space. The world prints in CMYK for the most part, so it is a good idea to get familiar and comfortable with it. I would encourage any retoucher to pick up a color book, or even make one up and study it.
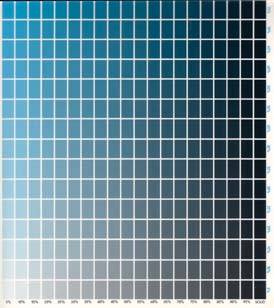
A color swatch book is a printed book with varying values of cyan, magenta, yellow, and black (CMYK) printed in various combinations of the four colors in varying degrees of values, which can range from 0 to 100% in dot values in steps typically of 5%. Reading a color book is like reading a telephone book: it looks boring, but it's great to have one on hand for referencing color, particularly if you are given a color to match or subtle corrections have to be made to an existing color. A simple check in the color swatch book will allow you to look up the color and determine which way to numerically swing it.
Color books are generally produced in house by pre-press houses and are very time consuming to make up and expensive to produce. Pantone produces swatch books that have CMYK values and the Pantone PMS color equivalents on them, which is nice because the special colors are there too. They are expensive though. However, I did find a very inexpensive publication that offers a color book, which is available from Amazon.com: Process Color Manual, 24,000 CMYK Combinations for Design, Prepress, and Printing by Michael Rogondino. At around $24.00 dollars, I'd consider it a bargain.
A page from a color swatch book

Custom profiles are the most accurate. To generate a profile purchase the device that reads the target output, called a spectrophotometer, and get your hands on some profiling software, but be warned: a spectrophotometer can cost thousands of dollars. Unless you are getting profiles for all kinds of devices day in and day out, it probably isn't worth the investment. Remember, too, that you must have a custom profile for each different type of paper stock you will be using on your printer. The two most common paper types are typically magazine stock and newsprint, although your needs may differ.
Use the best inks for your printer, and choose a paper stock that best reflects what the final printed piece will be output on, whether that be newspaper stock or coated magazine stock. Short of going with a full-fledged high-end proofing system, a good Raster Image Processor (RIP) is the best way to go with a quality inkjet printer. A RIP is basically a glorified printer driver that replaces the factory printer driver that came with your printer. A RIP allows for many more output options than the standard supplied driver offers.
Note: RIP is essentially a high-performance engine that converts image data into information that a printer can use, and therefore print. RIP vendors write their own algorithms to enhance the output and versatility of the stock software supplied with the printer. RIP software has numerous advantages over the drivers included with many printers. In fact, many wide-format printers ship with a custom written RIP, which gives professionals the added productivity they need right out of the box.
Other Necessary Equipment
Apart from having my G4 Mac, monitor, keyboard, and mouse, I also have a DVD/CD burner, FTP software for transferring files to anyone in the world, a Firewire backup drive, a scanner for scanning transparencies, a flatbed scanner, and of course, lots of drive space.
You may want to keep a few demonstration files on hand in case you have to show a client or clients a few of the things that can be retouched on a file. I like to use human faces, as everyone can relate to an image like that, and it's fun to change eye color or put a smile on someone's face with the Liquify tool. It's amazing how many people are not aware of the capabilities or what is really done to ad images.