The basic Lasso option is for drawing a selection freehand. This is a good option if the object you want to make a selection for is small and can be drawn in one go without having to stop and continue drawing, as it could create join marks where you start and stop your selection.
The second option is the Polygonal option. This option is good for creating a selection of an object that has straight edges. Again, if you have to start and stop the selection because you can't finish the selection in one go, you may get join imperfections as you go along.
There is also the Magnetic Lasso tool option. I find that I really don't use it often at all. I find the edges can get quite jaggy with this tool, and it is time consuming. I'm much quicker with the Pen tool.
Use the Lasso tool if you can fit the whole element you want to select on the screen without having to scroll through the image to complete the selection. Of course, if you don't have a steady hand, the Lasso tool might not be for you. A selection made with the Lasso tool should be made in one smooth, fluid motion. When you stop and start a Lasso selection, it can have a jerky, uneven look to it. Large, smooth areas that are to be cropped are better done with the Pen Tool.
Using the Mask Mode to Isolate an Image
Another method of selection I use often is the Quick Mask mode. Masking works particularly well for choosing objects that are soft or fast moving where it is difficult to define an edge in the object. A fast-moving car or cropping someone with hair out of a background can be tricky, but made easier with the Quick Mask mode. The nice thing about this way of isolating an image is that you have control over how the mask is made.
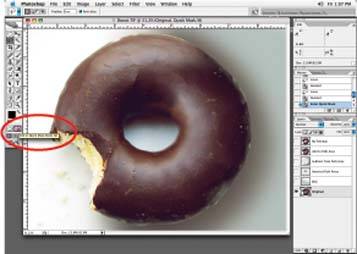
When you double-click the Quick Mask Mode button toward the bottom of the Tools palette.
The Quick Mask Mode button
When you start Quick Mask Mode, you see this dialog box
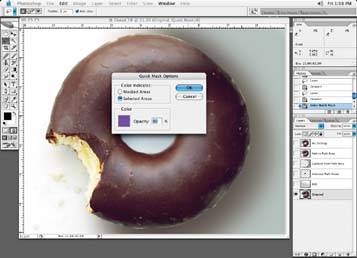
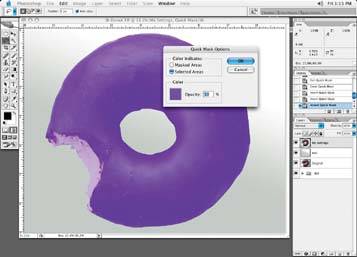
You have two options. You can choose to have the mask color indicate the selected areas, which means your selection will fill with color. Or, you can choose to have color indicate the masked areas, which means the background will be filled with the mask color. You can choose whichever works best for the needs of your particular project.
If you choose Selected Areas, the selection will be filled with the mask color
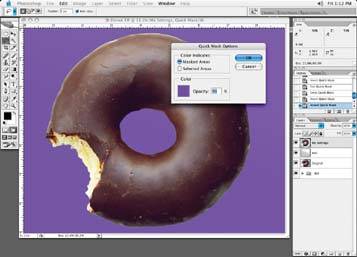
If you choose Masked Areas, the unselected areas will be filled with the mask color
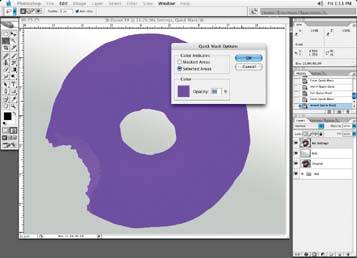
The opacity setting allows you to set the transparency of the mask so that you can still see a certain percentage of the image through the mask, and know where you are brushing. Note in following figure that the opacity is set to 50%, and you can still see some details of the donut behind the purple mask. The color of the mask can be set by double-clicking on the color swatch, which launches the Color Picker. You might want to change the mask color to something that cannot be confused with any other element in your image.
Opacity setting allows you to see your image through the mask so you know where you are brushing
You use the Brush tool to brush in the mask, and all brush attributes can be used just as they would for any brush. Using a combination of the Opacity setting and the Hardness setting, feathering off a mask gradually is a perfect way to create crop masks for blending images together seamlessly. For instance, as mentioned earlier, hair is very troublesome for people to crop out and, if not done properly, it will look just plain fake and carved out.
Save Your Selections
Once you have made a selection or clipping path of your object, save the selection or path for future use. Save the path or selection with a descriptive name so that next time you need the file, or if someone else works on the file, it is clear what the path or selection is for. This is particularly helpful if several channel masks or clipping paths are made. I like to use names anyone could figure out to make it easy for everyone.
Once you have created a path, double-click on the work path and enter a descriptive name for the clipping path. If the selection is made in the Quick Mask mode or as a hand-drawn selection, save the selection as a channel mask. Typically, once I have created a mask in the Quick Mask mode, I go back into my Standard mode and choose Select » Save Selection to save the selection as a mask or channel.
If you have created many paths, you can turn one of then into a clipping path. Programs like Quark will recognize the clipping path created in Photoshop and crop the image out as determined by the clipping path shape. Any path you make can be turned into a clipping path, and you will be given a drop-down list of paths to choose from.