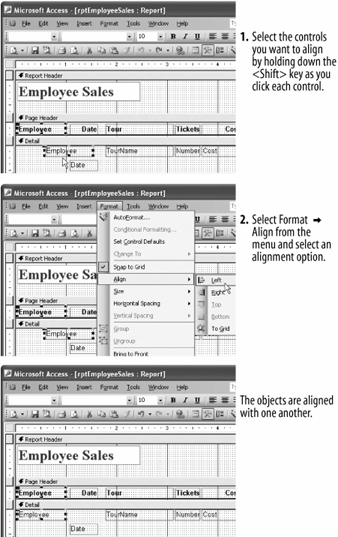
The steps for with one another.

Forms and reports that have controls scattered randomly about them look terrible. The , located under the Format menu, aligns controls relative to one another. You can align controls so that they are lined up with one another or spaced equally apart from one another. This lesson will give you some practice with the Align command.
-
Open the rptEmployeeSales report in Design view.
Someone sure was sloppy when creating this reportits controls are all over the place! You could manually move the controls and align them with one another by using the mouse and eyeballing it, but that would require a lot of time, and (unless you have eyes like a hawk) it would be difficult to align the controls perfectly. Instead, we'll align the controls using the Align command.
First you need to select the controls you want to align with one another. There are three ways to select more than one control:
-
Press and hold down the Shift key as you click each control that you want to select.
-
Use the arrow pointer (
 ) to draw a box around the controls that you want to select. Point to a location above and to the left of the controls that you want to select, and click and drag the mouse down and to the right until the box surrounds all the controls. When you release the mouse button, all the controls in the box will be selected. The disadvantage of this method is that it's not as selective as using the Shift + click method.
 -
If the controls you want to select are aligned along a horizontal line, click to the left of the object in the vertical ruler to select every control to the right of the ruler.
-
-
Hold down the Shift key as you select the Employee text label and Employee text box control as shown in figure.
Now you can align the selected controls with each another. Here's how:
-
Select Format » Align » Left from the menu.
The Employee text box control is left-aligned with the Employee text label.
Next let's try vertically aligning two controlsthe procedure is almost the same.
-
Hold down the Shift key as you select the Employee text box control and Date text box control.
Now let's vertically align the controls with each other.
-
Select Format » Align » Top from the menu.
Access vertically aligns the two controls with each other.
You can also quickly adjust the amount of horizontal or vertical space between controls by selecting the controls and then selecting a command from either the Horizontal Spacing or Vertical Spacing submenu under the Format menu.
Move on to the next step and we'll adjust the amount of space between the controls on the report.
-
Hold down the Shift key as you click the vertical ruler to the left of the text labels in the Page Header. Keep holding the Shift key and click the vertical ruler to the left of the fields in the Detail section.
You've selected all the text labels in the Page Header and all the fields in the Detail section. Here's how to adjust the spacing between the selected controls with just a few quick clicks of the mouse.
-
Select Format » Horizontal Spacing » Make Equal from the menu.
Access evenly distributes the selected controls.
-
Click and drag the Page Footer divider up to reduce the amount of empty space in the Detail section.
You're finished!
-
Click the Close button and then Yes to close the form and save your changes.
TO SELECT MULTIPLE CONTROLS:
-
PRESS AND HOLD DOWN THE SHIFT KEY AS YOU CLICK EACH OBJECT THAT YOU WANT TO SELECT.
OR...
-
USE THE ARROW POINTER (
 ) TO DRAW A BOX AROUND THE OBJECTS THAT YOU WANT TO SELECT.
OR...
-
IF THE CONTROLS ARE ALIGNED ALONG A HORIZONTAL OR VERTICAL LINE, CLICK THE HORIZONTAL OR VERTICAL RULER ABOVE OR TO THE LEFT OF THE CONTROLS.
TO ALIGN OBJECTS WITH EACH OTHER:
-
FOLLOW THE ABOVE STEPS TO SELECT THE OBJECTS YOU WANT TO ALIGN.
-
SELECT FORMAT » ALIGN AND SELECT AN ALIGNMENT OPTION FROM THE MENU.