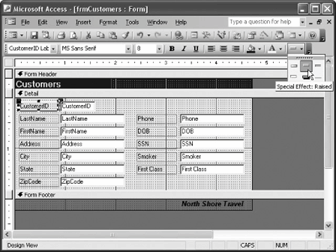
Applying a special effect to a control.

You can apply special-effect formatting to the controls in your forms and reports to give them a polished, high-tech appearance. For example, you can give a form a three-dimensional look by applying a sunken or raised effect to its controls. Applying special-effect formatting is pretty straightforward: Simply select the controls you want to format and then select one of the six special-effect options from the Special Effect button list.
-
Make sure the frmCustomers form is open in Design view.
Normally, you will want to apply special-effect formatting to both a control and its corresponding text label, so you will have to select both controls using one of the multiple-selection techniques you've (hopefully) learned.
-
Click the CustomerID text box control to select it, then hold down the Shift key as you click the CustomerID text label.
You're ready to apply a special effect to both controls.
-
Click the
 Special Effect button list arrow on the Formatting toolbar and select Special Effect: Raised, as shown in figure.
TO APPLY A SPECIAL EFFECT TO A CONTROL:
-
SELECT THE CONTROL, CLICK THE SPECIAL EFFECT BUTTON LIST ARROW, AND SELECT THE DESIRED SPECIAL EFFECT.
Available Special-Effect Options
| Special Effect | Example | Special Effect | Example |
|---|---|---|---|
|
Flat |
|
Raised |
|
|
Sunken |
|
Etched |
|
|
Shadowed |
|
Chiseled |
|