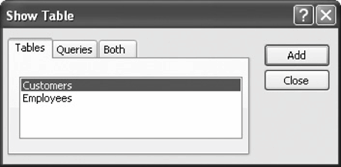
The Show Table dialog box

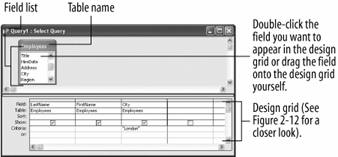
The Query window in Design view.

The design grid.

Most of the time the fastest and easiest way to create a query is in Design view. Here's how:
-
Open the Lesson 2 database.
Here's how to create a simple query:
-
In the Database window, click the Queries icon in the Objects bar and double-click Create query in Design view.
The Show Table dialog box appears, as shown in figure. Here you have to select the table or query you want to use.
-
Click Employees and click Add.
When you have finished adding the tables and/or queries to your new query, you can close the Show Table dialog box.
-
Click Close.
The Query window appears in Design view, as shown in figure. Notice that the window is split. The top half contains a box labeled Employees, which displays all the fields in the Employees table. The bottom half of the screen contains a design grid, which is where you will add the fields you want to appear in your query.
You can add fields to the design grid in two ways:
-
By double-clicking the field in the field list.
-
By clicking and dragging the field down to the design grid.
-
-
Double-click LastName and FirstName in the Employees field list.
Access adds the LastName and FirstName fields to the design grid.
Often you will have to use the field list's scroll bar to scroll up or down the list in order to find a field.
-
Scroll down in the field list and double-click the City field.
Now you need to specify any criteria for the query. You enter the criteria in the design grid's Criteria row. For this exercise you want to see only the records whose City fields contain "London"move on to the next step to add this criteria to the query.
-
Click in the City column's Criteria row and type
London.If you want to use a field in the query, but you don't want it to be displayed in the query results, uncheck the "Show" box for that field. Your design grid should look like figure.
-
Click the Show box for the City field to uncheck it.
The query will still use the criteria you specified for the City field, but it won't display the City field in the query results. You've created a simple query. Here's how to save it:
-
Click the Save button on the toolbar, type
LondonQueryand click OK.OKlet's run our new query!
-
Click the
 Run button on the toolbar.
Other ways to run a query are to open the Query from the Database window, or click the
 Datasheet View button on the toolbar. You can also select Query » Run from the menu.
 -
Access displays the results of the query.
Notice that while the City field is part of the query, it is not displayed because you unchecked its "Show" box back in Step 8.
Following table shows a smattering of criteria operators and examples to get you started.
Common Criteria Operators
| Operator | Example | Description |
|---|---|---|
|
= |
="MN" |
Finds records equal to MN. |
|
"MN" |
Finds records not equal to MN. |
|
|
< |
<10 |
Finds records less than 10. |
|
< = |
<=10 |
Finds records less than or equal to 10. |
|
> |
>10 |
Finds records greater than 10. |
|
> = |
>=10 AND 5 |
Finds records greater than or equal to 10 and not equal to 5. |
|
BETWEEN |
BETWEEN 1/1/99 AND 12/31/99 |
Finds records between 1/1/99 AND 12/31/99. |
|
LIKE |
LIKE "S*" |
Finds text beginning with the letter "S." You can use LIKE with wildcards such as *. |
TO CREATE A QUERY IN DESIGN VIEW:
-
IN THE DATABASE WINDOW, CLICK THE QUERIES ICON IN THE OBJECTS BAR AND THEN DOUBLE-CLICK CREATE QUERY IN DESIGN VIEW.
-
SELECT THE TABLE YOU WANT TO ADD TO THE QUERY AND CLICK ADD.
-
REPEAT STEP 2 AS NECESSARY FOR ADDITIONAL TABLES OR QUERIES, AND CLICK CLOSE.
-
IN THE FIELD LIST, DOUBLE-CLICK EACH FIELD YOU WANT TO INCLUDE IN THE QUERY.
OR...
DRAG THE FIELD FROM THE FIELD LIST ONTO THE DESIGN GRID.
-
IN THE DESIGN GRID, ENTER ANY DESIRED SEARCH CRITERIA FOR THE FIELD IN THE CRITERIA BOX.
-
UNCHECK THE FIELD'S SHOW BOX IF YOU DON'T WANT IT TO BE DISPLAYED IN THE QUERY RESULTS.
-
CLOSE THE QUERY WINDOW.
-
CLICK YES TO SAVE THE QUERY, ENTER A QUERY NAME, AND THEN CLICK OK.