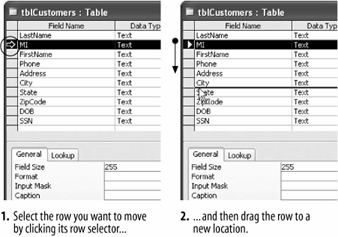
The procedure for changing the order of fields in a table.

You can insert, delete, and reorder fields in your tables in Design view. Remember that in Design view, for tables, each row corresponds to a field. You add a field by a new row and delete a field by deleting its corresponding row.
-
If necessary, open the Lesson 4 database.
In order to be able to insert, delete, or reorder fields, you must be in Design view.
-
If necessary, select the tblCustomers table and click the Design button in the document window.
The table appears in Design view. To insert a new field, you must first click the row selector of the field that will appear below the new field you want to insert.
-
Click the
 row selector for the Phone field. Press Insert to add a blank field.
Now all you have to do is give the new row a name and specify its data type.
-
Click the Field Name box for the new row and type
MI.You've added a new field. Now let's see how to rearrange the order of fields in a table.
-
Click the
 MI row selector to select the MI field.
Now you can move the selected MI row.
-
Click and drag the
 MI row selector down below the City row, as shown in figure.
Finally, here's how to delete a field:
-
With the MI field still selected, press Delete to delete the selected field.
Access deletes the MI field from the tblCustomers table.
Great! In a very short lesson you've learned three new table skills.
TO INSERT A ROW:
-
CLICK THE
 ROW SELECTOR FOR THE FIELD THAT WILL BE BELOW THE NEW FIELD YOU WANT TO INSERT.
 -
PRESS INSERT.
TO CHANGE THE ORDER OF FIELDS IN A TABLE:
-
CLICK THE
 ROW SELECTOR FOR THE FIELD YOU WANT TO MOVE.
 -
CLICK AND DRAG THE SELECTED ROW TO THE DESIRED LOCATION.
TO DELETE A FIELD FROM A TABLE:
-
CLICK THE
 ROW SELECTOR FOR THE FIELD AND PRESS DELETE.