Inserting a Merge Field into a Microsoft Word document.
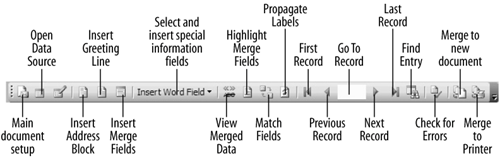
The Microsoft Word Mail Merge toolbar.
Ever wondered who at Publisher's Clearing House Sweepstakes types your name on the letters you receive on a weekly basis? Well, thanks to a process known as mail merge, creating these "personalized" letters requires no more effort than a few keystrokes. Mail-merge letters are used to send the same or similar documents to many different people at once.
To perform a mail merge you need two files:
-
A Main Document: a Microsoft Word document that contains the text that is the same in all of the merged documents (also known as boiler-plate text).
-
A Data Source: which contains the records that you want to insert into the merged documents. A Microsoft Access database makes a great data source.
In this lesson you will learn to merge information from Access into Microsoft Word.
-
In the Database window, click the Tables icon in the Objects bar, select the tblCompanies table, click the OfficeLinks button list arrow, and select Merge It with Microsoft Word from the list.
Another way to merge an object with Word is to select Tools » Office Links » Merge It with Microsoft Word from the menu.
The Microsoft appears and asks if you want to link the data to an existing Microsoft Word document or create a new Word document and then link the data to it. For this exercise you will be using an existing Word document.
-
Click OK to link your data to an existing Word document.
The Wizard prompts you for the name and location of the existing Word document.
-
Browse to your Practice folder, then find and double-click the Cover Letter document.
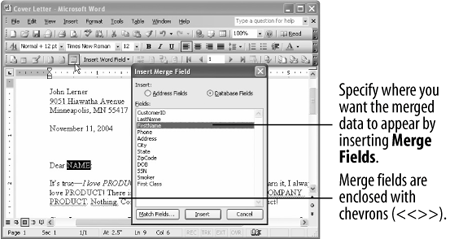
The Cover Letter document opens in Microsoft Word, as shown in figure.
Now comes the most important part of the mail-merge process: You have to specify where you want to insert the information from the data source (or Access database) into your main document. You do this by inserting merge fields. Merge fields are where the information from your data source gets inserted into the main document.
-
Place the insertion point at the end of the date line and press Enter twice.
This is where you will place your first merge field.
-
Click the
 Insert Merge Fields button on the Mail Merge toolbar, as shown in figure, and select Name from the field list, click Insert, and click Close.
The Name field (from the Microsoft Access database) is inserted into the document. You may have noticed chevrons surround the field (

 ). The chevrons differentiate the merge fields from other text in the document.
 -
Press Enter, click the Insert Merge Fields button, select Company from the field list, click Insert, and click Close. Press Enter, click the Insert Merge Fields button, select Address from the field list, click Insert, and click Close.
Move on to the next step and finish the address.
-
Press Enter, click the Insert Merge Fields button, select City from the field list, click Insert, and click Close. Type a
,(comma) and press the Spacebar. Click the Insert Merge Fields button, select State from the field list, click Insert, and click Close. Press the Spacebar, click the Insert Merge Fields button again, select PostalCode from the field list, click Insert, and click Close.Getting the hang of it? You can merge the information in the data source with the main document in one of four ways:
-
New Document: Merges the data source with the main document and places the results in a single, new document. Each record in the data source will appear on a separate page. You can then save the new merged document.
-
Printer: Merges the data source with the document and prints the results.
-
E-mail: Merges the data source with the document and e-mails the results.
-
Fax: Merges the data source with the document and faxes the results.
For this lesson, we'll merge to a new document.
-
-
Click the
 Merge to New Document button on the Mail Merge toolbar, select the All option, and click OK.
Word merges the main document "Mail Merge Letter" and the data source "Mail Merge Letter Data" into a new document called "Letters1." The new merged document contains four lettersone letter for each record in the data sourcethat are separated with a page break.
-
Press Page Down several times to move to the next page of the document to view the second letter.
Notice that this letter uses data from the second record in the data source.
-
Close Microsoft Word without saving any of your changes.
Congratulations, you've performed a mail mergea task many people consider to be one of the most difficult procedures in word processing.
TO MAIL MERGE RECORDS WITH MICROSOFT WORD:
-
OPEN OR SELECT THE TABLE, QUERY, OR REPORT YOU WANT TO USE FOR THE MAIL MERGE.
-
CLICK THE OFFICELINKS BUTTON LIST ARROW ON THE TOOLBAR AND SELECT MERGE IT WITH MICROSOFT WORD FROM THE LIST.
-
SPECIFY WHETHER YOU WISH TO MERGE TO AN EXISTING WORD DOCUMENT OR IF YOU WANT TO CREATE A NEW WORD DOCUMENT.
-
PERFORM THE MAIL MERGE USING MICROSOFT WORD.