The Form Selector

In the previous few lessons, you've been learning how to view and change the properties for form controls. In this lesson you will learn how to view and change the properties and settings of the form itself. That's rightjust like controls, forms also have their own set of properties that you can view and manipulate. So why would you want to change a form's properties? Modifying a form's properties can be especially important if you are creating a database that will be used by novice users. For example, by modifying a form's properties you can:
-
Allow users to edit exiting records in a table or querybut not add any additional records.
-
Display one record at a time on each form or display many records at once.
-
Determine the size and location of the form.
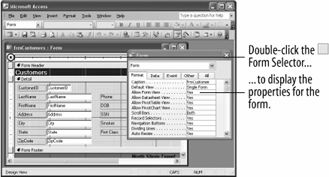
To view the properties for a form or report, simply double-click the ![]() Form Selector, as shown in figure. In this lesson you will learn how to work with a form's properties.
Form Selector, as shown in figure. In this lesson you will learn how to work with a form's properties.
-
Open the frmCustomers form in Form view.
In its current state, the frmCustomers form displays one record at a time and has a rather confusing caption in the title bar: "frmCustomers." These are form properties that you can change. You must be in Design view in order to view and change a form's properties.
-
Click the View button on the toolbar to switch to Design view.
To view the properties for a form, double-click the
 Form Selector, as shown in figure. Move on to the next step and try it!
 -
Double-click the
 Form Selector.
Microsoft Access displays the properties for the form. First, let's give the "frmCustomers" title bar a more descriptive name.
-
Click the Format tab, if necessary, click in the Caption box, and replace its text with
Customers.One of the most important form properties is the Default View property, which determines how many records a form can display at once. Let's take a closer look at this property...
-
Click the Format tab, click the Default View box, and click the
 down arrow.
You have five options. They are:
-
Single Form: Displays one record at a time on a form.
-
Continuous Forms: Displays multiple records on a form. The main difference between Datasheet and Continuous Forms is that a continuous form can be customized.
-
Datasheet: Displays multiple records in a table, using one line per record. Tables and queries display information in datasheets.
-
PivotTable: Dynamically analyzes information and summarizes it into a datasheet-like table.
-
PivotChart: Dynamically analyzes information and summarizes it into a chart.
-
-
Select Datasheet from the list.
That's enough changes for now.
-
Close the Properties dialog box.
Let's see how the form looks with its new properties.
-
Click the View button on the toolbar to display the form.
Access now displays the frmCustomers form in Datasheet view, and it has a new caption in the title bar.
-
Click the Close button to close the frmCustomers form without saving any changes.
You're probably wondering how you are going to get a handle on all these form . Don't worryyou will probably never touch 95 percent of them. And when you actually do have to roll up your sleeves and tackle form properties, you'll find the cheat sheet in the next lesson invaluable.
TO VIEW AND CHANGE FORM PROPERTIES:
-
DISPLAY THE FORM IN DESIGN VIEW.
-
DOUBLE-CLICK THE FORM SELECTOR.
-
CLICK THE APPROPRIATE PROPERTY TAB AND PROPERTY BOX AND MAKE THE DESIRED CHANGES.