Double-buffering and the HIMEM.SYS, SMARTDRV.EXE, SETVER.EXE, and IFSHLP.SYS programs and files are all loaded from within IO.SYS. Microsoft also provides protected-mode drivers for a broad cross section of peripheral devices.
When Windows 95 installs, it looks for real-mode drivers in CONFIG.SYS and AUTOEXEC.BAT that it can replace. The list of device drivers that can be safely replaced is stored in the text file IOS.INI (located in the Windows directory).
IMPORTANT
There are roughly 300 device drivers that Windows 95 can replace, and about 300,000 device drivers that Windows 95 has never heard of. These real-mode device drivers must run, or the device they support will not operate. That is why CONFIG.SYS, SYSTEM.INI, and AUTOEXEC.BAT files still exist.
Virtual Device Drivers vs. Real-Mode Drivers
There are several reasons for eliminating real-mode drivers from the Windows memory stack:
- Real-mode drivers are 16-bit drivers. For the most part, they are slower than 32-bit drivers (although a well-written 16-bit driver can out-perform a poorly-written 32-bit driver).
- Windows 95 runs in protected mode. To use a real-mode driver, Windows must switch between real mode and protected mode (this is time consuming).
- Real-mode drivers must reside in conventional or upper memory, thus utilizing valuable resources (virtual drivers don't).
- The processor has no built-in protection for real-mode drivers.
Windows 95 includes VxDs (virtual device drivers) to replace the following Windows 3.x real-mode components:
- FAT file system (VFAT.VXD)
- CD-ROM file system (CDFS.VSD)
- SMARTDrive disk cache (VCACHE.VXD)
- Mouse driver (VMOUSE.VXD)
- Network protocols
- SHARE.EXE MS-DOS file sharing and locking support (VSHARE.VXD)
- Disk device drivers including SCSI devices
Plug and Play
The ultimate goal of any computer user is to be able to simply plug any device into a computer, turn it on, and have it work. This is the concept upon which Plug and Play is founded. A well-designed Plug and Play system would eliminate the need for jumpers, switches, and installation software. Does Plug and Play work? The answer is a resounding yes and no. In order for Plug and Play to work, the system must have three things:
- A Plug and Play BIOS
- A Plug and Play device
- A Plug and Play operating system (such as Windows 95)
Windows 95 uses the Configuration Manager (CONFIGMG.VXD) to collect BIOS information and manage the assignment of IRQ, DMA, and other settings. During each startup, the Configuration Manager searches the system for all information, checks for conflicts, and reconfigures as necessary to resolve conflicts. Any time a new device (without a driver) is detected, the Configuration Manager launches the necessary wizard to configure the device. When all is well, it simply asks for confirmation of the device and how it is to be configured. When Plug and Play doesn't work or there is a problem, the solution is usually in the Device Manager.
Device Manager
As mentioned, all Windows 95 information is stored in the Registry. The Device Manager provides a graphical view of all the devices on a computer. This is the place to find and resolve hardware problems. The Device Manager allows you to make many changes to the hardware configuration of a computer, including:
- Add or remove a device.
- View devices by IRQ, I/O port, and DMA channel.
- Print system reports.
- View individual device properties.
- Adjust a device's resources.
- Change drivers.
- Adjust settings.
To display the Device Manager, select Start, select Settings, then select Control Panel, and open the System icon. You can also right-click My Computer and select Properties from the context menu. (See Figure 16.9 for the Device Manager.)
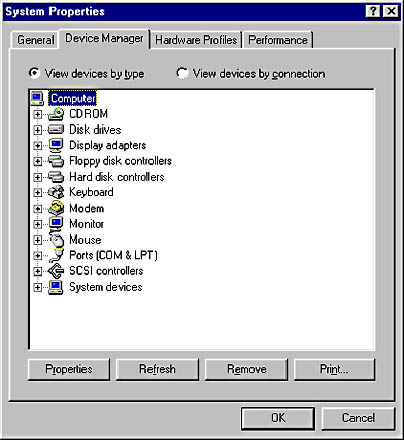
Figure 16.9 Device Manager
To see a specific device, click on the plus sign (+) to the left of the device class. (See Figure 16.10.) Any time Windows 95 sees a conflict, it denotes the device with a red X or a yellow exclamation point.
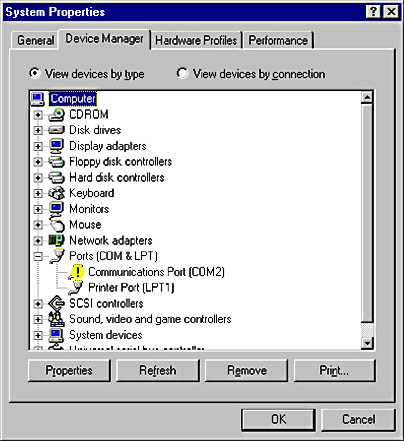
Figure 16.10 Device Manager expanded
To see a list of all IRQ and DMA channels, right-click My Computer to get Properties, click on the panel marked System Manager, and then click on the Properties dialog box below that to get the IRQ, as shown in Figure 16.11.
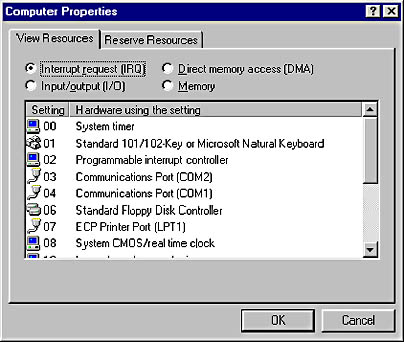
Figure 16.11 Computer properties
To document a system, select the Print command button from the Device Manager window, then select the type of printout you want (system summary, selected class or device, all devices and system summary), shown in Figure 16.12.
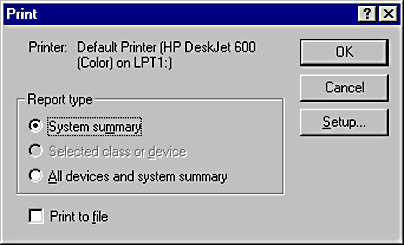
Figure 16.12 Print system summary
To view the details of an individual device, select the device and select the Properties button at the bottom of the window. Many setup options can be changed from this screen.
NOTE
If the device is not Plug and Play-compliant, the changes will also need to be made on the device itself.
To remove a device, simply select it from the Device Manager and click the Remove button at the bottom of the Device Manager screen. Don't forget to turn off your computer and physically remove the device from the system.
Adding New Hardware
Adding new hardware is simple-it will follow one of two processes, depending on whether or not the device is Plug and Play. Both processes use the Hardware wizard. With Plug and Play, this wizard is launched automatically when Windows detects the new device during startup. With a non-Plug and Play device, you have to start the wizard manually by using the Add New Hardware icon in the Control Panel. When installing manually, Windows asks if you want to specify the device or let Windows find it. In most cases, Windows does a good job of finding it; however, if you know the device and have the manufacturer's software for installation, it is often better to tell Windows what to do.
Installing Printers
Installing printers is similar to installing any other device. However, since several printer drivers can be installed and chosen at will from inside an application, Windows 95 uses a special wizard for printers. Printers also use standard ports (LPT1 or LPT2); therefore, setting the IRQs and I/O addresses is not an issue. A new Plug and Play printer is perhaps as close to true Plug and Play as possible. Simply plug the printer into a parallel port, turn on the printer, and boot up the computer. Windows 95 will recognize the printer (by polling the ports during startup) and launch the Install wizard. In many cases, you merely confirm that Windows has recognized the correct printer and it will do the rest.
For a non-Plug and Play printer, simply select the Add Printer icon from the Printers folder in the Control Panel. You will be asked to select the printer from a list. If the printer is not on the list, you will need to use the Have Disk option and supply the software. Options can vary depending on whether you are connecting to a network or a local printer.