After a hard disk drive has been installed physically, the geometry of the drive must be entered into the CMOS through the CMOS setup program before the PC will recognize the new device. This information must be entered exactly as specified by the manufacturer. Figure 8.11 shows hard disk drive configuration information in a typical CMOS. Figure 8.12 shows a subscreen of the main hard drive setup screen.
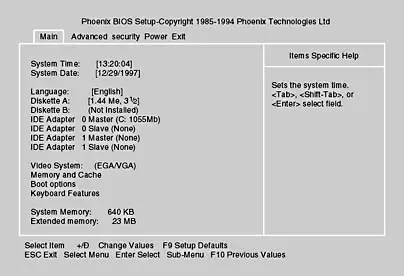
Figure 8.11 CMOS main screen
Originally, CMOS would allow for only two drives. Later versions allow up to four drives, because most new PCs have two IDE channels.
The CHS (cylinders, heads, sectors per track), along with write precompensation and landing zone, determine how the hard disk drive controller accesses the physical hard drive. The creators of the first CMOS routines for the 286 AT believed that the five different geometry numbers would be too complicated for the average user to configure, so they established 15 preset combinations of hard drive geometries. These preset combinations are called types. With types, the user simply enters a hard drive type number into the CMOS.
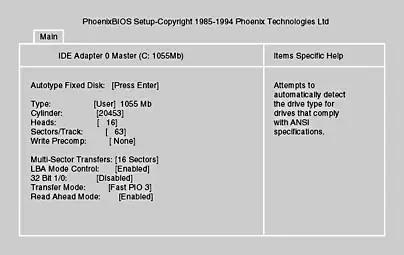
Figure 8.12 Hard disk drive setup screen
This system worked well for a period of time, but with each new hard disk drive that manufacturers designed, a new type also had to be created and added to the list. BIOS makers continued to add new types until there were more than 45 variations. To deal with this issue, Setup routines now include a user type. This allows manual entry of the geometry values, increasing both the flexibility and complexity of hard drive installation.
CMOS setup is easy with IDE drives. Most CMOS chips today have a setting known as IDE autodetection, which runs the identify drive command, gathering and setting the proper geometry values. To use it, simply connect the drive to the computer, turn it on, and run the CMOS. The identify drive command instructs the drive to transmit a 512-byte block of data containing the following information:
- Manufacturer
- Model and serial numbers
- Firmware revision number
- Buffer type indicating sector buffering or caching capabilities
- Number of cylinders in the default translation mode
- Number of heads in the default translation mode
- Number of sectors per track in the default translation mode
- Number of cylinders in the current translation mode
- Number of heads in the current translation mode
- Number of sectors per track in the current translation mode
IMPORTANT
Be sure to save your settings before you exit the setup program.
What happens if wrong data is entered into the CMOS? For example, what if a 1.2-GB hard disk drive is installed and the CMOS is set up to make it a 504-MB hard drive? When you boot the computer, you will see a perfect 504-MB hard drive. You will need to correct the entry to obtain proper use of the drive. It should not be left improperly entered, and it might not be accessible by the system.
If the computer you are working on does not support autodetection, you must be able to determine the geometry of a drive in order for it to be installed.
There are many ways to determine the geometry of a hard disk drive:
- Check the label. The geometry or type of many hard drives will be labeled directly on the hard drive itself.
- Check the documentation that came with the hard drive. All drives have a model number that can be used to obtain the geometry parameters either from the manufacturer or a third party. The hard drive manufacturers usually reserve a section of their Web site for providing configuration data and the setup utilities available for download.
- Contact the manufacturer. Many manufacturers have toll-free phone numbers.
After a drive is installed, it must be assigned a drive name or letter that is unique. There are several drive-naming conventions that help identify this unique name. If only one hard disk drive is installed, it must be configured as drive 0, or master. If a second drive is installed, it is recognized as hard drive 1, or slave. Many CMOS configurations use the terms C: and D:. Under all versions of MS-DOS and Windows, hard drive 0 is recognized as C; hard drive 1 is recognized as D.
As more drives are added to a system, (including tape, CD-ROM, and network drives), the names of existing drives might change. For example, installing a portable drive such as an Iomega Zip drive can change a CD-ROM from the D drive to the E drive. When the portable drive is removed, the CD-ROM will once again be the D drive. Keep in mind the difference between logical and physical drives. A physical drive is the hardware-it can be divided into two or more logical drives. (See the "Partitioning" section later in this lesson.) Drives on a network server are also logical drives. Write down the configuration and keep track as changes in the system are made. The only drive letters that are fixed are the A and B drives, which are always the floppy disk drives, and the C drive, the boot drive where the MS-DOS operating system resides.
This confusion in drive letters can also confuse the operating system, making it hard or impossible for it to locate drivers. In such cases, you might need to reinstall the drivers before the system can make use of the affected hardware, and a Windows 95, 98, or 2000 machine might automatically start in Safe Mode. Check the System/Device manager option in the Control Panel after the PC is operational and look for duplicate hardware items or items with flags noting missing or inoperable conditions.