Run Sqlxmlsetup.exe. The ISAPI DLL will be copied to your server and a menu entry named XML Technology Preview for SQL Server will be created.
Choose Programs from the Start menu, and then choose XML Technology Preview for SQL Server, and then Registration Tool. This will open a vrootmgt MMC snap-in that can be used to set up a SQL database so that the database can be accessed directly through the Web.
You will need to create a virtual root on the IIS Web server using the vrootmgt MMC snap-in. As an example of how this works, right click on the Default Web Site, choose New, and then choose Virtual Directory to open the New Virtual Directory Properties window, as shown in Figure 15-1.
-
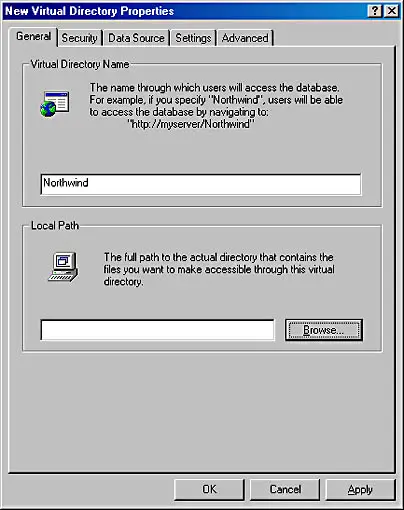
Figure 15-1. The New Virtual Directory Properties window.
In the General tab, change the default name of the virtual directory to a name such as Northwind and specify a local path to the actual directory that contains the files you want to make accessible through this virtual directory.
Click the Security tab. You can choose any of the security mechanisms that are appropriate for your server, including Windows Integrated security and SQL Server account. Select a security mechanism that will give you access to the Northwind Traders database on a SQL Server database that you have access to. If you select the Always Log In As option, you must supply a user ID that has access to the Northwind Traders database.
Next select the Datasource tab, choose the correct data source, and pick the Northwind Traders database.
Select the Setting tab, and then select Allow URL Queries.
Click OK to close the New Virtual Directory Properties window.
XML SQL Server ISAPI Extension
The SQL Server extension allows you to send a SQL query to a SQL Server 6.5 or 7.0 database through IIS in the HTTP query string of the request and get the data back as XML. The extension will give you a preview of the functionality that will be in SQL Server 2000. You can download this tool from the Microsoft Web site at http://msdn.microsoft.com/xml/articles/xmlsql/sqlxml_prev.asp, where you can find the link Download Microsoft SQL Server XML Technology Preview. Right-click this link and choose Save Target As from the context menu to open the Save As dialog box. You will see the Sqlxmlsetup.exe file in the File Name box. Save this file to the local drive of a server running IIS. To install this extension, follow these steps:
by updated