A simple curve adjustment opens up the midtone areas of the image
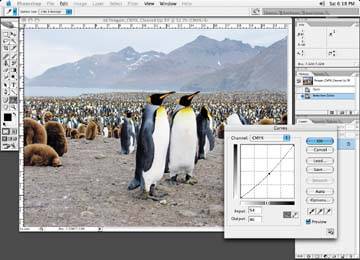
The image will look a little lean, and it should look that way prior to printing. The image will gain a lot on press.
Increase Sharpness
The next step in producing a quality image for newsprint is to increase the amount of sharpness. Again, when an image is printed in the newspaper, the ink spreads and makes the image look softer than it really is. To remedy this, use the Unsharp Masking tool and add a lot of Unsharp Masking to the image. You'll find this tool under Filter » Sharpen » Unsharp Mask.
It's difficult to explain how much sharpness to add, so some experimentation is necessary. Following figure shows an unsharpened image; and the next figures show how sharpening can affect image quality.
The original corrected image with no unsharp added
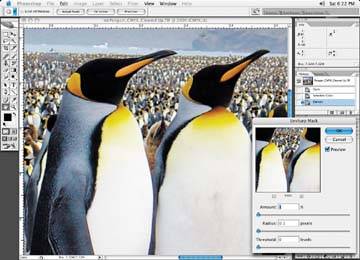
The image with the correct amount of unsharp added

Add enough of the Unsharp Masking to make the image appear noticeably sharper, and it should almost have a line shot or line drawing look to it; but too much Unsharp Masking makes the edges and lines appear jagged, and the image can start to look posterized.
The image with too much unsharp added; it starts to look posterized

There seems to be a happy correlation between the various numbers you can type into the Unsharp Masking dialog box and how the image relates to these numbers. For instance, if you type in 200 for the Amount, then 2 usually works for the Radius. If you type in 150 for the Amount, then 1.5 works for the Radius; for 300, 3 is the Radius; and so on. Typing values in this way seems to work. I usually leave the Threshold at 0; there are enough variables between the Amount and Radius that I don't need to change the Threshold from 0.
Something else you can do when adding sharpness is concentrate or isolate the sharpening to the main focal point of the image. If the image contains a hard object, select the object or crop it out so it is on a separate layer, and sharpen only that object. You could also take a History snapshot and brush the Unsharp Masking effect into the area or focal point of the image you wish to change.
One other thing you can do, depending on the image, is throw everything but the focal point of an image out of focus a touch with a Gaussian blur, just so the sharpened object or focal point stands out even more. This adds some depth of field to the image. It doesn't have to be a big blur even a 1 or 2 pixel Gaussian blur may do it. It shouldn't be very noticeable. You wouldn't want people to notice that the background was thrown out of focus. It should be more of a subconscious thing.
In this case, I'd mask the two main penguins and blur the background. You can see a close-up of the background after the blur in above figure.
Notice how it makes the focal point stand out a little more? You don't have to blur every background you get, it's just a little tip that you may find useful!