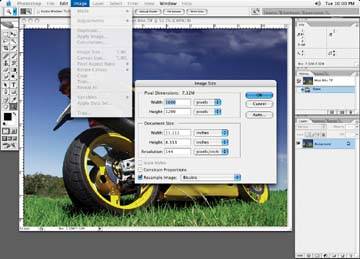
Now open the image to be scaled in Photoshop. Let's assume that the file is a typical CMYK file that is 8.5 x 11 inches at 300 dpi, which works out to be about 32 megabytes. Go into the Image Size dialog box in Photoshop (Image » Image Size), shown in Figure 7-3, and click off the Resample Image checkbox, change the resolution to 50 pixels per inch (assuming that the requirements are for a 50 dpi resolution at final size), and then let the document width and height adjust themselves to see what the size works out to be. In this case, the file will have a new height and width of 51 x 66 inches. This may still be a far cry from the 20 feet wide we'll need, but it will give us some indication of where we currently stand with the image.
Figure 7-3. The Photoshop Image Size dialog box

Of course, the image's megabyte size doesn't change when you make these resolution changes in the Image Size dialog boxonly the physical dimensions do. Once the image is sized in this manner, inform the client the status of the image and let them know just how short the image will be or how low the resolution will be at the size required.
Options for Enlarging on a Grand Scale
Once the client is aware of the shortfall of the image and they decide to go ahead with the image anyway, increase the image to the full size required (if possible), or to a size you are comfortable working with. I say "if possible" because sometimes it may not be possible to increase the image to the full final size required because of the limits in Photoshop. If Photoshop imposes or limits the physical size of the image, try changing the image to half the size, but at the highest resolution acceptable that will meet the requirements of the final output. Of course, you can only do what you can do. Some versions of Photoshop limit your file size to about two gigabytes, although this limit has been lifted on the later versions. One option might be to change the file to an RGB file to knock about 25% off the image size. Make sure you crop only what you need out of the image. Of course our billboard specifications are asking for a 400 MB maximum file size, so we will work to this, but some applications may require other larger file sizes.
This actually reminds me of some unusual requests. On occasion, a client will ask me for a huge file. Further investigation (contacting the printer or output people) reveals that they do not require the huge file the client is asking for. Often, clients just assume that they need these incredibly sized files when in fact they don't. If something seems a little off, don't be afraid to follow up on some requests and get the correct information firsthand.
Another option is to build the image in two or more sections if the background will allow for this, and then assemble the various pieces in a program like Quark or InDesign. Building files in sections works if the background can be broken down into sectionsif there is a tint or a white background and you are not cutting through the middle of an image where a join will not show up during the final assembly process.
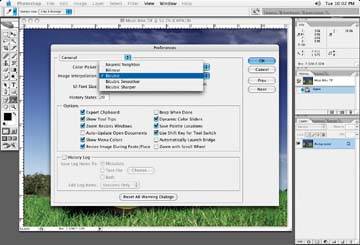
When it comes time to scale the image, make sure you are using the highest quality scaling when sizing up an image. In the case of Photoshop, that would be Bicubic Smoother. You can choose this setting each time or set your default preference in the Photoshop Preferences menu (Preferences » General), shown in Figure 7-4.
Figure 7-4. The Bicubic setting for scaling images (Bicubic Smoother in Photoshop CS2) for the best quality

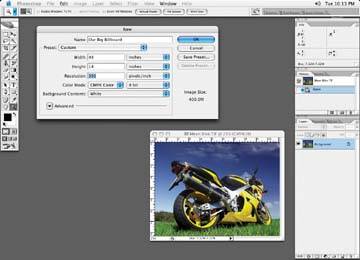
Set up your new image. In Figure 7-5, one inch equals one foot. We are keeping the size of the image to the maximum 400 megabytes asked for. These dimensions do include bleed.
Figure 7-5. Our new image

The only saving grace in some cases is that the resolution requirements for billboards are around 30 to 50 dots per inch (dpi), which means that if you have a 300 dpi image, there is obviously some decent resolution to start with. Of course, this diminishes rather quickly as the size goes up.
Reality Check: Spot Test
Once the image has been sized up, take any small sections of the image that look like they might be particularly troublesome and output them at the full size on a proof just to see how good or bad they may be. Check for graininess or jaggedness, which you might get when an image is blown up. Sometimes the graininess of the enlarged image is acceptable and you can get away with it. Remember, billboards and posters are typically viewed from a very far distance; what may look like golf balls on the image will not be all that noticeable at a far distance. No point in checking the proof with a magnifying glass from an inch away, although clients may still do this!
To clarify, when I say "get away with," I am not implying that I am trying to fool anyone into accepting an image. Let's face itretouching is my livelihood. But unnecessarily retouching an image isn't the objective here. Clients will usually appreciate an honest evaluation, especially if it can save them some money in the process.
Next, discuss the results of the output with the client to see if the image should be processed further or left as it is.