Eliminating the black channel of a four-color CMYK file, in order to satisfy the requirements of the printing process, can result in a superior looking image. Printing the job with three colors instead of four also saves some money, as it's one less printing plate and one less ink color to worry about. Having said that, a discussion with your client (again, he may not know or care!), or better yet, the printer involved with the job, may be a good idea if you are considering eliminating the black.
If you were to go in and simply delete the black channel, you could lose a lot of shape and contrast, and depending on where the black is in the image, the whole image could look terrible. So rather than remove the black channel altogether, we will blend the black channel information into the C, M, and Y channels to the best of our abilities so we do not lose the information, we just redistribute it!
For example, imagine that our client gives us the four-color image shown Figure 5-25 and wants a file that can be printed without using black.
Figure 5-25. Imagine that a client wants this image to be printable without black

If we simply remove the black channel information, we get the image in Figure 5-26, which is colorful but lacks texture.
Figure 5-26. Simply removing black information flattens the image too much
This first step is to change the image to an RGB file so that when we convert it back to a CMYK file later, our special color setting will be read and our conversion to a three-color CMY(K) file will be done. (I use Adobe 1998 as my RGB color setting.) We'll then use a special color setting that converts a four-color CMYK image to a CMY image with no black information.
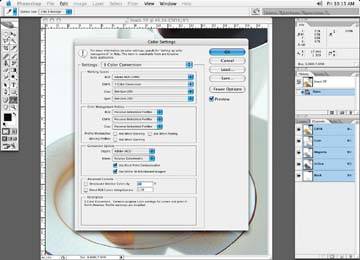
Call up your color settings by choosing Edit » Color Settings. You'll see the Color Settings dialog box that's shown in Figure 5-27. Under Working Spaces, choose CMYK and then Custom CMYK.
Figure 5-27. The Color Settings dialog box
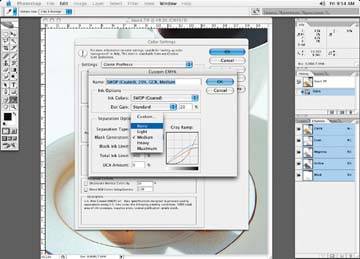
In the Custom CMYK dialog box, shown in Figure 5-28, put in a descriptive name like: Three Color Conversion. Under ink colors, choose SWOP (coated). Leave dot gain at Standard and 20%. Under Separation Options, choose GCR, and then set the Black Generation to None. Set the black ink limit to 0% and the total ink limit to 300%.
Figure 5-28. The Custom CMYK dialog box, setting Black Generation to None
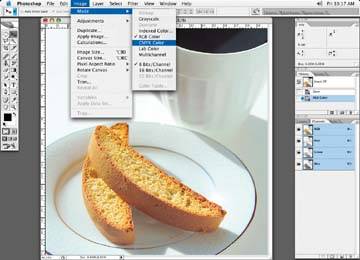
Click OK (twice), and all your new settings are ready to go. Now convert your image to RGB, as in Figure 5-29. When you convert your image from its current RGB state to CMYK (Image » Mode » CMYK Color), Photoshop will read the settings you have put in and convert the image without a black channel back into CMYK, and you'll end up with a three color image (Figure 5-30). Notice how there is only a slight change to your image (as opposed to Figure 5-26) The black channel is now empty of color information, but the texture is still there.
Figure 5-29. Convert your image to RGB
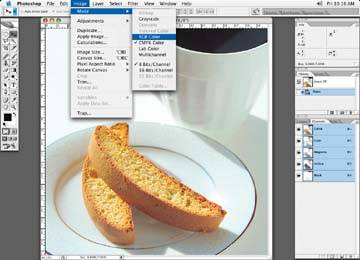
Figure 5-30. Now back to CMYK, at which time the Photoshop will read the new color setting and apply it to your image
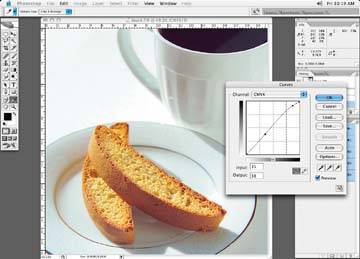
You can then make further changes with a curve adjustment or a hue and saturation, if you feel you need more contrast or brightness. In Figure 5-31, I've used a slight curve adjustment to add contrast and depth. This file is now ready for output.
Figure 5-31. Make a slight curve adjustment to add contrast and depth to the image