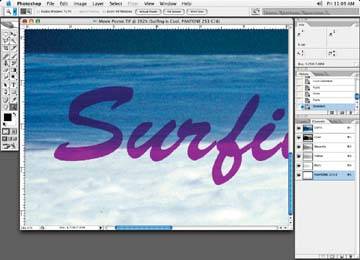
Let's say we were printing the image with the special color text shown in Figure 5-32. Take a look at the difference in the area around the letter S in Figures 5-33, 5-34, 5-35 through 5-36.
Figure 5-32. We'll work on adding trap for the special color (text) in this image
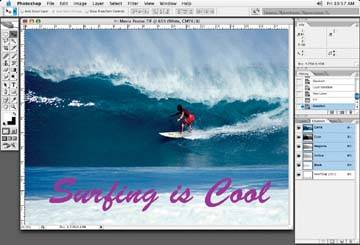
Figure 5-33. Colors are butted together without trap

Figure 5-34. Colors are butted together without trap and have shifted during printing

I have worked on many packaging projects in which a special color is used for a text heading or shape with little or no CMYK values. When a spot channel area containing little or no CMYK values butts up to another area of an image that uses no special color but contains CMYK values, you have to somehow create an overlap where the CMYK of the image and the special colors meet. That way, if the special color plate shifts during the printing process (which can happen often), there is some elbow room for the CMYK values, and the spot channel colors still print on top of each other without causing a gap to occur. Although Photoshop does not have the elaborate trap functions that some specialized programs designed for trapping do, there are a couple of things you can do to create a trap in situations where you may need it.
Figure 5-35. Colors butted together with trap

Figure 5-36. Colors butted together with trap, after having shifted

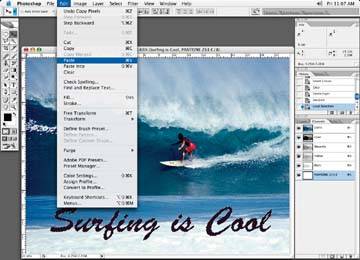
To create a trap, make a selection of the special color shape or heading (which may be a layer you have in your Layer palette or a special color that is already in your Channels palette) by holding down the Command/Control key and clicking on your special channel in the Channels palette. This then makes a selection of your special color (Figure 5-37) Then paste the text into a new special color channel, as in Figure 5-38.
Figure 5-37. Copy text in the special color channel
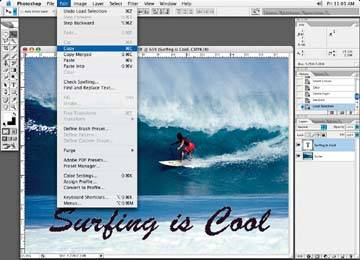
As you can see in Figure 5-39, the text pasted into the special color appears transparent, and you can see the CMYK image beneath it. Special color always overprints an image and does not knock out the image below it. If you wish to overprint your special color, you can skip the next few steps. However, if you wish to have the special color knock out the image beneath it, read on.
Figure 5-38. Paste the text into a new special color channel
So, keeping in mind is that spot colors basically will overprint, let's knock that CMYK information out to let the full strength of the special color to show through. Start by creating a new layer and calling it Knock-Out. Make a selection of your text and fill it with white.
Figure 5-39. The special color text appears transparent, revealing the CMYK information beneath it
Spot colors cannot be put on a layer; they can only be created as a channel. You won't have the flexibility that you have with a layer. That's why I typically add this white knockout layer so I can knock out the CMYK information. This way, if the position of the special color changes for some reason, I can just make my change and know that I haven't permanently knocked out the CMYK information.
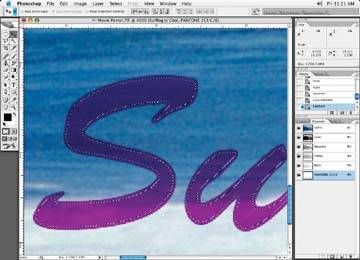
When you fill this white layer, it will be the exact same size as the special color text. This means that there will be no trap between the CMYK file and the special text channel. To fix this, contract your type selection by a pixel or two. After selecting the text, use the Select » Modify » Contract command (Figure 5-40), as shown in Figure 5-41.
Figure 5-40. Contract the white layer slightly to create trap between the CMYK and the special color channel
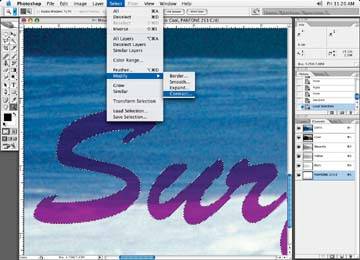
Figure 5-41. Now the selection is contracted to act as a trap for the special color
Next, fill the white layer selection, as in Figure 5-42, by using Edit » Fill and choosing the appropriate color. The results are shown in Figure 5-43. You now have a poster with a heading that is colored white. The white text heading is on a layer so that if the poster ever comes back for a text change, all you have to do is change or update your white layer file.
Keep in mind that unless you are given an exact value by the printer, you can typically use one pixel as a starting point. However, this is not correct all the timeit's just that Photoshop requires a minimum of one pixel in the expand or contract command.
Now the image, shown in Figure 5-44, is ready to print properly.
A spot channel will print only in the spot color chosen, regardless of what it is filled with. I choose 100% of a color, typically black. If you choose any percentage less than 100% for filling the spot color selection, the new special color will not be a solid color, but the percentage of color indicated from the Color Picker on the toolbar.
Figure 5-42. Fill the white layer selection with white
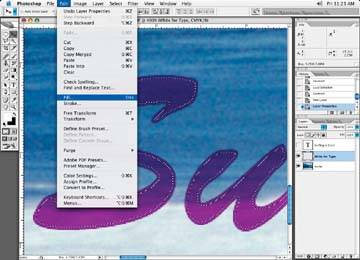
Figure 5-43. The spot color text is no longer transparent, but the CMYK information underneath is preserved in case there is a text change later
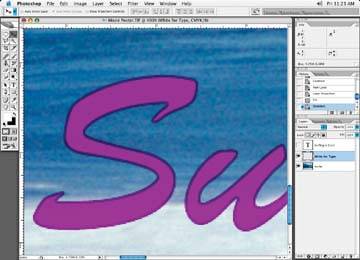
Figure 5-44. Final image ready to print

| TIP Adding Trap with Photoshop's Trap Function |
|
Photoshop has a Trap feature that allows you to add a blanket trap over an entire image (or isolated part thereof). Start by opening the image to which you wish to add trap in Photoshop. Select Image » Trap. Photoshop will ask if you want to flatten the file, say OK. Select the trap size in pixels, points, or millimeters, and click OK. The Photoshop Trap function traps the entire image. If you wish to limit a trap to a certain portion of your image, make a selection of the area you wish to trap, or take a History snapshot and brush it into the area you wish to trap. With a trapped image, if the special color happens to shift during the printing process, there should be enough extra to prevent the shift from causing gaps or white spaces to appear around the text. This method is obviously shorter than the one described above, but it doesn't allow you to adjust the edges for smoother transitions. Photoshop Trap also chops |