In this dramatic example, the red car sitting still in following figure is going to be made to appear as though it is speeding past us and traveling to the road ahead.
We'll begin by putting the wheels in motion with Photoshop's Radial Blur tool. The radial blur is designed to be used with a straight-on, perfect circle. So if the wheels are a straight-on shot, all you'll have to do is mask them, copy them, and paste them onto a new layer, using Layer » New » Layer Via Copy. (Make sure you get the tires as well. I have seen many people spin the wheel or hubcap, but forget the actual tire! If the wheels are on an angle, like they are in following figures, you'll have to make sure they are round before adding a radial bur.
Before: the car appears to be standing still
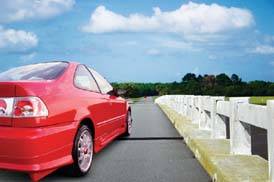
After: off into the horizon

To make the wheel and tire round, first make a selection of the two wheels and put them on a separate layer.
Tire and wheel selected out from the car and put on their own layer
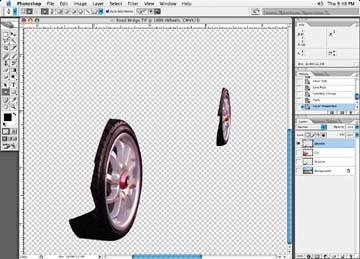
Next, select one of the wheels. Choose Edit » Transform » Scale and scale the wheel on the horizontal plane until you have what you feel is a round looking wheel. No need to measure it or use a compass on screen! Just make sure that it looks pretty round to you, like the one shown in following figure. Initially, it will look rather odd, of course, but not to worry you will distort the wheel back to its original shape once you are done. Do one wheel at a time and repeat this process for each wheel.
Transformed wheel being turned into a round shape
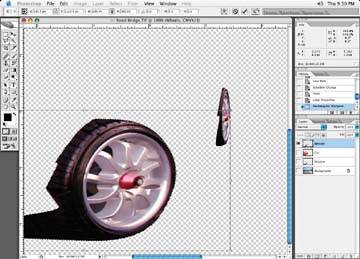
An 18-wheel truck would take you quite a while!
Once you've applied the Transform tool, repeat the transform process for the other wheel. Then make a circular selection around the wheel and apply a radial blur (Filter » Blur » Radial Blur)to the wheel, as shown in following figure.
Apply the radial blur to your transformed wheel
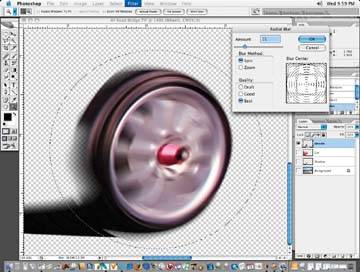
Notice that the center of your wheel should match the center of the spin in the dialog box. You may have to try a couple of times to get the spin just right. If the spin is off center, the wheel spin will look off center.
Choose Spin and Best for your dialog options. You'll have to experiment with the amount of blur or spin to use. It may take a couple of goes before you see the amount of spin that you like. Obviously, the faster the object is traveling, the more spin you will want to choose.
Using the Transform tool Scale mode, bring the wheels back to their original shape on the horizontal plane only, just as you did to originally distort them. Basically, you are just trying to do the opposite of what you had done in the first place to distort the wheels to a round shape, only this time we are changing them back to the way they were originally. Typically, to bring the wheels back into the correct shape, I would set the opacity of the wheel layer to about 50% so that I can see the old wheel through my new spinning one. Then use the Transform tool in the Scale mode on the horizontal plane to adjust the shape of the wheel back to its original shape. Once done, I set the layer opacity back to 100%. This works for any wheel, regardless of the angle it was shot on.
If the radial spin center is off, the image doesn't look right
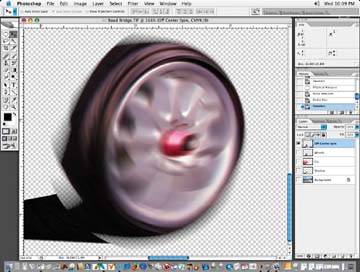
The radial blur may cause some of the original wheel to overhang onto the body of the car. You will want to erase any of the wheel that may overhang onto the body of the car. Repeat this process for the second wheel. Typically, you can use the selection that you used to crop out the wheels from the original car as your guide to erasing the excess blur overhang of the wheels. The wheels are now complete you can see the results of this phase in following figures.
The wheels are now ready to be transformed back to their original shape
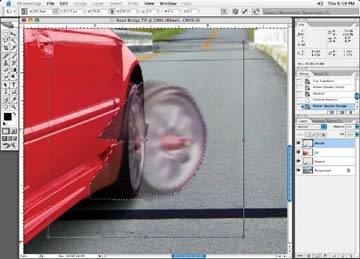
Final result of the wheels having been spun
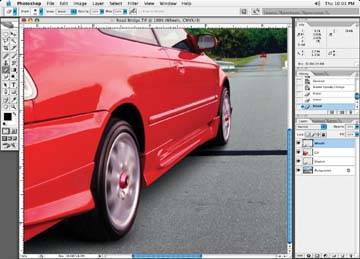
Time to add some motion to the background of the image. Let's call up the zoom blur option (Filter » Blur » Radial BlurZoom give the impression that we are speeding into the horizon. Adjust the center of the zoom blur to match the vanishing point of the horizon.
Now that we've got the wheels turning, let's add some motion to the background. A zoom blur option is suitable when we are trying to make an object appear as though it is traveling away from or toward us. This differs from a motion blur, in that a motion blur is for objects traveling horizontally or vertically.
Select the background using one of the techniques described in the previous section. Within the Radial Blur dialog box, Choose Zoom as your Blur method. Again, make sure that the center or vanishing point, the point or the center where the object is disappearing into or heading toward, matches the center point in the Blur dialog box, as indicated in the Blur Center. Of course the amount of the blur will have to be experimented with. The more blur, the faster the object appears to be traveling.
Adding zoom blur to the background gives the sense of movement off into the horizon
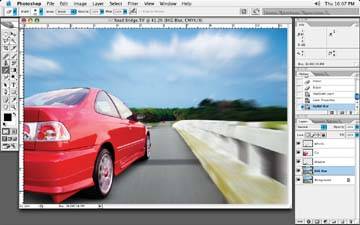
So there you have it. Our car is on its way to wherever it's going. We've applied motion blur to the background. We've added motion to the wheels. Further motion could be added to the outside edge of the back of the car as if its paint isn't able to keep up with the rest of the vehicle! Adding a range of motion will be discussed in the following section.