Getting Your Own API Key
The easiest part of the map creation process is obtaining your own Google Maps API key. This virtual key is literally your key to being able to view, test, and share your map creations with others. A Google Maps API key is completely free of charge, and is presumably required so that Google can keep close tabs on how its technology is being used. Keep in mind that Google Maps is technically still a beta product, which means that it is still under development. So in many ways you are playing the role of tester when using Google Maps.
Anyway, getting back to the API key, you can sign up and obtain your key by visiting http://www.google.com/apis/maps/signup.html. This page requires you to enter the URL of the web site to which you plan on publishing your maps. A single API key gives you the ability to publish maps to one folder on one web server. As an example, if I register an API key for http://www.xyz.com/maps, I can only publish maps to the maps folder on my web server and nowhere else. Well, technically I can publish them wherever I want on my web server but they'll only work if I place them in the maps folder. Make sure you actually publish your maps to the URL you specify when obtaining your API key.
The API key is provided to you as a long text code that you will cut and paste into your mapping code later. For now, copy and paste the code into a text file and save it for later.
Touring the Google Maps API
The Google Maps API consists of a set of JavaScript functions that you call in order to create and manipulate a map within an HTML web page. Every map must have a standard <script> tag in the head of the HTML document that references the Google Maps API and specifies your API key. Following is an example of how this <script> tag is coded:
<script src="http://maps.google.com/maps?file=api&v=1&key=
ABQIAAAASyb3gcwJHvHRgYeL6xQGZRScAy-
eqpGBgb_U5UIf4tD_qtSUMBQD201ZWuwo7NWFLUKzESpdimx61w"
type="text/javascript"></script>
The API key is too long to fit on one, which is why you see it broken across multiple lines. In your HTML code, don't add any spaces or line breaks in the API key or it won't work. After placing the <script> tag in the head of a web page, you can begin calling API functions to create the map itself.
The GMap() function is called to create a new map. This function expects as its only argument the element on the page that is to contain the map:
var map = new GMap(document.getElementById("map"));
The map container element is typically a div element, as in the following sample code:
<div style="width:700px; height:450px"></div>
Notice that the ID of the div element is map, which corresponds to the ID of the element passed into the GMap() function. This is how the map gets connected to a container element on the web page.
If all this talk of functions and arguments is flying right over your head, don't worry. It really isn't critical that you understand the JavaScript code in this example in order to use XML to customize it. However, in case you do have some JavaScript knowledge, I want to at least lay down the basics of how the Google Maps API works. If you'd like to learn more about JavaScript, I recommend Teach Yourself JavaScript in 21 Days and JavaScript Bible.
The Google Maps API offers several different user interface controls that you can use. The standard control that consists of full-sized pan/zoom buttons is represented by the GLargeMapControl object. There is also a smaller control called GSmallMapControl, as well as a control with no pan features at all called GSmallZoomControl. To set the control for a map, you call the addControl() method on the newly created map, like this:
map.addControl(new GLargeMapControl());
There is also a control that determines whether or not you can switch between the different map views (Map, Satellite, and Hybrid). To enable this control, add the GMapTypeControl object to the map with the following piece of code:
map.addControl(new GMapTypeControl());
With the map and controls in place, you're ready to set the default area for the map, which is based upon a geocoordinate as well as a zoom level. You learn how to find a geocoordinate for a location in the next section. For now, just understand that it consists of two numbers that represent the latitude and longitude of a location. Furthermore, the zoom level of the map is set to an integer number that you will likely need to experiment with in order to find a zoom level that suits your specific map. Following is the code that centers and zooms a map at a specific geocoordinate and zoom level:
var point = new GPoint(-86.853171, 36.071689);
map.centerAndZoom(point, 6);
The last step in creating a custom map is creating the markers on the map, which can also involve using custom icon images if you so choose. Custom icons in Google Maps actually consist of two images: the icon image and a shadow for the icon. You learn more about these images a bit later in the tutorial. For now, take a look at the following code, which shows how to create a marker with a custom icon, as well as how to set a listener function that opens an information window when the marker is clicked.
var icon = new GIcon();
icon.iconSize = new GSize(48, 40);
icon.shadowSize = new GSize(75, 32);
icon.iconAnchor = new GPoint(24, 38);
icon.infoWindowAnchor = new GPoint(24, 20);
icon.image = "mapicon.png";
icon.shadow = "mapicon_sh.png";
var marker = new GMarker(point, icon);
GEvent.addListener(marker, "click", function() { marker.openInfoWindowXslt(
  description, "styles.xsl"); });
The main things to note in this code are how the various icon sizes are specified, including the relative offset of the icon anchor and the information window anchor. These offsets determine how the marker icon image is positioned relative to the location on the map, as well as the offset of the information window with respect to the marker. The last two lines of code look messier than they truly areall they do is open an information window and display an XML element in it, while making sure that the element is coded using the styles.xsl stylesheet. The job of this stylesheet is to transform the XML description of a location on the map into HTML code that can be displayed in a browser.
I realize I hit you pretty fast with the Google Maps API and code that puts it to work. Not to worry because you see all of this code again in the context of a real custom Google Maps web page. For now, I just wanted to lay the groundwork and start getting you comfortable with the script code required to get a custom map up and running.
Obtaining the Geocoordinates of a Location
Although Google Maps is typically queried based upon the mailing address of a location, when you deal directly with the Google Maps API you are required to deal with more accurate location data. More specifically, you must specify the latitude and longitude of a location, also known as its geocoordinates, when specifying its position to the Google Maps API. Because you probably haven't committed to memory the latitude and longitude of your favorite hangouts, you'll likely need to use a tool to find out the coordinates of any address that you want to include on a map. Fortunately, exactly such a tool exists in the form of the geocoder.us web site, located at http://geocoder.us/.
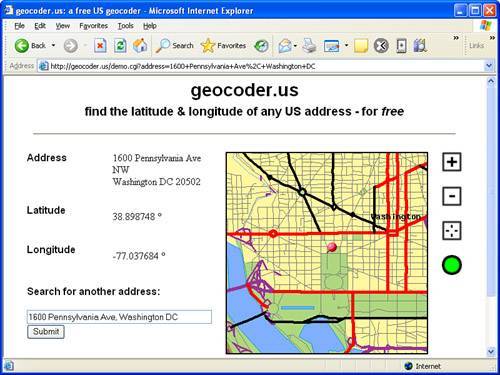
This web site allows you to enter an address much as you would enter it in Google Maps. Assuming the address is successfully found, geocoder displays the latitude and longitude of the address, which you can then use in Google Maps to specify the exact position of the location. Figure 15.4 shows the geocoder online tool displaying the latitude and longitude of a well-known address.
Figure 15.4. The geocoder.us web site is extremely handy for converting physical addresses to geocoordinates (latitude and longitude).
If you happen to have a GPS receiver, you can also determine the latitude and longitude of any location using the receiver. Of course, you'll have to physically travel to the location so that its latitude and longitude are registered on your GPS device.
The figure reveals the geocoordinates for the White House, which is located at 1600 Pennsylvania Avenue in Washington, DC. You can use the geocoder.us web site to look up any address that you want, keeping in mind that you can always cheat and use a nearby address if for some reason the address you're looking for isn't found. Later in this tutorial you'll use the latitude and longitude values displayed on the geocoder.us web site to fill in details regarding the locations of real estate projects in XML code.