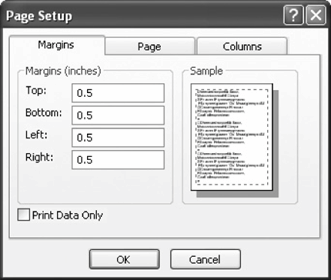
The Margins tab of the Page Setup dialog box

Margins on a page.

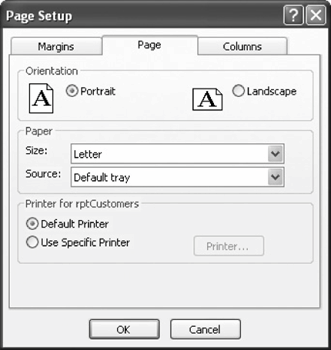
The Page tab of the Page Setup dialog box.

Comparison of portrait and landscape page orientations.

You're probably already aware that margins are the empty space between the text and the left, right, top, and bottom edges of a printed page. The default margins for a report are one inch at the top, bottom, left, and right. There are many reasons to change a report's margins: To make room for more data, to add some extra space if you're binding a document, or to leave a blank space to write in notes. If you don't already know how to adjust a page's margins, you will after this lesson.
This lesson also explains how to change the page orientation. Everything you print uses one of two different types of paper orientations: portrait and landscape. In Portrait orientation, the paper is taller than it is widelike a painting of a person's portrait. In Landscape orientation, the paper is wider than it is talllike a painting of a landscape.
-
Make sure that you have the rptCustomers report open in Design view.
Here's how to modify the page setup for a report:
-
Click File » Page Setup from the menu and click the Margins tab if it is not already selected.
The default margins are one inch at the top, bottom, left, and right.
The Margins tab of the Page Setup dialog box appears, as shown in figure. Here you can view and adjust the margin sizes for the current worksheet. Notice that there are margin settings in the Top, Bottom, Left, and Right boxes.
-
Click the Top Margin box and type
.5.This will change the size of the top margin from 1.0" to 0.5".
-
Repeat Step 2 and change the Bottom, Left, and Right margins to
0.5inches.Do you think you have a handle on changing a report's margins? Good, because without further ado, we'll move on to page orientation.
-
Click the Page tab.
The Page tab appears, as shown in Figure.
-
In the Orientation area, click the Landscape option.
This will change the worksheet's orientation to Landscape when it is printed.
-
Click OK.
The Page Setup dialog box closes, and the report's margins and page orientation settings are changed.
When you change a report's margins, you will usually want to resize the report itselfhere's how:
-
If necessary, scroll to the right edge of the report. Click and drag the right edge of the report to the right to the 7.5 inch mark on the ruler.
Let's see how the newly formatted report looks.
-
Click the View button on the toolbar.
The report is previewed on the screenand it's easy to see the new landscape orientation. You can reduce or enlarge the display by clicking the area of the report you want to magnify with the
 pointer.
 -
Move the
 pointer over an area of the report and click the mouse button. Click the mouse button again when you have finished looking at the enlarged area.
Once again, Access displays the entire report. Now let's close Print Preview.
-
Click Close and click the Save button to save your changes.
TO ADJUST MARGINS:
-
SELECT FILE » PAGE SETUP FROM THE MENU AND CLICK THE MARGINS TAB.
-
ADJUST THE APPROPRIATE MARGINS.
TO CHANGE A PAGE'S ORIENTATION:
-
SELECT FILE » PAGE SETUP FROM THE MENU, AND CLICK THE PAGE TAB.
-
IN THE ORIENTATION SECTION, SELECT EITHER THE PORTRAIT OR LANDSCAPE OPTION.