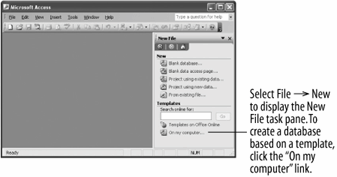
The New File task pane appears each time you start Access.

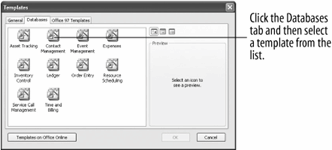
The Databases tab of the Templates dialog box

If you're just getting started with Microsoft Access, the easiest way to create a database is by using one of the built-in database templates. A database template saves you time and effort, providing you with ready-to-use tables, forms, queries, and reports. There are templates available for the most common types of databases, such as contact management, inventory, and order taking. You can also modify a database created by the to better suit your needs.
This lesson explains how to use the Database Wizard to create a database by using a database template.
-
Start Microsoft Access and select File » New from the menu.
The Microsoft Access program appears with the New File task pane displayed, as shown in figure . The New File task pane gives you quick access to any database you have worked on recently and allows you to create a new database.
-
Click the On my computer link in the task pane, and then click the Databases tab.
Another way to use the Database Wizard is to click the
 New button on the toolbar, click General Templates, and click the Databases tab. Or you can select File » New from the menu, click General Templates, and click the Databases tab.
The Templates dialog box appears with the Databases tab in front, as shown in figure. Here you need to select the type of database you want to create. For this exercise we'll create a Contact Management database.
-
Double-click the Contact Management icon.
Access prompts you to type in a file name for your new database.
-
TypeMy Contacts and click Create.
The first screen of the Database Wizard appears and describes the database it will create for you.
-
Click Next to continue.
The next screen of the Database Wizard appears. This dialog box displays the standard tables and fields that the Database Wizard is building for you. Click a table on the left side of the dialog box to view its fields on the right side. If you want, you can remove the fields from the database by unchecking them. For this exercise we will leave the standard fields as they are.
-
Click Next to accept the Database Wizard's standard tables and fields.
Now you have to decide what your new database should look like. Access provides you with several aesthetic styles to choose from. Click a style to see a sample of what it looks like.
-
Browse the various styles by clicking each of them, then select the style you like best and click Next.
Another screen appears with more aesthetic decisions to make. Here you need to select the font you want to use in your reports. You can preview each of the font styles by clicking them.
-
Select the font style that you like best and click Next.
You're just about done. The next step in the asks you to enter a title for your new database. This title will appear on the heading of all the reports in your database. You can even add a graphic or logo to your reports by checking the "Yes, I'd like to include a picture" box, clicking the Picture button, and selecting the picture or graphic file.
-
Type
ACME Client Listand click Next.That's ityou've finished giving the Database Wizard all the information it needs to create the database.
-
Click Finish to create the new database.
Access chugs along and creates the new database for you. When it's finished, the Main Switchboard dialog box will appear. The switchboard comes in very handy, making it easy to access the database's tables, forms, and reports.
-
Explore the tables, forms, and reports in the new database by clicking the various buttons on the switchboard form.
Move on to the next step when you have seen enough of the new database.
-
Close the new database by clicking Exit this database in the Main Switchboard dialog box.
That's it! You've created your first database using the Database Wizard. The database created by the Database Wizard may not be exactly what you're looking for, but you can always modify its tables, queries, forms, reports, and pages to better suit your needs. A lot of people create databases using the Database Wizard to serve as the foundation for a more customized database.
TO CREATE A DATABASE USING THE DATABASE WIZARD:
-
CLICK THE NEW BUTTON ON THE TOOLBAR.
OR...
SELECT FILE » NEW FROM THE MENU.
-
CLICK THE ON MY COMPUTER LINK IN THE TASK PANE.
-
CLICK THE DATABASES TAB IN THE TEMPLATES DIALOG BOX.
-
DOUBLE-CLICK THE TYPE OF DATABASE YOU WANT TO CREATE.
-
FOLLOW THE ONSCREEN INSTRUCTIONS AND SPECIFY WHAT YOU WHAT TO APPEAR IN YOUR DATABASE.