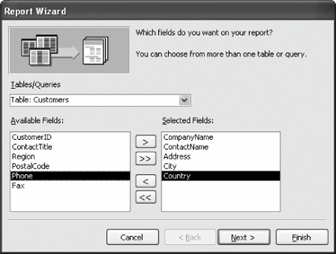
Step One: Select the fields you want to appear in your report.

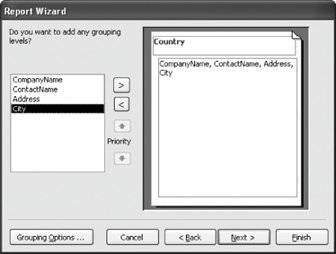
Step Two: Select how you want your fields to be grouped.

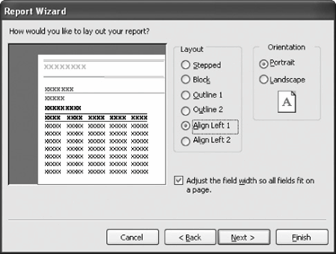
Step Three: Select a layout for your report.

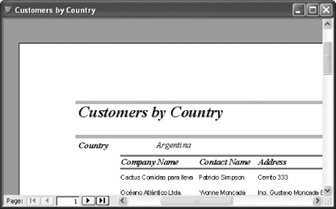
The new report.

Even more so than the Form Wizard, the fastest and easiest way to create a report is with the . It's almost always easier to create and modify a report created by the Report Wizard than it is to create one from scratch.
-
Click the Reports icon in the Objects bar and double-click Create report by using wizard.
The Report Wizard appears, as shown in figure. Anytime you create a report you have to tell Access which table or query you want to use for your report.
-
Click the Tables/Queries list arrow and select Table: Customers.
Now that you have specified the table, you need to tell the Wizard which fields you want to display on the report. To add a field, double-click the field or select the field and click the
 button. Click the
  button to add all the fields to your report.
 -
Double-click the CompanyName field in the "Available Fields" list.
The CompanyName field appears in the "Selected Fields" list. If you accidentally add a field to the "Selected Fields" list, you can remove it by double-clicking it or by selecting it and clicking the
 button.
 -
Add the following fields to your table by double-clicking them: ContactName, Address, City, and Country.
Compare your Report Wizard dialog box to the one in figure when you're finished.
-
Click Next.
The asks you if and how you want to group the data in your report, as shown in figure. For example, you can group all the customers from the same country together in your report. Grouping can help organize and summarize the information in your report. To use a specific field to group data, double-click the field you want to use. For this exercise, we'll group our report data using the Country field.
-
Double-click the Country field in the list.
The Country field appears on top of the sample report to show how Access will group the data in the report. If you change your mind, simply double-click the grouping field at the top of the sample report to remove it.
-
Click Next.
Next the Report Wizard asks if you want to sort the records in your report. Simply select the field you want to use to sort the records. You can click the button to the right of each list to toggle between ascending and descending sort orders.
-
Select CompanyName from the list and click Next.
Now the Report Wizard asks how you want to display the data on the report. Click a layout option to see it previewed onscreen. You can also specify the page orientation here.
If you're trying to get a lot of fields onto your report, consider using Landscape orientation. Landscape orientation lays the page along its longest side.
-
Select the Align Left 1 option, as shown in figure, and click Next.
Now the Report Wizard offers several interesting styles that you can use in your report. Click a style to preview it onscreen.
-
Select Corporate style and then click Next.
You need to give your new report a name.
-
Type
Customers by Countryin the text box and click Finish.After a few moments, your new report appears on the screen, as shown in figure. You don't have to worry about saving your new reportthe Report Wizard does this for you automatically as part of the report creation process.
-
Close the report.
TO CREATE A REPORT USING THE REPORT WIZARD:
-
IN THE DATABASE WINDOW, CLICK THE REPORTS ICON IN THE OBJECTS BAR AND THEN DOUBLE-CLICK CREATE REPORTS BY USING WIZARD.
-
SELECT THE TABLE OR QUERY YOU WANT TO USE TO CREATE YOUR REPORT AND SELECT THE FIELDS THAT YOU WANT TO APPEAR ON THE REPORT. CLICK NEXT WHEN YOU'RE FINISHED.
-
SELECT A FIELD BY WHICH TO GROUP THE REPORT AND CLICK NEXT (OPTIONAL).
-
SPECIFY THE FIELD(S) YOU WANT TO USE TO SORT THE REPORT AND CLICK NEXT (OPTIONAL).
-
SELECT A FORMAT FOR THE REPORT AND CLICK NEXT.
-
GIVE YOUR REPORT A NAME AND CLICK FINISH.