The Table Wizard

If you're new to Access, the easiest way to add a table to an existing database is with the Table Wizard. The Table Wizard asks you a series of questions about which fields you want to appear in your table, and then it does all the dirty work of creating a new table for you. The Table Wizard can create a variety of different tables to store mailing lists, inventory, catalogs, and more.
-
Make sure that you have a blank database open.
If you don't have a blank database open, you can create one by clicking the New button on the toolbar, double-clicking Blank Database, entering a name for your database, and clicking Create.
-
Click the Tables icon in the Objects bar if it is not already selected.
Access lists all the tables in the current database.
-
Double-click Create table by using wizard.
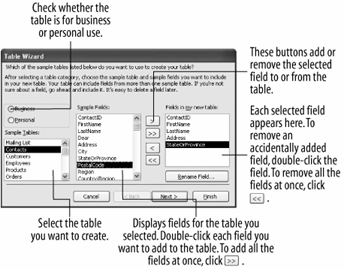
The Table Wizard dialog box appears, as shown in figure. This is definitely one of the more confusing dialog boxes in Access. The list in the far left of the dialog box contains the sample tables from which you can choose. See table for useful sample tables and their descriptions.
Start the Table Wizard by selecting the sample table you want to use.
-
Click Contacts from the Sample Tables list.
The Table Wizard displays the ready-made fields that you can incorporate into your table in the Sample Fields list. To add a field to your table, double-click the field or select the field and click the
 button. Click the
  button to add all the sample fields to your table.
 -
Double-click ContactID in the Sample Fields list.
The ContactID field appears in the "Fields in my new table" list. If you accidentally add a field to the "Fields in my new table" list, you can remove it by double-clicking it or by selecting it and clicking the
 button.
 -
Add the following fields to your table by double-clicking them: FirstName, LastName, Address, City, StateOrProvince, and PostalCode.
You can easily change the field names in your new table if you don't like the default names given to them by the Table Wizard. Here's how to rename a field:
-
Select StateOrProvince from the "Fields in my new table" list and click Rename Field.
The appears. From here, a field is pretty much self-explanatory.
-
Replace the StateOrProvince text with State and click OK.
Once you have finished adding the fields to your table, you can move on to the next step in the Table Wizard.
-
Click Next.
The Table Wizard asks you to give your table a name and asks if you want to have Access set a primary key for you. You will learn more about primary keys later on, so for now let's accept the Table Wizard's default settings and create the table.
If other tables exist in your database, another screen will appear, asking you how this table relates to the other tables in your database.
-
Click Finish to create the new table.
The builds the table using the fields you selected, then opens the new table ready for your data input.
-
Close the Contacts table.
Useful Sample Tables from the Table Wizard
| Sample Table | Description |
|---|---|
|
Employees |
Tracks such employee data as addresses and phone numbers. |
|
Orders |
Tracks customer orders. |
|
Contacts |
Stores details about your customers and prospects. |
|
Customers |
Stores all your customer or client information. |
|
Products |
Maintains a list of products that your company sells. |
|
Order Details |
Tracks what was purchased in each orderused with the Orders table. |
|
Time Billed |
Tracks how much time to bill a client. |
|
Expenses |
Tracks expensesuseful for reimbursements or for billing customers. |
|
Tasks |
Tracks to-do items. |
TO CREATE A NEW TABLE USING THE TABLE WIZARD:
-
IN THE DATABASE WINDOW, CLICK THE TABLES ICON IN THE OBJECTS BAR AND THEN DOUBLE-CLICK CREATE TABLE BY USING WIZARD.
-
SELECT THE TYPE OF TABLE YOU WANT TO CREATE.
-
FOLLOW THE ONSCREEN INSTRUCTIONS AND SPECIFY WHAT YOU WANT TO APPEAR IN YOUR DATABASE.