The Problem:
If you open a document, you'll more than likely want to close it sometime, but there's no Close button on the Standard toolbar.
The Solution:
You can put a Close button on the Standard toolbar easily enough, and you can put a Close All button on it as well:
-
Choose Tools » Customize. In the Customize dialog box, click the Commands tab if it's not already displayed.
-
Make sure that Normal.dot is selected in the "Save in" drop-down list.
-
With the File item selected in the Categories listbox, scroll down to the Close item in the Commands list. Drag it to the Standard toolbar and drop it there (see figure 1-10).
-
If you choose, drag the Close All item to the Standard toolbar as well. If you do, you'll find that its icon is identical to that of the Close button, which can be confusing. To change one of the buttons, click it on the Standard toolbar and click the Modify Selection button in the Customize dialog box. Then take one of the following actions.
Figure 1-10. Use the Customize dialog box to add a Close buttonand, if you like, a Close All buttonto the Standard toolbar to make closing your documents easier.

-
Click the Text Only (Always) item to display only text for the button instead of the icon.
-
Click the Image and Text item to display both the icon and the text. This produces the most intelligible button, but it occupies more space than you may want to give it.
-
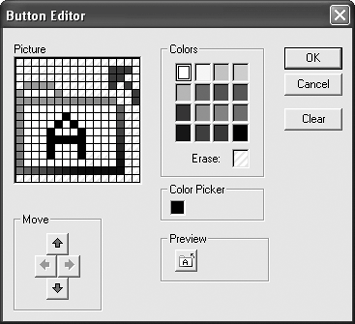
Click the Edit Button Image item and use the Button Editor (see Figure 1-11) to change the image. You can edit one pixel at a time, or wipe the slate so that you can start from scratch.
-
Click the Change Button Image item and choose one of the ready-made buttons on the panel.
-
-
Click the Close button to close the Customize dialog box.
-
Shift-click the File menu, and then click Save All to save the changes to Normal.dot.
If you don't want to add a Close button to the Standard toolbar (or another toolbar), you can close a document by clicking the close button (the X button) in the upper-right corner of its window.
Figure 1-11. Use the Button Editor to change the icon on a button, either subtly or completely.
