- Will the drive physically fit inside the computer? Some desktop cases have only enough space for one hard disk drive, or the available space might be occupied by another device (a CD-ROM drive or floppy disk drive). If there is not enough space, you will have to consider alternatives such as external SCSI (Small Computer System Interface) drives, USB drives, and parallel port interface drives.
- Will the computer's BIOS and operating system support the size (storage capacity) of the drive?
- Will the drive controller support the new drive? A second or updated controller might be required.
- Are there sufficient cables (data and power) to install the drive?
Procedure for Installing an IDE Drive
Installing an IDE (Integrated Drive Electronics) drive will require some hardware and software preparation to get it running properly. Hardware preparation includes ensuring that you have the correct drive, a place to physically install it, and the proper cables to connect it. Software preparation includes at least a bootable MS-DOS disk containing a minimum of FORMAT and FDISK. A Windows 95 or 98 startup disk will do the job. If you don't already have such a disk, be sure to create one before removing the old drive. Follow these steps to install the drive:
- Collect all the necessary documentation for the drive and the computer.
- Turn off the computer and unplug the power cord.
- Follow the appropriate ESD safety procedures.
- Open the case of the computer.
- Set the jumper for the drive. Consult the documentation that came with the drive. It must be set to single use or master or slave. If this is a second drive, both drives might require jumper settings.
- Connect the cable to the drives. The end connector should be plugged into the master drive. Be sure the cable orientation is correct (pin 1 goes to the red wire).
- Connect the power cable. (See Figure 14.9.)
-
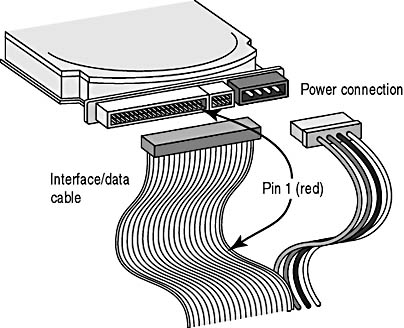
Figure 14.9 Cable Connections
- Install the drive in its bay.
- Reconnect the power, boot up the computer, and run the CMOS setup utility. The CMOS must be set to recognize the new drive. See the manufacturer's documentation for proper configuration. Don't forget that drives larger than 528 MB (approximately) will require logical block addressing (LBA).
NOTE
It might be advisable to set up and test a drive before final installation in the bay. Be careful to avoid ESD or placing the drive in a position that will cause excessive heat build-up. Large capacity drives, especially SCSI and older ESDI (Enhanced Small Device Interface) drives, can generate a lot of heat. It might be necessary to position a small fan to send a current of air over the drive's logic board when running a hard disk drive out of a computer or drive case.
Some larger drives installed in older machines might require the use of disk-management software. This software is usually provided with the drive (in some cases, it's already loaded in the drive). Follow the instructions provided by the manufacturer to extract and use this software. It's especially important to document the use of such software, and to make sure it is included on any boot/rescue floppy you prepare for such a system.
To complete the installation:
- Boot the computer from the bootable floppy disk and run FDISK to set the partition (or partitions).
- Format the drive. If it is the only drive or the bootable drive, it must be formatted with the system files.
- Replace the cover of the computer.
The drive is now ready for software to be installed.