Controller Cards
The most difficult part of installing a CD-ROM drive is determining which controller card is best for the system. The controller card should be selected before buying the CD-ROM drive because it must be compatible with both the CD-ROM drive and the motherboard's expansion slot. There are several ways to ensure this:
Use the secondary IDE controller on the motherboard.
Install a new controller card (this might be supplied with the CD-ROM drive).
Install the CD-ROM drive in an existing SCSI chain.
Install a new SCSI host adapter and create a new SCSI chain.
Use an existing sound card with a CD-ROM connection.
A quick review of how the computer is currently equipped will guide you in the selection of the proper card. In most cases, there will be a SCSI or IDE interface available. Whatever card arrangement you choose, be sure to disable any other possibly conflicting cards. Confirming the extent of the computer's resources before purchasing a new CD-ROM drive could save you the time and frustration of having to return or exchange it.
Installing the Drive Internally
A CD-ROM drive can be mounted easily in any computer that has an open bay for a 5.25-inch disk drive. Physical installation is as simple as installing a floppy disk drive. Most new CD-ROM drives come with a hardware kit, which includes a combination of screws and brackets.
Make sure you have all the tools and parts before beginning. These include:
The CD-ROM drive.
The correct cables.
The appropriate hardware (including special mounting rails for the PC's case).
A flat-head screwdriver.
A Phillips screwdriver.
Needle-nose pliers or tweezers (for jumper settings).
Connecting the cables for a CD-ROM drive is as simple as installing a floppy disk drive. There are two cables-a flat ribbon cable (for data) and a power cable. Be sure to connect the flat ribbon cable to the correct location on both the controller and the CD-ROM drive (the red wire going to pin 1). If there are no available power cables, use a Y power splitter cable (this will split a single Molex connector into two connectors; these are discussed earlier in Tutorial 5, Lesson 1: Power Supplies). There might also be an audio out cable (two to four wires) that connects to a sound card (see Figure 9.1). This connection will allow you to take full advantage of the audio capabilities of the CD-ROM drive.
If you are adding an IDE-style CD-ROM drive, be sure to set the master/slave jumper as required (see Tutorial 8, Lesson 2: Hard Disk Drives). For SCSI drives, you must set the proper SCSI ID using either a jumper or switch and make sure the chain is properly terminated.
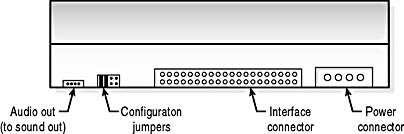
Figure 9.1 Cable connections to a typical CD-ROM drive
Software Setup
The file structure for a CD-ROM drive is different from the directory used by the MS-DOS FAT (file allocation table). Therefore, a special driver is necessary for MS-DOS to be able to recognize this device as a drive. A standard device driver supplied by the manufacturer (for BIOS) might also be required.
Windows 3.x
Microsoft's MSCDEX.EXE, an MS-DOS resident application, provides the required translation and also specifies the device driver required by the device. The following changes in CONFIG.SYS and AUTOEXEC.BAT will do the job.
Changes to CONFIG.SYS
To load the device driver, type the following line and include the directory and driver for the CD to be installed. (The exact name and location of the your driver file might be different from what is shown in this example.)
device=C:\CDROM\MTMCDAI.SYS /D:MSCD001
To ensure drive number assignment space, type the following line. (Note that the last drive letter assignment and, therefore, the number of drives, can be limited by assigning a lower value letter).
lastdrive=z
Add the following line to AUTOEXEC.BAT:
c:\dos\mscdex.exe /d:mscd001 /l:e /m:10
This instruction provides the location of the driver and any switches required to set up the driver. You might have to consult the documentation for the CD-ROM drive to determine which, if any, switches are required.
Many CD-ROM drive installation disks will make these changes automatically. (Additional information for configuring CONFIG.SYS and AUTOEXEC.BAT is found in Tutorial 15, "Software: MS-DOS and Windows 3.x.")
Windows 95 and 98
Windows 95 and 98 use a 32-bit protected-mode driver called VCDFSD.VXD. This driver replaced MSCDEX.EXE, the MS-DOS real-mode driver. When adding a new CD-ROM drive after Windows 95 has been installed, be sure to use the Add New Hardware wizard. This wizard will properly identify and set up the CD-ROM drive. With the Windows 95 and 98 Plug and Play feature, installing a new CD-ROM drive is simple-the operating system will recognize the drive and run the install wizard automatically.
If you intend to use a CD-ROM drive in the MS-DOS mode (from a bootable disk), the real-mode drivers will have to be installed and added to the CONFIG.SYS and AUTOEXEC.BAT files of the boot disk.
You can use a Windows 98 startup disk to obtain the files required to recognize a CD-ROM drive. Be sure that the PC has the proper software licenses to use those files.