Start with the Host Adapter
SCSI cards come in a wide variety of sizes, shapes, and configurations. Some offer one connection, others have four. Options include secondary or even tertiary channels-RAID, cache RAM, and so forth. Be sure that the card will be able to service the devices planned for it. Set any jumpers first, then install the SCSI adapter card in the appropriate expansion slot.
Set the SCSI IDs, Termination, and Peripheral Cabling
Write down the ID for each device-including the host adapter-as it is assigned. After the IDs are set, verify termination for each end of the chain. Finally, attach the cables-first to the host adapter, then to the closest internal device-and move outward on the chain. Repeat the process for the external devices.
External devices usually use some form of switch to set the ID. Most allow setting IDs from 0 through 7 only. You might need to adjust that with internal devices that often allow a wider range of ID numbers. Cable types include: 50-pin Centronics type, SCSI-2 D-Shell 50, and 68-p type connectors. Make sure the last device in the chain is properly terminated.
Internal SCSI devices are installed inside the computer and are connected to the host adapter through an interior connector on the host adapter. Check the connection diagram to be sure the fitting is the right one for that type of device. The options are a 50-pin ribbon cable (similar to a 40-pin IDE cable) and two similar 68-pin cables. Be sure to use the right type of 68-pin cable: one is for ultra-low voltage differential (LVD), and the other is for single-ended (SE) drives. They are NOT interchangeable.
IMPORTANT
SCSI devices connected incorrectly (for instance, with the cable plugged backwards) can be damaged! Be sure the red or blue strip on the cable is facing toward pin 1. Some SCSI devices allow only a proper connection.
Power Up One Device at a Time
A good practice is to connect the power to one device, power up, and check for problems. Then power additional devices one at a time and make sure everything is working and without conflict.
Load Operating System Drivers and SCSI Software
Finally, load any software required to allow the operating system to recognize the new hardware and take full advantage of its features.
Using a cable with enough connectors enables you to easily link multiple internal devices. You can have up to eight (numbered 0 through 7) devices, or 16 (numbered 0 through 15, depending on the host adapter and the devices) on a single SCSI chain. Don't forget that one position in each SCSI chain is taken up by the host adapter. Figure 9.3 shows a SCSI chain.
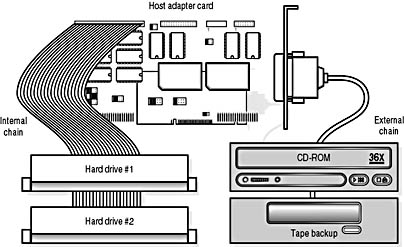
Figure 9.3 SCSI Chain
The exact number of devices will vary depending on a number of conditions. The host adapter must support the number selected, the installer must be able to set proper IDs, and the cables and connectors must be compatible. Older adapters allow only seven total IDs, and the card will use one, leaving you with six devices. Some SCSI devices have limited ID options. Many older products have only seven possible settings; some scanners or optical products are factory-set to an ID. Given the range of cable options and performance considerations, you might have to limit the number of devices on a single chain to get maximum performance.
Setting SCSI IDs
A simple SCSI chain works like a network, and-like a network-each device requires its own unique address. But unlike a network, setting an address on a SCSI chain is simple. A SCSI device can have any ID number in a range recognized by the host adapter, as long as no other device on the same chain has been set to the same number.
In SCSI numbering conventions:
The host adapter is typically set to SCSI ID 7. (This is a de facto standard, not a requirement.)
There is no mandated order for the use of SCSI IDs, but the SCAM feature will use a preestablished pattern of IDs if one is available.
The ID of a bootable hard disk drive may be preset by the host adapter manufacturer. Most manufacturers use SCSI ID 0, although a few are configured to SCSI ID 6.
Setting a SCSI ID for a device is accomplished using jumpers or switches located on, or inside, the SCSI device. Typically, all internal SCSI hard disk drives use jumpers to set their IDs. External devices usually (but not always) have switches. Some SCSI devices have automatic ID and termination, using SCAM.
CAUTION
Some external devices will offer a limited number of choices. This lack of choices could cause some problems when the chain is full. You might then have to adjust other drive IDs in order to find a unique ID for the new drive.
If you plan to utilize a SCSI drive as your C drive (this is required if you want to boot into MS-DOS from this drive), it must be configured as a bootable drive. This is done by either specifying the host adapter as the "bootable" SCSI ID or setting the host adapter to emulate a standard AT-style controller.