Real Mode vs. Protected Mode
The 286 might have made older hardware outdated, but Intel had no desire to invoke industry ire and slow the adoption of the new chip by requiring all-new software applications. The result was a CPU with two operating modes: real and protected.
In real mode, sometimes called compatibility mode, a 286 emulates the 8086 processor and addresses only the first 1 MB of memory. This mode is used to run older software. Protected mode allows access to all memory on the system, physical and virtual. In protected mode, a program can write only to the memory allocated to it, with specific memory blocks allocated to different programs. This mode can go well beyond the 16 MB of "true" memory, opening up the possibility of multitasking-running more than one program at a time.
This development required new, more powerful operating systems and applications, but they were slow in coming. By the time they arrived on the market, the 286 was functionally obsolete, but it paved the way for today's powerful multitasking environments such as Windows 95 and 98, Windows NT and 2000. Another major drawback to the 286's memory management scheme was its need to reboot the system when changing between real and protected modes.
The original 286 processor came packaged in DIP (already shown), PGA (pin grid array), and PLCC (plastic leadless chip carrier) designs. The PLCC can be recognized by the arrangement of thin legs around its perimeter. The PLCC's major advantage is its stronger leads (pins), which make it more difficult to damage during removal or installation. PLCCs became popular because they made it easier to upgrade a PC with a faster CPU.
PGA and PLCC models look very much alike, but CPUs designed for some types can't be socketed in the other type. Verify the type you need before ordering or attempting a replacement or upgrade (see Figure 4.9).
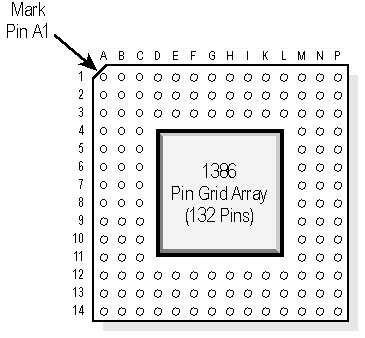
Figure 4.9 Plastic Leadless Chip Carrier (PLCC) CPU Package
The 80386 Arrives
On June 16, 1985, Intel introduced the original 80386 (commonly known as the 386). This true 32-bit processor was equipped with a 32-bit external data bus, 32-bit registers, and a 32-bit address bus. The first models shipped with a clock speed of 16 MHz, and the CPU sported 275,000 transistors. It could directly address 4 GB of RAM, and 64 TB (terabytes-a terabyte is approximately one trillion bytes) of virtual memory. According to Intel, the 386 could hold an eight-page history of every person on earth in that address space. The 386 was a true generational leap in PC computing, with true multitasking capability-it really could run more than one program at a time. That was due to a third memory mode, called virtual real mode, that allowed independent MS-DOS sessions (called "virtual machines") to coexist on the same system at once. It spawned a host of programs called "memory managers" designed to optimize (and troubleshoot) the more complex world of virtual memory.
The original 80386 chips shipped with speeds of 12 or 16 MHz. Intel produced faster versions-25 and 33 MHz, while AMD manufactured a 40-MHz variant. The 386 provided both the real and protected mode available in the 286.
By April of 1989, the 386 was running at clock speeds of 33 MHz, and Intel was calling it the 80386DX to distinguish it from a lower-cost model, the 386SX.
The 386SX: A Scaled-Down Version
The 386SX came on the scene in June, 1988. Intel wanted to increase the sales of 386-based machines without dramatically dropping the price of its flagship CPU. The result was the introduction of a scaled-down model for "entry-level" computers. It had a 16-bit external data bus and a 24-bit address bus (it could address only 16 MB of memory). The 16-bit configuration allowed it to be used as an upgrade chip for existing 16-bit motherboards, thereby providing an easy transition to the next generation of computers.
The following table compares members of the 80386 chip family from Intel and rival AMD. The AMD 80386DXLV is notable as the first PC CPU with an internal cache.
| Chip | Number of Transistors | CPU Speed (MHz) | Register Width | External Data Bus | Address Bus | Internal Cache |
|---|---|---|---|---|---|---|
| Intel 80386SX | 275,000 | 16-25 | 32-bit | 16-bit | 24-bit | None |
| Intel 80386DX | 275,000 | 16-33 | 32-bit | 32-bit | 32-bit | None |
| AMD 80386DX | 275,000 | 20-40 | 32-bit | 32-bit | 32-bit | None |
| AMD 80386DXL | 275,000 | 20-33 | 32-bit | 32-bit | 32-bit | None |
| AMD 80386DXLV | 275,000 | 20-33 | 32-bit | 32-bit | 32-bit | 8 KB |
NOTE
The terms "SX" and "DX" are not acronyms; they do not stand for longer terms.
386 Packaging
The 386 was usually placed in either a PLCC package or a PGA package. This type of mount can be found with the 80386, 486, and some older Pentiums up to 166-MHz models. The pins are evenly distributed in concentric rows along the bottom of the chip (see Figure 4.10).
Figure 4.10 PGA (Pin Grid Array)
PGA chips go into regular PGA or the popular ZIF (zero insertion force) sockets. Care must be used when inserting or removing CPUs from a PGA mount-it is very easy to bend the pins if you do not pull perfectly straight up from the socket or have a slight uneven push downward. ZIF mounts are a bit better, but much tech time has been wasted straightening pins, and it is possible to ruin a CPU! PGA mounts are often "hidden" under a CPU fan, which presents another hurdle during repair or upgrade.
A variation of the PGA is the SPGA (staggered pin grid array). It looks almost the same, but with (surprise!) staggered rows of pins. This allows engineers to place more connectors in a smaller area. It also adds emphasis to the caution given earlier about not bending pins through careless removal or insertion.
Both the PGA and SPGA have three pointed corners and a "snipped corner" on one side. Use that corner to line the chip with the socket. If it does not go in smoothly-double check!