Now that we have figured out how to isolate the parts of our composition, let's look at the process of putting those images together. Once I have my recipient file prepared, I call up all the other images I'll use in my composition. Assuming we'll be using the selection techniques we discussed earlier to isolate the pieces, we now need only to make those selections and copy and paste or drag the elements over to the new image. You have a couple of options to bring an image in to the new composition: you can Select All, and then copy and paste it into the new composition, or you can drag and drop the image layer over to the new composition. Either way will get the job done.
Making a Simple Composition
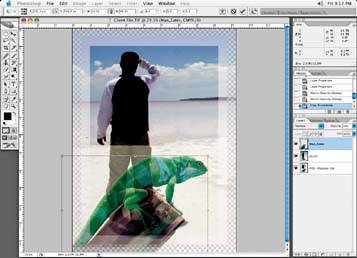
I will start with the image of my guy on the beach and my lizard, shown in Figure 6-29.
Figure 6-29. All the pieces ready to place in a composition

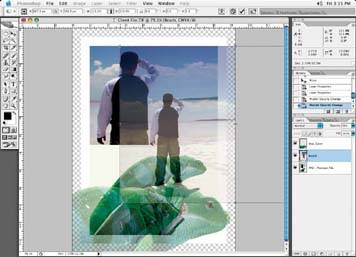
Once I have all the pieces, I change the image element's opacity to 50% so I can see the FPO through my image for correct positioning. This a much better way of positioning a file than using guidelines. I have seen images rotated slightly and distorted; guides would not work effectively in a case like this. Notice how, since I am able to see both pieces of my composition at once, I can put the lizard right where I want to, as shown in Figure 6-30.
I usually resize the image elements that make up my composition as I go along, using the Transform tool (Edit » Transform » Scale to resize Figure 6-31.
Figure 6-30. Set the layer opacity to 50% so you can position the images easily
Sometimes clients can be notorious for distorting images without telling anyone. If you find that you are having trouble fitting the image to the client's position file, the client may have distorted the images somewhat. Hey, it happens!
Figure 6-31. Using the Transform » Scale tool with the image opacity set to 50%
When adjusting the size of the picture element with one of the corner adjustment handles, be sure to hold down your Shift key while scaling to keep the picture element aspect ratio the same; if you don't, you could distort the image. On occasion, if you can't seem to fit your picture element to a client position file, the client may have distorted the image. It is typical for them not to say anythingI guess it's assumed you'll figure it out!
Once the correct positioning is achieved, I change the elements opacity back to 100%, assuming that 100% is what it is supposed to be!
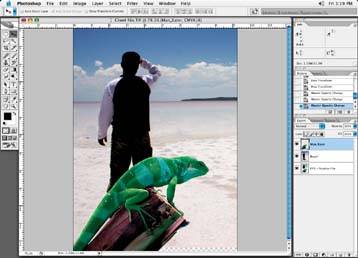
Figure 6-32 shows the final image assembled to the client file. Save this as an EPS or TIF file; now it is ready for an application like Quark or InDesign.
Figure 6-32. The final composite
One note about edges: once you have an assembled composition with all the elements in place, turn off the FPO layer in the Layer palette and check all the element edges to make sure they don't look cut or carved out, and that their focus or edge softness matches the look of the rest of the image, as discussed earlier.
If you find that the edges of the images you have placed look too hard, here is a quick fix if the image has already been cropped and placed. Make a selection of the picture element in question by clicking on the layer while holding down the Command key. Go to Menu item Select » Modify » Contract. Type in a value of one pixel and accept this. Go to the Menu item Select » Feather, type in a softness value as determined by our discussion earlier, and accept this. Invert your selection so that the background is now selected (with Shift/Command+I). Now hit your Delete key and watch the edge soften up. You can continue to hit the Delete key, and it will continue to nibble away at the edge of you picture element until the desired softness or look is attained.
I continue this procedure for each element for the entire composition. I may have to turn layers on or off as I go to see my image placements clearly if any picture elements overlap each other and the view of an image where it may make it difficult to see.