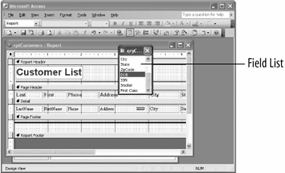
Add a field to a report by clicking and dragging it from the Field List onto the report.

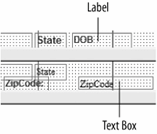
Adding a field or control to a report often produces unwanted results: Here the ZipCode field is the wrong size and creates an unneeded text label.

The steps in modifying a text label.

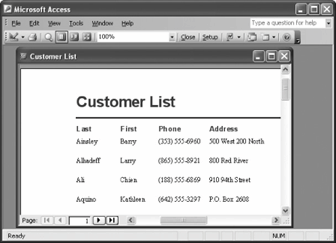
The modified report.

Once you have created a report, you can delete a field that you don't need or make a report more comprehensive by adding more fields to display additional information.
In this lesson you will modify an existing report by .
-
Make sure you have the rptCustomers report open in Design view. Maximize the report window.
First, click the control you want to delete.
-
Click the DOB text box (in the Detail section) to select it.
Handles appear around the control, indicating that the control is selected.
-
Press the Delete key to delete the DOB text box.
The DOB text box disappears from the report screen.
Unfortunately, adding fields to a report isn't quite as easy...
-
If the Field List isn't displayed, click the Field List button on the toolbar.
The Field List displays all the fields from the table or query you used to create the report though you will often have to scroll down the Field List to find the field that you want. Once the Field List is displayed, you can click and drag the field you want to add from the Field List onto the report, as shown in figure.
-
Scroll down the Field List until you find the ZipCode field. Click and drag the ZipCode field to the right of the State field, then release the mouse button.
The ZipCode field appears on the report with less than desirable results, as shown in figure. An annoyance with adding controls to a report is that you almost always have to do some clean-up work afterwards. For example, the ZipCode field has an unneeded text label and isn't positioned correctly. Don't worry about the positioning for nowyou'll learn how to move controls in the next lesson. We can fix some of the other problems, however, starting with getting rid of the unneeded text label.
-
Click the unneeded ZipCode text label (NOT the actual ZipCode text box!) and press Delete.
Before we're finished, we have to give the ZipCode field a more meaningful text heading. Here's how:
-
Click the DOB text label to select it.
-
Position the pointer over the DOB text label until it changes into a
 , and then click inside the text label.
Now you can edit the text label, as shown in figure.
-
Replace the text label text with
Zip Code.Let's see how the modified report looks.
-
Click the View button on the toolbar to display the report in Print Preview.
Compare your report with the one in figure.
-
Close Print Preview and click Yes to save your changes.
TO ADD A FIELD TO A REPORT:
-
DISPLAY THE REPORT IN DESIGN VIEW AND CLICK THE FIELD LIST BUTTON ON THE TOOLBAR, IF NECESSARY.
-
FIND THE FIELD YOU WANT TO ADD TO THE REPORT IN THE FIELD LIST, THEN CLICK AND DRAG THE FIELD TO THE DESIRED LOCATION ON THE REPORT.
TO DELETE A FIELD OR CONTROL:
-
CLICK THE FIELD OR CONTROL TO SELECT IT.
-
PRESS DELETE.