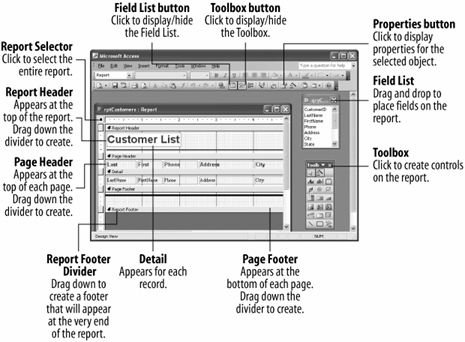
A report in Design view.

After you create a report (from scratch, using the Report Wizard, or using the AutoReport Wizard), you may decide to modify it to make it easier to read and understand. For example, you might want to add or delete a field, change a column heading, or change the locations of the fields in the report. You modify a report in Design view, which you can get to from:
-
The database window: Click the Reports icon in the Objects bar to list the reports in the database. Click on the report you want to modify and click the Design button.
-
Any report window: Click the View button on the toolbar or select View » Design View from the menu.
This lesson will introduce you to report Design view.
-
In the Database window, click the Reports icon in the Objects bar if it isn't already selected, then select the rptCustomers report and click the Design button.
The rptCustomers report appears in Design view, as shown in figure.
If you have already worked with forms in Design view, you should be in familiar territoryDesign view is remarkably similar for both forms and reports. Just as it is with forms, report Design view is similar to many Paint programs: Think of the report as your canvas and the Toolbox and Field List as the paintbrushes you use to add fields, headings, and lines to the report.
Any object that appears on a report is called a control. A text box used to display record information (usually fields from a table or query) or a column heading are both examples of controls. You add controls to a report by clicking the control you want to use and then dragging it onto the report. See Table for Toolbox .
Toolbox Buttons and Controls
| Toolbox Button | Description |
|---|---|
|
|
Click this button and then click the control you want to select. To select multiple controls, click this button and hold down the Shift key as you click each control, or drag a rectangle shape around all the controls you want to select. |
|
|
Click to use Control Wizards when you add controls to your report. |
|
|
Creates a text label that appears the same for every record, such as a heading. Most controls already include a text label. |
|
|
Creates a text box that displays information from tables and queries in a report. |
|
|
Creates a box around a group of option buttons so that the user is only allowed to make one selection from the group box. Normally used in forms, not reports. |
|
|
Creates a toggle button. Normally used in forms, not reports. |
|
|
Creates an option button (or radio button) that displays data from two or more options. Normally used in forms, not reports. |
|
|
Creates a box that is empty or contains a checkmark. Use to display data from a Yes/No field. |
|
|
Creates a combo box. Normally used in forms, not reports. |
|
|
Creates a list box. Normally used in forms, not reports. |
|
|
Creates a button that runs a macro or Visual Basic function. Normally used in forms, not reports. |
|
|
Displays a picture by using a graphic file that you specify. |
|
|
Inserts an OLE object that is not bound to a field in the current database. Use an Unbound Object Frame to display information from an external source or program, such as a spreadsheet, graphic, or other file. |
|
|
Inserts an OLE object that is bound to a field in the database. Use Bound Object Frames to display pictures or other OLE information in the database. |
|
|
Inserts a page break. |
|
|
Creates a tab control. Normally used in forms, not reports. |
|
|
Inserts another report within the main report. Use when you want to show data from a one-to-many relationship. |
|
|
Enables you to draw a line in the report. |
|
|
Enables you to draw a rectangle in the report. |
|
|
Click to display other toolboxes and OLE objects. |
TO MODIFY A REPORT:
-
IN THE DATABASE WINDOW, CLICK THE REPORTS ICON IN THE OBJECTS BAR.
-
CLICK THE REPORT YOU WANT TO MODIFY AND CLICK THE DESIGN BUTTON.
OR...
OPEN THE REPORT AND CLICK THE VIEW BUTTON ON THE TOOLBAR.