Choosing a new Office Assistant

Click the Help button to display help on what a dialog box control does.

If you find that 's (the cartoon paperclip) antics are getting old, you can choose a different Office Assistant at any time. People have different tastes and personalities, and that's why Microsoft allows you to select from eight different Office Assistants. Of course, if you really hate the Office Assistant, you can always completely shut it off too.
The other topic covered in this lesson is how to use the Help button. During your journey with Access you will undoubtedly come across a dialog box or two with a number of confusing controls and options. To help you find out what the various controls and options in a dialog box are there for, many dialog boxes contain a Help (![]() ) button that explains the purpose of each of the dialog box's controls. This lesson will show you how to use the Help button, but first, let's start taming the Office Assistant.
) button that explains the purpose of each of the dialog box's controls. This lesson will show you how to use the Help button, but first, let's start taming the Office Assistant.
The Office Assistant must be somewhere on your computer's screen in order to change it, so...
-
If necessary, select Help » Show the Office Assistant from the menu.
The Office Assistant appears.
-
Right-click the Office Assistant and select Choose Assistant from the shortcut menu.
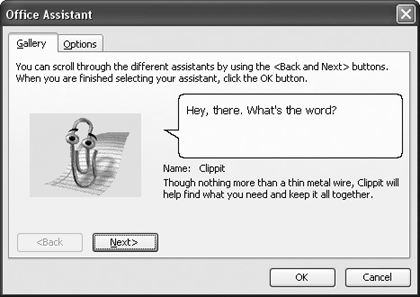
The Office Assistant dialog box appears, as shown in figure.
-
Click the Back or Next button to see the available Office Assistants.
The Office Assistant you select is completely up to you. They all work the samethey just look and act differently.
-
Click OK when you find an Office Assistant you like.
If you find the Office Assistant annoying (like a lot of people do) and want to get rid of it altogether, you can close it the same way you did at the end of the last lesson.
-
Right-click the Office Assistant.
A shortcut menu appears.
-
Select Hide from the shortcut menu.
You can always bring the Office Assistant back whenever you require its help by pressing the F1 key. Now let's move on to how to use the Help button to discover the purpose of confusing dialog box controls.
-
Select Tools » Options from the menu and click the View tab.
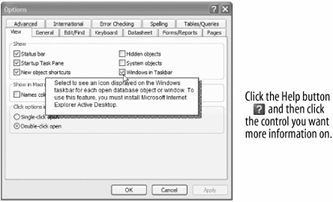
The Options dialog box appears, as shown in figure. Notice the Help button located in the dialog box's title bar just to the left of the dialog box's Close button.
-
Click the Help button (
 ).
).The mouse pointer changes to a
 , indicating you can point to anything on the dialog box to find out what it does. The Windows in Taskbar check box is rather confusing, isn't it? Move on to the next step and we'll find out what it's there for.
 -
Click the Windows in Taskbar check box with the
 pointer.
A brief description of the Windows in Taskbar check box appears.
-
Click the Close button to close the Options dialog box.
TO CHANGE OFFICE ASSISTANTS:
-
IF NECESSARY, SELECT HELP » SHOW THE OFFICE ASSISTANT FROM THE MENU.
-
RIGHT-CLICK THE OFFICE ASSISTANT AND SELECT CHOOSE ASSISTANT FROM THE MENU.
-
CLICK THE NEXT OR BACK BUTTONS UNTIL YOU FIND AN OFFICE ASSISTANT YOU LIKE, THEN CLICK OK.
TO HIDE THE OFFICE ASSISTANT:
-
RIGHT-CLICK THE OFFICE ASSISTANT AND SELECT HIDE FROM THE SHORTCUT MENU.
TO SEE WHAT A CONTROL IN A DIALOG BOX DOES:
-
CLICK THE DIALOG BOX'S HELP BUTTON (LOCATED RIGHT NEXT TO THE CLOSE BUTTON).
-
CLICK THE CONTROL YOU WANT MORE INFORMATION ON WITH THE QUESTION MARK POINTER.