Create a Custom List
By adding a custom list to Excel, you can type the first item in the list, drag it down using the fill handle, and watch the list fill automatically.
One of Excel’s most popular time-saving features is its ability to automatically increment not only numbers but certain text as well. Excel has a couple of built-in lists, such as days of the week and months of the year. Currently, when you use the fill handle, you type the first item, then use the fill handle to fill cells with the next item in the list, and so forth. You can easily create our own custom list for commonly used items.
To create a custom list, follow these steps:

- Select the
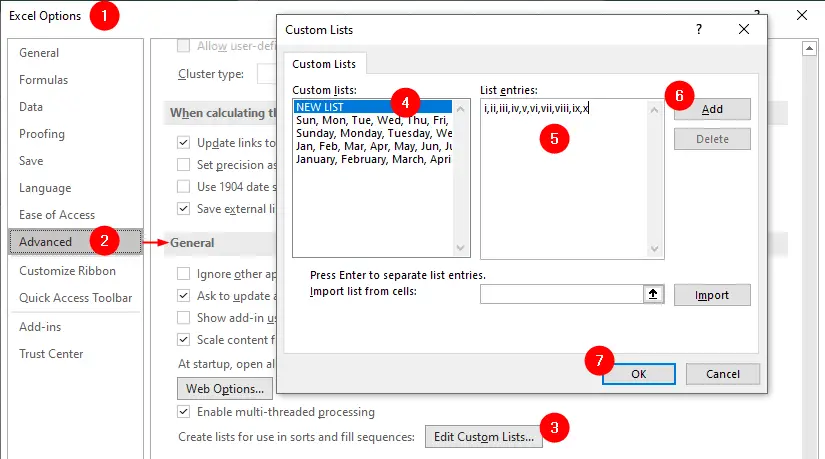
Filetab and click onOptions. - In the Excel Options dialog box, click on
Advancedin the left pane. - Scroll down to the
Generalsection and click onEdit Custom Lists. - In the
Custom Listsdialog box, selectNEW LISTin theCustom listsbox. - In the
List entriesdialog box, you can:- either enter the values for your list in the
List entriesbox, separated by commas or line breaks (we entered Roman numerals 1 to 10 in ascending order to use for sorting and filling). - or select a range of cells that contains the values for your list in the worksheet and click the
Importbutton.
- either enter the values for your list in the
- Click on
Addto add the list to theCustom listsbox. - Click on
OKto close the Custom Lists dialog box and then click on OK again to close the Excel Options dialog box.
We created a custom list that contains values of Roman numerals I, II, III, IV, V, VI, VII, VIII, IX, and X that represent 1, 2, 3, 4, 5, 6, 7, 8, 9 and 10 respectively. You can now use this custom list to sort and fill data in your worksheet.
Fill data using a custom list
By creating custom lists, you can quickly autofill data based on those lists, saving you time and effort. Instead of manually entering repetitive data, you can simply type the first value and drag the fill handle to populate the remaining values from the custom list.
To fill data using a custom list, enter the first value of your list in a cell and then drag the fill handle (the small square at the bottom right corner of the cell) across or down the cells that you want to fill. Excel will automatically fill the cells with the values from your custom list in order.
Sort data using a custom list

To sort data using a custom list:
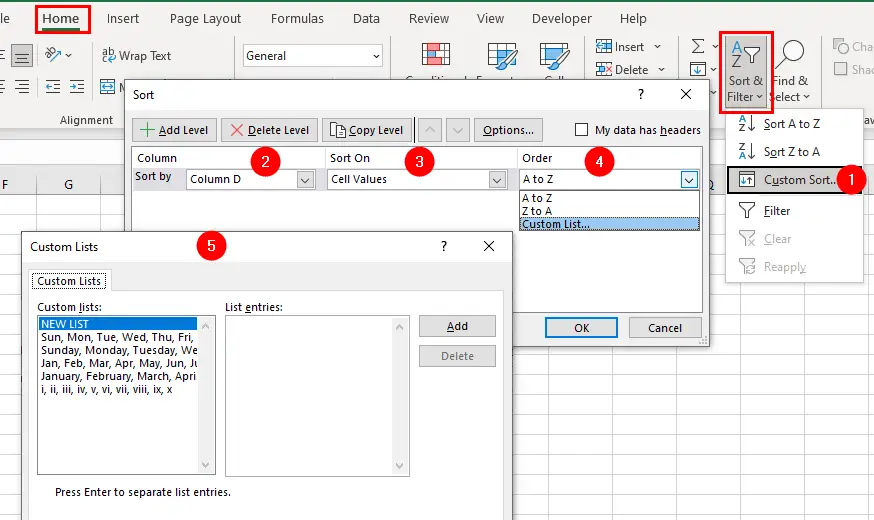
- Select the data range and click on
Sortin theDatatab. - In the
Sortdialog box, choose the column that you want to sort by - Choose
Cell ValuesfromSort Onmenu. - Select Custom List from the Order drop-down menu.
- Then select your custom list from the list of options and click on OK.
For details, visit How to sort months and weekdays using custom lists.
Reverse a List

Once you create a custom list, you can turn the list upside down. To do this, return to the column next to the custom list and place the last entry from the list in the top cell. In the cell beneath it, place the second-to-last entry. Select both cells and double-click the fill handle. The list you produced should be reversed.
